Connect can use email servers both as source and destinations. With an email source, Connect will strip the email attachments from the message and process the attachments through a channel. With email servers used as a destination, Connect will send each file processed in a channel to an SMTP server as an attachment to a number of email addresses. A custom email subject and message body can also be made.
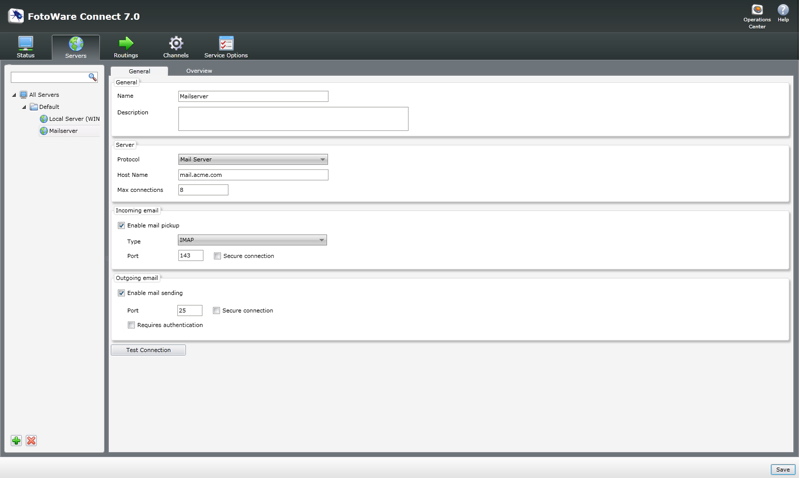
To create a mail server connection, go to the Servers tab in the Connect configuration and click on the Plus icon to create a new server. You will be asked to specify a few general settings for the server before you can proceed.
Name: Enter a descriptive name for the mail server here.
Description: A more detailed decription of what the mail server is used for can be typed here.
Protocol: Choose Mail Server from the drop-down list.
Host name: Type in the host name or IP address of the mail server here.
Max connections: Specify the maximum number of connections Connect may open to the mail server simultaneously.
Sender address: This email address is identified as the sender's email address.
Making the server a source or a destination, or both
If you plan to have Connect use the mail server as a source for a channel - i.e. to fetch emails and attachments from the server, you must check the Enable mail pickup option. Then you will have to choose the protocol to use (POP or IMAP) and optionally choose whether the email server is configured to communicate on a secure connection. The port number will change according to your choice, but you can also set the port number manually if your server uses a non-standard port.
If this email server should be used for mail delivery of files, i.e. as a destination, you need to tick the Enable mail sending checkbox. Choose the port number and optionally whether the server uses a secure connection. If the outgoing mail server requires authentication, you should also tick that checkbox and then set the account information when you proceed to create the distribution lists in the next step.
Remember to click the Save button in the lower-right corner when you have made changes to the configuration.
Having set up the mail server settings, you can click on the mail server and the click on the green Plus icon to define a new account for fetching or sending emails.
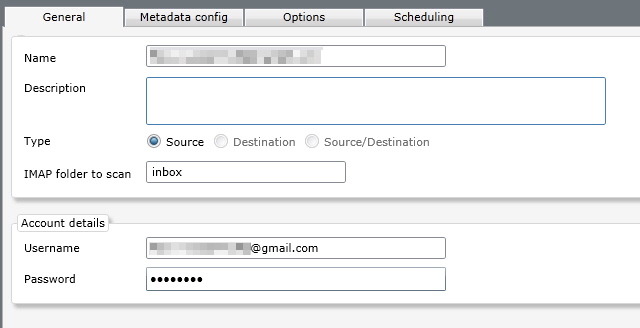
Name: Name the account here. This is used to identify the account when you later add it to a channel.
Description: More information about the account can be added here.
Type: Choose whether the account should be used to send or retrieve emails. The default selection here will depend on whether you enabled email pickup or delivery on the mail server settings page.
IMAP folder to scan: Assuming you are configuring mail pickup from an IMAP server, you must specify the name of the IMAP folder where the mails reside - Inbox for example. Ask you mail server administrator if you are unsure about this. Connect will only scan this folder when picking up files from the IMAP server.
Sender details: Type in the sender's name and email address here. This will be added to the message header for outgoing emails. This option is only available when you are creating a destination.
Account details: Enter the required account information here. This information is required to connect to the email account and download messages. Typically you don't need to specify any account credentials for using a corporate outgoing email server, but if you have specified that the outgoing mail server requires authentication, this is where the credentials should be filled in.
Ignore Filter: This option is available when configuring mail pickup from a POP or IMAP connection (i.e. you have set the account type as Source, not Destination). It allows you to define a filter that ignores email attachments of a certain kind. For example, if you would like to ignore all text file attachments with the extension .txt and not download them, type in *.txt in the Ignore Filter field.
Setting options for mail destinations
Having set the basic properties of the mail account, proceed to the Mail Options tab to configure outgoing email should be handled. If the server has only been enabled to utilize the mail server as an input, the Mail Options tab will not be available.
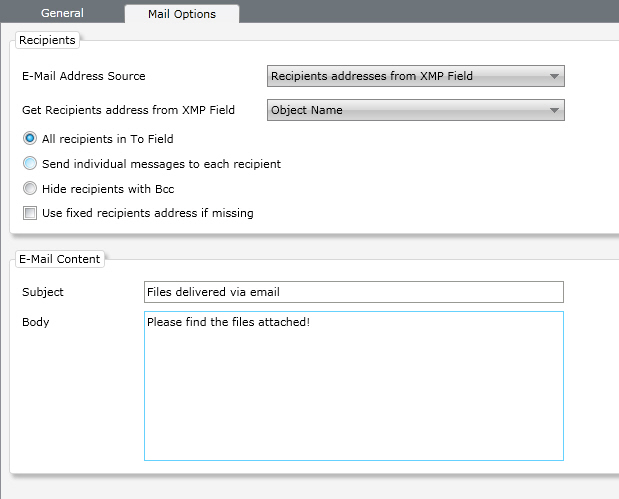
Recipients: Choose where the recipients' addresses should be obtained. You can either have Connect extract email addresses from a specific XMP field or create a distribution list with fixed email addresses where you manually enter the email address of each recipient.
If you choose to extract the email address from an XMP field, you have a fallback option if the field is missing a valid email address. In that case, enable Use fixed recipients address if missing and add any number of backup recipients to the list.
Connect will send one email per file, and you can choose whether all recipients should be listed in the To field in the email header, or if each recipient should receive a separate message. Your last option is to hide recipients by placing them in the Blind Copy (BCC) field in the email header.
E-Mail content: If you would like a custom email subject and message body you can type that in here.
A note about email channels with multiple destinations
If a file transfer fails in one or more of the destinations in a channel, the file may be sent several times to any e-mail destination configured in the channel.
Setting options for source mail accounts
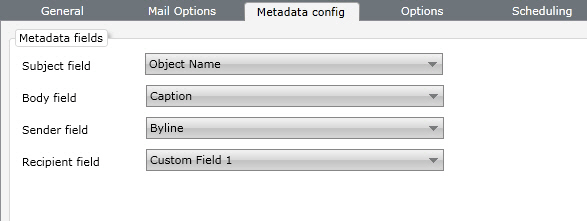
If you want to use the mail account as a channel input, go to the Metadata config tab to set up the mapping of email content to metadata fields. This will allow you to extract the information in the message and store it as metadata in the XMP fields you specify.
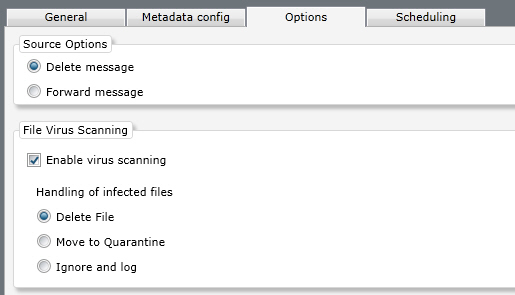
By proceeding to the Options tab, you can choose how Connect should handle the emails that have been processed. You can choose to delete them from the server, or you can leave them on the server and simply mark them as read, based on whether you're configuring a POP or an IMAP connection.
If you have enabled POP email pickup and SMTP sending, you will have the possibility to forward a copy of the message to a separate email address, using the Forward message option.
With an IMAP connection enabled for mail pickup and an SMTP connection turned on for outgoing emails, you can choose between marking the processed email as read to prevent it being processed again or deleting it altogether, or you can choose to move the email to another folder in the IMAP structure.
The Options tab also makes it possible to enable virus scanning for all files that are downloaded from the email server. The actual virus scanner settings are configured on the Service Options tab.
Scheduling
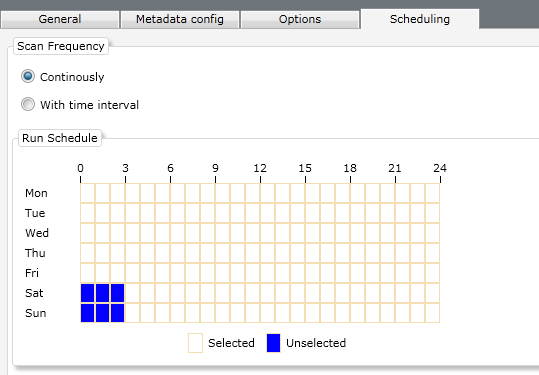
Scan frequency: This setting determines how often Connect will scan the input folder for new files. By choosing continuously, Connect will scan the folder several times per minute, whereas if you specify the time interval option you can manually set the number of seconds between each scan.
Run Schedule: By clicking and/or dragging in this grid you can set a run schedule based on the time of the day and the day of the week. White dots in the grid indicate when the folder is active while blue dots indicate when there is no scanning of the folder.
Remember to click the Save button in the lower-right corner when you have made changes to the configuration.