
Connect can both upload and download files from FTP servers, so an FTP folder can be used both an a source and a destination.
To create an FTP server, go to the Servers tab in the Connect configuration and click on the Plus icon to set up a new FTP server connection. You will be asked to specify a few general settings for the server before you can define the folders that you want to use for file transfers.
Name: Type in a short, descriptive name for the server
Description: If you would like to add a longer server description, this can be done here.
Protocol: Click on the Drop-down list to expand it and choose between one of the three available FTP protocols: FTP, FTPS or SFTP.
A note about FTPS: Connect will not validate FTPS server certificates; it will accept all certificates.
Host name: Type in the name to the host server here. It could typically be ftp.domain.com or simply an ip address. If the ftp server is outside a corporate firewall you need to make sure the required ports have been opened for incoming and/or outgoing FTP traffic.
Max connections: Set the maximum number of connections that the server will allow.
Authentication: Type in the username and password required to log on to the ftp server. (If anonymous access is allowed it is often sufficient to specify Anonymous as the username and an email address as the password.)
Port number: The default port number will vary depending on your choice of FTP protocol.
Security: If you have chosen FTPS as your connection type, you can choose between Implicit and Explicit security. Implicit means that the FTP server expects a TLS/SSL ClientHello message, otherwise it will drop the connection. With Explicit, Connect will explicitly request a secure connection. Talk to your FTP server's administrator if you are unsure about this setting.
Use passive FTP: If the FTP server is configured to use passive FTP, select this option.
Test Connection: Having configured all of the above settings, clicking on this button will attempt to connect to the ftp server and validate the username and password.
Remember to click the Save button in the lower-right corner when you have made changes to the configuration.
Having set up the general FTP server properties, you are ready to add folders to the server. These can be either source or destination folders in a workflow.
To create a folder, click on the FTP server in the you created and the click on the green Plus icon below the list of configured servers.
General properties
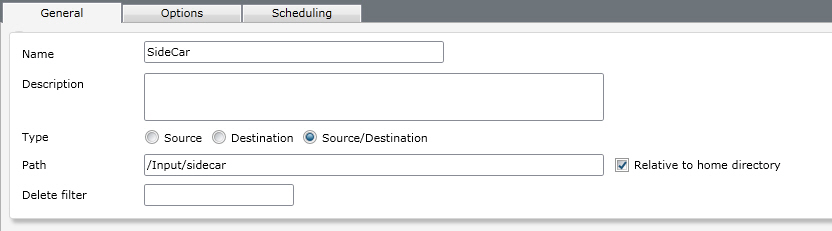
Name: Type a short descriptive name for the folder here.
Description: Here you can specify more accurately what the folder is for. (Limited to 255 characters)
Type: Choose whether this should be a source or a destination folder, or both. This setting determines which category the folder shows up in when creating a channel.
Path: Type in the path to the ftp folder here. If your login credentials on the ftp server takes you to a certain home directory, you can choose whether the specified path is relative to the home directory or to the ftp server's root by ticking the corresponding checkbox.
Important: The path should always start with a leading forward slash: e.g. /files.
Delete filter: Lets you specify files to delete from the input to avoid transferring them. This can be used to remove unwanted files from your workflow or to avoid transferring accompanying files that your system doesn't use. Several file types can be defined and separated with a space, thus: *.txt *.tmp
Source Folder Options
These options apply only to source or source/destination folders:
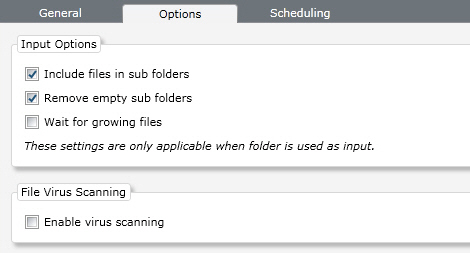
Include files in subfolders: Specifies whether Connect should retrieve all files in subfolders in the specified path.
Remove empty subfolders: Enable this option to have Connect "clean up" empty subfolders after retrieving the files in them.
Wait for growing files: This option can be enabled to make sure Connect only picks up the file in the source folder when is has been written entirely. This may be useful if the source folder is populated by another application that writes files byte-for-byte in the input folder without locking it.
Enable virus scanning: Enable this option to automatically check all incoming files for viruses. Infected files can be deleted, quarantined or ignored and logged. The actual virus scanner settings are configured on the Service Options tab.
Scheduling
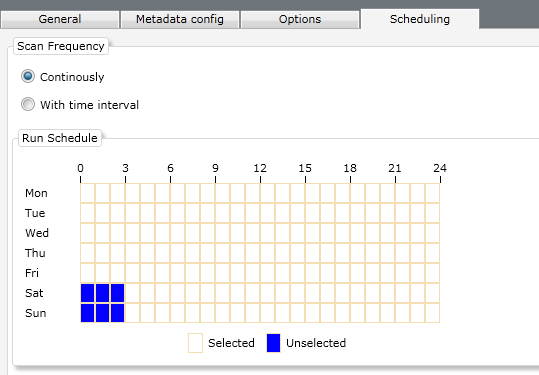
Scan frequency: This setting determines how often Connect will scan the input folder for new files. By choosing continuously, Connect will scan the folder several times per minute, whereas if you specify the time interval option you can manually set the number of seconds between each scan.
Run Schedule: By clicking and/or dragging in this grid you can set a run schedule based on the time of the day and the day of the week. White dots in the grid indicate when the folder is active while blue dots indicate when there is no scanning of the folder.
Remember to click the Save button in the lower-right corner when you have made changes to the configuration.