File markers are visual, customizable indicators that can be used as a means of alerting a FotoStation user about files that meet certain criteria and should be given special attention. FotoStation lets you configure up to five different image marker sets, each of which can contain ten different markers that are applied based on custom criteria. Note that image markers do not alter image data or change files in any way – they are merely visual indicators that FotoStation displays when files meet the set criteria.
To access the image marker setup, open the program configuration and expand the Archives node. Then select the archive to which you want to apply image markers. From the dropdown list, select an image marker set, for example number 1, then click on the Edit button to open the image marker editor.
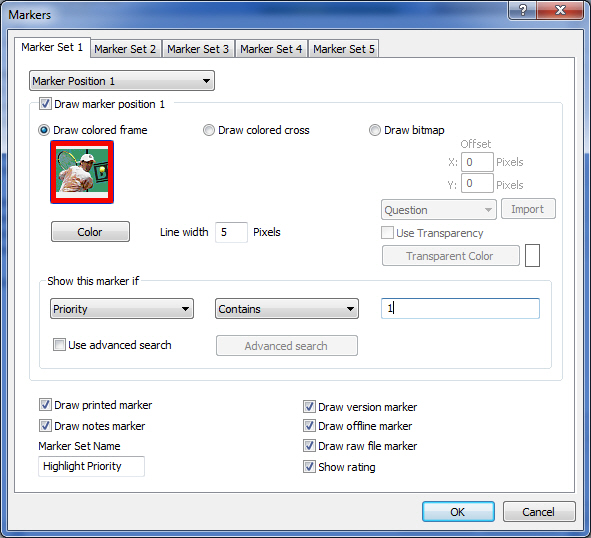
Each marker set has 10 marker positions available in the Marker Position dropdown list at the top of the window and you can enable or disable each marker position individually within each marker set by clicking in the Draw marker position checkbox. In the above example, Marker position 1 is a red frame that’s added to files with priority setting 1 (high).
Choosing a marker type
There are three different types of markers to choose from. You can choose between Draw colored frame, Draw colored cross and Draw bitmap. By clicking on the Color button you can choose a color for the frame or cross, and it is possible to choose the thickness of the line by setting the number of pixels in the Line Width box.
When choosing to draw a bitmap, you can pick one of the included bitmaps by selecting it in the dropdown list. You can also import your own, custom bitmap by clicking on the Import button. FotoStation lets you use any image format as a file marker, but you should make sure that it isn’t so large that it occupies too much space within the thumbnails themselves. A custom bitmap can be placed anywhere inside the thumbnail frame by adjusting the values in the X and Y Offset fields, but keep in mind that altering the size of the thumbnail grid will affect the result. You may find the Offset adjustment useful if the conditions defined make several markers appear on a thumbnail. Then, simply adjust the offset values to avoid overlapping markers.
It’s also possible to make part of an imported file marker transparent by selecting the Use Transparency checkbox and clicking on the Transparent Color button. To find the exact color in the file marker that you want to make transparent, you may use the color picker in the Edit mode in FotoStation or Photoshop and then define this color manually in the color dialog that opens when you click on the Transparent color button in FotoStation.
Choosing when a marker should be shown
In the Show this marker if area there are two dropdown lists and a metadata field that let you define simple conditions that must be met for the marker to be shown. Choosing the conditions is similar to setting up a basic search: Select a metadata field in the first drop-down list, then choose from Contains, Does NOT contain, Is empty and Is NOT empty in the second field. Finally, if you chose Contains or Does NOT contain, you can specify a text string in the metadata field.
If these conditions aren’t specific enough for your needs, you can specify a more advanced search to define even stricter conditions. To do this, select Use advanced search and click on the Advanced search button. This will bring up the full search dialog to let you set up a search with operators and specify additional attributes. However, keep in mind that the Advanced search does not support expressions with parentheses or quotation marks to specify strings.
Default markers
In the lower part of the marker dialog you will find checkboxes for printed, notes, version and offline markers, indicating that a file has been printed, contains notes, exists is several versions (a Color Factory server setting related to archive management – see the Color factory documentation for details) or is stored offline, respectively.
Naming the marker set
To give the marker set a more descriptive name, fill in a new name in the Marker Set Name text field.