
Where: Click on the Metadata node in the Configuration window
The Metadata node in the configuration window lets you set up and configure all aspects of the handling of metadata in your system. As explained in the Metadata Configuration (MDC) appendix, it is extremely important that all FotoWare products in your system use the same metadata configuration. The configuration files, called metadata schema files, can be configured on a computer running e.g. FotoStation using the metadata configuration program and then exported for distribution to all other FotoWare clients and servers in your system.
This part of the configuration gives access to the XMP configuration. The three buttons here, Import, Export and Configure, allow you to import an existing schema file, export the active schema file or open the Metadata Configuration program to make changes to the schema file. For an in-depth explanation of the concept of schema files and how to configure them, please refer to the Changing the XMP Configuration topic.
Customizing the drop down menus

Certain views and dialogs in FotoStation let you choose metadata fields via a dropdown list. This is the case with the data mining feature and Search dialog, among others. If you only need certain fields in these dropdown lists you can remove the ones you don’t need access to from the lists by clicking on the Drop down menu filter button in the Metadata node in the configuration window. Then, simply remove the checkbox from the fields you don’t need to access to. This way you can make the dropdown lists shorter so that it’s easier to select the field you want to use.
Changing priority labels and colors
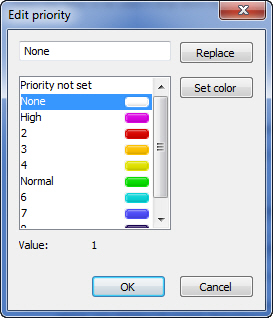
Priority is a special metadata field with a value ranging from 0 to 9. The default labels and their color codes can be changed by clicking on the Edit priority button in the Metadata configuration (by clicking on the Metadata node in the configuration tree). By selecting one of the priority levels in the list you can replace the priority label by typing a new value in the top text field and clicking on the Replace button. You can also change the color associated with the priority level by clicking on the Set color button. When browsing thumbnails in FotoStation, a file’s priority is indicated by the colored strip below each thumbnail.
Enabling and disabling history events
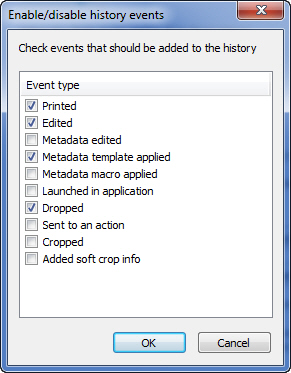
When performing operations on files in FotoStation, such as editing files or printing them, FotoStation writes a log to the History metadata field. If you want full control over the events that are recorded in the history log, click on the Enable history events. The list of events that can be recorded is shown in the screenshot above. Select the items that you want to record by ticking the appropriate checkboxes and click on the OK button.
IPTC-specific character set translation (codepage)
The preferences in this section are used to determine how IPTC metadata (which is in ASCII format, unlike XMP, which uses Unicode/UTF-8) without a defined codepage should be interpreted.
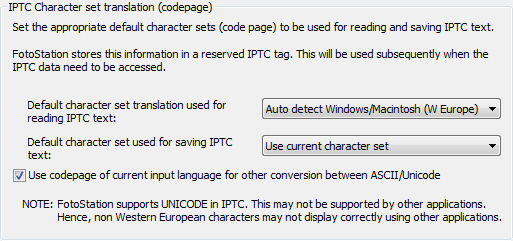
Default character set translation used for reading IPTC text: Choose the codepage to use when translating IPTC metadata from files where no codepage is specified. Normally, FotoStation will be able to distinguish between Windows and Macintosh ASCII by choosing Auto detect Windows/Macintosh (W Europe). If you know that the metadata in the files you will be processing was created using another character set you can select it from the dropdown list.
Default character set used for saving IPTC text: Choose the character set to use when saving IPTC metadata back to a file for which no codepage has been defined. By choosing Use current character set, FotoStation will save the metadata using the currently active keyboard character set. (You can check the Windows Control panel or Preferences panel in Mac OS to determine the active keyboard layout.)
Use codepage of current input language for other conversion between ASCII/Unicode: Enabling this option makes FotoStation use the active system codepage when reading QuickLists, Prefix lists and other ASCII format files.
Where: Expand the Metadata node, then click on the Dialog builder node.
The metadata editor designer is used to make custom metadata editor layouts. This means that you can create a completely custom metadata editor using the XMP fields that you have defined in the metadata configuration. The editors you create here can be exported and shared with FotoWeb also for a consistent look throughout a larger system.
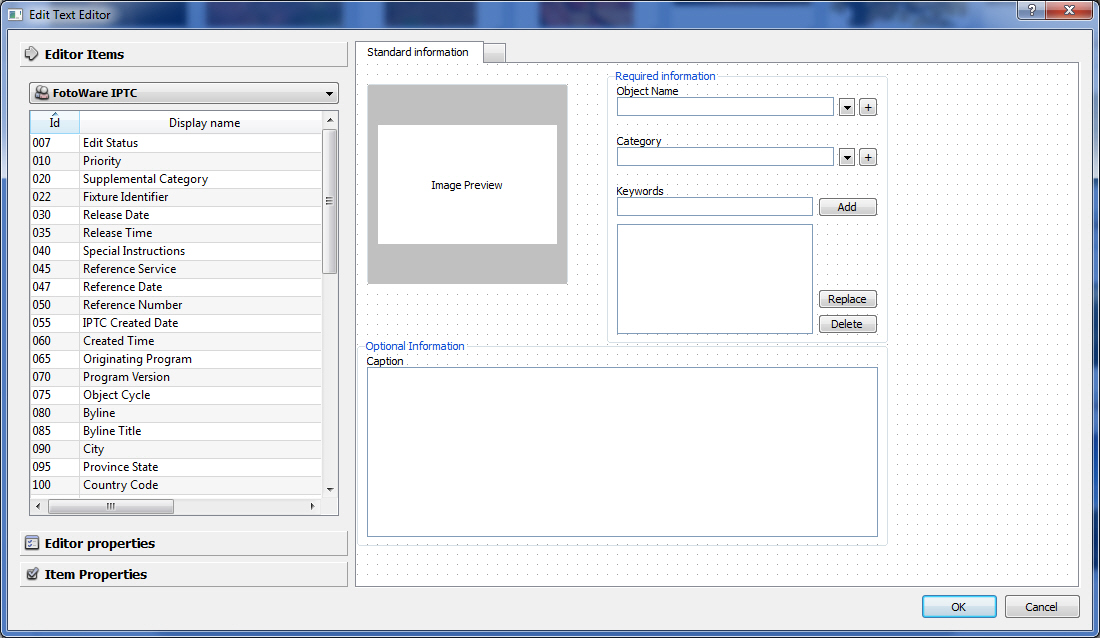
An overview of the Metadata Editor Designer
To create a new, blank editor, click on the New button. To use one of the existing editors as a template, select it in the list and then click on the New button. In this case, the new editor will be named Copy of <old editor name>.
When the designer opens, you have three panels on the left side of the screen:
Editor Items contains a list of all the XMP fields in your metadata configuration. Using the drop-down list you can filter the contents by namespace or by field groups that you define in the metadata configuration. You can also add group boxes for your fields and an image preview from here by choosing Other graphical items from the drop-down list.
Editor Properties contains all the general properties of the metadata editor you are working on. Here you can, among other things, change the editor name, change colors enable an ODBC connection for searching a database or writing information in the editor back to a database.
Item Properties will change based on the item you have selected in your layout. It allows you to set special properties related to the fields and other items in your editor, for example whether certain fields should be required, whether they have a quicklist associated with them etc.
Creating a custom editor
1. To add fields to the editor, go to the Editor Items panel, select the fields you want to add to your editor and drag them onto the layout on the right.
2. To align the fields on the page, select them either by dragging a frame around them or by Ctrl-clicking each field you want to align. Then right-click your selection and choose Align left/right/top/bottom from the context menu. Note that the last selected field determines what the other fields are aligned by.
3. To adjust the position of the select fields you can use the arrow keys on the keyboard. If you wish to adjust the grid size, right-click an empty area in the editor and choose Set grid size.
4. You can also make all your fields the same height and/or width using the options on the context menu. Again, the last selected field determines the height and width of the fields you adjust.
5. If you need to create additional pages you can click on the little square at the top of the editor (next to the Default page label). You can rename and change the order of pages by right-clicking their label and choosing Rename page.
6. If you would like to create a group box around some of your fields, select them and right-click, then choose Create group box from the context menu. To change the group box label, click on the label and go to the Item Properties page, then change the content of the Label field.
7. Now it may be time to change the properties of your fields. Click on one or more fields and go to the Item Properties page. Here you can set properties such as QuickList support and sorting options for each field. Note that if you select several fields the Item Properties page may not show all the properties of a field.
8. If you would like to add a file preview to your layout, right-click an empty area inside the layout and choose Insert preview item. Then size it and place it as you wish.
9. If you would like to adjust the tab order (the order in which the cursor jumps from one field to the next when you hit the Tab key), right click a free area inside the layout and choose Set tab order. Then click the fields in the order you would like them to be tabbed between. To help you know which fields have had a tab order set and which haven't, the numbering turns green for the fields that you have given a tab order.
If you get the order wrong, start over by right-clicking an empty area in the editor and choosing Set tab order again. When you are done setting the tab order, click an empty area in the editor.
10. Now it's a good idea to name you editor. Go to the Editor properties panel and enter a name in the Name field.
11. Finally, click on OK to store the editor.
That's it! Note that this is not an exhaustive list of all the things you can do in the editor designer. The right-click context menu, in particular, provides a host of useful functions to let you easily arrange and modify the items that you add to your editor.
Did you know this? When captioning files using the text editor you can jump from one field to the next using the Tab key. The order in which the text input marker jumps from one field to the next is determined by the order in which you clicked the fields on each page in the editor before saving it.
Where: Expand the Display templates node under Metadata in the program configuration.
Listed under the Display templates node are the templates used for displaying the metadata of certain fields in the text panel below the image area in FotoStation (Text info, File info and Camera info), as well as the files used in the Rich List view (namely Rich List1 through Rich List4).
By expanding the Display templates node you can click on each of the templates below and edit their content in the text editor to the right. By clicking on the Insert code button you can choose a metadata field from which FotoStation will extract information. Keep in mind that due to the complexity of the Rich List view (it consists of a combination of four separate templates), if you make major changes to the Rich List display templates the entire layout of the Rich List view may be distorted. Hence you may have to adjust the properties of the Rich list view under the Views node in the configuration.
If you would like more information about how the content in the display templates can be localized, please refer to this FotoWare Knowledge Base article.
Where: Expand the Metadata node, then expand the Text templates node in the program configuration.
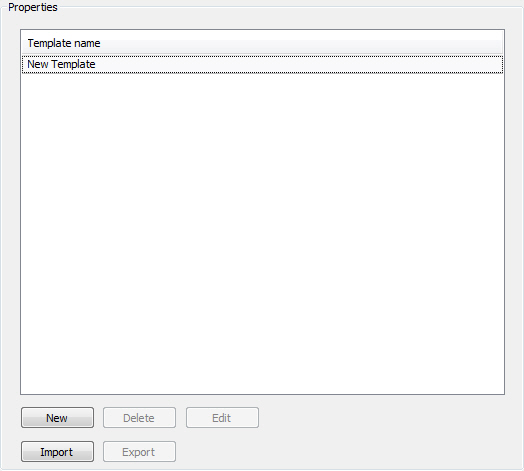
By clicking on the Text templates node (located under the Metadata node) in the configuration tree you can create custom text templates that can be applied to files when captioning them in the editor. Any templates that have been saved using the text editor will also show up in this list in the configuration window.
Creating a new text template
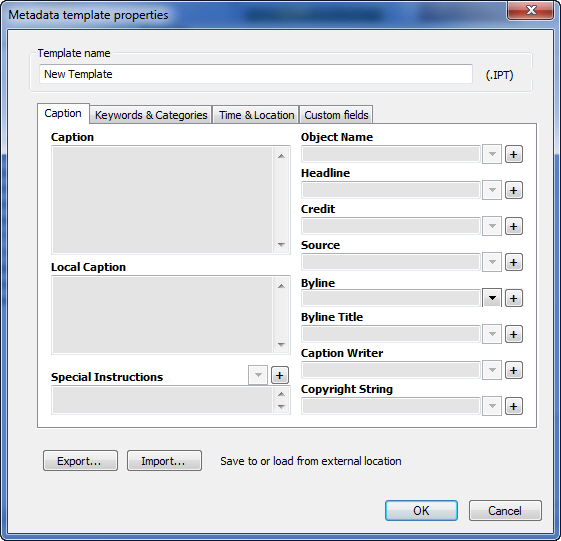
Simply click on the New button to create a new template from scratch. The template editor will open. Enter a name for the template in the top field of the dialog and fill in the fields with information. Note that if you create a blank template it will not be saved, so that the moment you close the configuration dialog the empty template will be lost. In other words, a template must always contain information.
Modifying or deleting a text template
To edit an existing template, select it in the list of templates, then click on the Edit button. Then make the necessary changes to the template. To rename it, simply change the name in the Template name field at the top of the window. Finally, click OK to save the changes.
To delete a template, select it in the list and click on the Delete button.
Did you know? When you open a text template from within the text editor, all information in that template will be applied, even if the text editor does not contain the fields to display all the information in the template.
Importing and exporting text templates
As you can see from the screenshot above, the template editor has two buttons at the bottom labeled Export and Import. Clicking on the Export button makes it possible to export the currently entered information as XMP (xml-based) with the extension .fmt. To preserve compatibility with older versions of FotoStation, when using the Import function you can still import the old binary IPTC files (extension .ipt) in addition to the new XMP metadata files.
Where: Expand the Metadata node, then expand the Text macros node.

In addition to templates, FotoStation can use text macros for more advanced automated editing of metadata. Macros makes it possible to add or modify field content, retaining or overwriting the existing metadata in the field. Macros also let you specify conditions that must be met before the metadata is modified.
Creating a text macro
Click on the New button below the list of macros to create a new one.
Name the macro by typing a name in the Macro name field at the top of the window. Now you can start adding fields to modify and set conditions by clicking on the Add Field button.
The dialog that opens now lets you set a number of parameters:
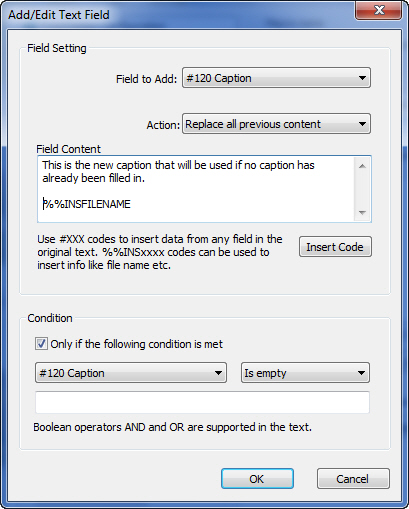
Field to Add: Choose the field whose contents you wish to modify in this dropdown list.
Action: Choose how you would like to modify the field. You can choose between Clear Field (clears all metadata in the field), Add to previous content (appends the information you choose after any existing information in the field), Replace all previous content (overwrites any existing information with your new information), Add substring in previous content (makes it possible to add information to a field directly after a specified string) and Replace substring in previous content (lets you replace a string in the specified field with another string).
Field Content: Type in the information that you would like to add to the field in question. Clicking on the Insert Code button makes it possible to insert a dynamic operator so that you can add any kind of information from other XMP fields, file properties or digital camera information fields to the field you are modifying.
Setting conditions
When configuring a text macro you can define conditions that have to be met before the macro is executed. Conditions are field-specific, so that a macro can modify the contents of many fields where some are modified whereas others aren’t, depending on whether the conditions set for each field are met.
To enable conditions, select the checkbox Only if the following condition is met.
Then pick a field from the drop-down list (often the same field as the one you want to modify) and choose the condition operator (Contains, Does not contain, Is empty, Is not empty) and type in the string in the field below if you chose Contains or Does not contain.
Modifying or deleting a text macro
To make modifications to an entry you create, select the field you want to modify and click on the Edit or Remove button. The above screenshot shows a macro that is set to replace the contents of the Caption field regardless of what’s already there, then add a Copyright string if the Copyright field does not already contain any information.
Importing and exporting text macros
Having selected the Text Macros node (under the Metadata node) in the configuration tree you can click on the Import button under the list of macros to import a macro from a file. Macros can be imported from .fmm files (FotoStation 6.0 XML-based files) and .ipm files from older versions of FotoStation.
To export a text macro, select it in the list and click on the Export button. Exported text macros will be stored in XML-based format with the extension .fmm.