Where: Expand the Actions node in the configuration tree.
Often when you work with a number of files, you perform the same tasks repeatedly. For example, it could be that you want to resize several images and add new metadata before you use an FTP client to upload the resized images to a web server. In FotoStation it is possible to create an action that can perform these and many other tasks in a single operation.
An action in FotoStation consists of several small operations called sub actions. Such sub actions can be combined in a chain to create an action. FotoStation comes with a few sample actions, such as copying an image to the My Pictures folder. If you need actions other than the predefined ones, you must create a new action or modify the sample actions.
To create an action, start by opening a side panel that contains actions (by default, the right side panel is configured to contain only actions).
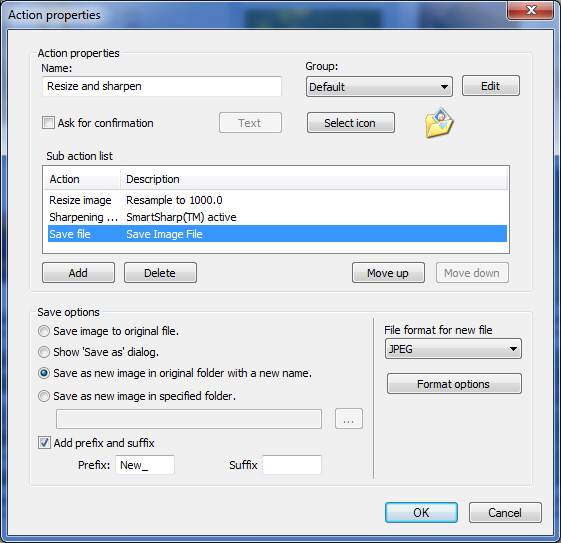
The screenshot above shows an example action named Resize and sharpen, made up of the three sub actions: Resize image, Sharpening Filter, and Save file.
These are the main steps involved when creating a new action: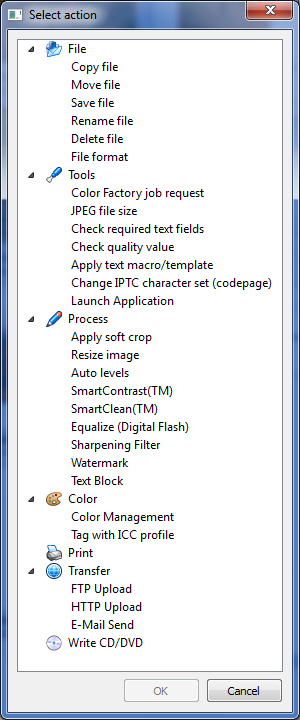
1. In the Actions tab, right-click on a group heading and select Create action from the pop-up menu. The Action properties window will appear. You can also open the Action properties window by clicking on the Action menu and selecting Create action.
Tip: You can also create actions in the program configuration, accessible by choosing File | Configuration in the program menu and selecting the Actions node.
2. Select a descriptive name for the action and enter it in the Name field.
Click on the Add button to add a sub action to this action. The Select action type window (shown to the right) will open. Select the desired sub action from the list by clicking on it, and then click on the OK button. To be able to view and edit the sub action’s properties, click on the sub action in question in the Sub action list to select it. Remove a sub action by selecting it in the Sub action list and then clicking on the Delete button.
3. When you are done, click on the OK button.
If, at a later stage, you would like to change any of the action properties (for example the action name, any sub action properties, etc), open the Action properties window by right-clicking on the action and selecting Properties from the context menu.
Action Properties
The Action properties window also provides access to these settings:
Select Group: In the Group dropdown list, select the group you would like the action to be a part of. If you wish, you can edit the group name, add a new group, or delete a group from this view by clicking on the Edit button on the right-hand side of the Group dropdown list. If group headers are enabled, actions are sorted according to the group they belong to.
Ask For Confirmation: If the Ask for confirmation checkbox is selected, FotoStation will display a warning asking for confirmation before the action is executed. This can be useful e.g. if the action is configured to alter the original image data and you want to make sure that the action isn’t run unintentionally (e.g. by dropping a file on the wrong action).
Please note that there are also other ways to prevent an action from being executed by accident. You can disable one or more actions for a specific archive (the Set disabled actions property in Archive properties), or you can choose to hide one or more actions from the action overview (the Display only selected action items property in the Side panel properties). Keep in mind you can have more than one Actions tab.
Select Icon: Select an icon for the action by clicking on the Select icon button and then clicking on the icon of your choice. FotoStation comes with a number of included icons that you can choose from. You can also import your own icons if you have for instance purchased icons from a collection or made your own using icon creator tools. To do so, click on the Import button and choose the icon files that you want to add to your configuration. When imported into FotoStation, the files are converted to png format and stored with your active configuration. Typically FotoStation is set up with a per-user configuration, which means your icons are stored in C:\Users\[username]\AppData\Roaming\FotoWare\FotoStation\Configuration\Archive Icons
The two save sub actions Save file and File format both save the result of one or more image processing sub actions, but while the Save file sub action lets you choose where to save the file together with many other options, the File format sub action only lets you choose a file format before automatically saving the file to a temporary folder. The File format sub action is normally used if you perform changes to an image but only need to save the changes temporarily to be able to perform other sub actions. This may for instance be the case when making changes to an image before uploading it to a web server.
A chain of image processing sub actions (see the table later in this topic) must be followed by one of the two save sub actions. Note however that you don’t always need the save sub action directly after the last of these sub actions. You can perform some of the sub actions (such as the Apply text macro/template sub action) before using the save sub action.
Make sure that you understand how a sub action works before you use it. If you are not sure, see the topic regarding the sub action in question. See examples of Valid and invalid sub action chains at the end of this topic.
As mentioned earlier, the order in which the sub actions are performed is important for the end result. For example, the Sharpening Filter sub action should always be the last sub action that changes the image data, and it should never be performed more than once on an image.
Image Processing and File Operating Sub Actions
FotoStation sub actions can roughly be divided into two separate categories. Either the sub action changes the image data (an “image processing” sub action), or it performs an operation on a file stored on the hard disk. As a rule of thumb, if a sub action is an image processing sub action, then it must be followed by either another image processing sub action, or by one of the two save sub actions.
This is because an image processing sub action alters the image in memory. If it is followed directly by a file operating sub action, for example move or copy, there is no file to work on since the image is now in memory only. Hence, an image processing action, or a chain or image processing actions must always be followed by a save action before file operating actions are performed. Or you could perform file operating actions first, then image processing operations and finally a save action.
An overview of the sub actions and which group they belong to:
|
Image Processing Sub Actions |
File Operation Sub Actions |
|
Apply Soft Crop |
Add Metadata |
|
Auto Levels |
Apply Text Macro/Template |
|
Color Management |
Attach License |
|
Equalize (Digital Flash) |
Change IPTC Character set (Codepage) |
|
Resize Image |
Check Quality value |
|
Sharpening Filter |
Check Required Text Fields |
|
SmartClean (tm) |
Clear Licenses |
|
SmartContrast (tm) |
Color Factory job request |
|
Tag with ICC profile* |
Copy File |
|
Text Block |
Email Send |
|
Watermark |
FTP Upload |
|
HTTP Upload |
|
|
JPEG File Size |
|
|
Launch Application |
|
|
|
Move File |
|
|
|
|
|
Rename File |
|
|
Write CD/DVD |
(*) For JPEG files, you don’t need a Save file or File format sub action for tagging with an ICC profile. For other file types, however, this sub action must eventually be followed by a Save file or File format sub action.
Changing the Sub Action Order
The order in which the sub actions are performed has impact on the final result. If you would like to move a sub action, click on it and then use the Move up and the Move down buttons to move the sub action to its correct location.
To be able to run an action, you must first select one or more files in the image window. If no files are selected, none of the actions can be accessed. When you have selected the files you can either drag and drop them onto the desired action, or you can simply click on the action that you would like to perform. The action in question will then be executed.
As described earlier it is important to make sure that the order in which the sub actions are performed is correct. If a sub action chain is not valid, a warning will normally appear when you try to use the action. Note that even if a sub action chain is formally valid, it may still not produce the desired result. We advise you to try executing the action on some suitable test files before using it in a production environment.
Resize
Color management
File format
FTP Upload
This is a valid sequence. The image is saved temporarily (using the File format sub action) after the three image processing sub actions, then uploaded to a server using the FTP Upload sub action.
Resize
Color management
FTP Upload
File format
This is an invalid chain. The image must be saved before you can upload it to a server using FTP. This means that you must add one of the two save sub actions (i.e. Save file or File format).
Solution: Change the sequence to Resize – Color Management – File Format – FTP Upload
Resize
File format
Color management
FTP Upload
This is an invalid chain. The image must be saved directly before the FTP Upload sub action.
Solution: Move File Format down so that the chain reads: Resize – Color Management – File Format – FTP Upload