When working with media files (images, movies and sound), especially large files, you may not always want to have the files stored on a disk that is directly accessible. It may be better to store the files on for example CDs, DVDs, or other types of removable media. Other times, a slow network connection may make real-time access to an archive less practical.
Even if the files are not easily accessible, it may still be practical to be able to see a thumbnail (or preview) of the file and to search for files by their metadata. This is where the Offline manager in FotoStation comes in handy. It lets you add offline resources to an archive. This implies that low-resolution copies of the files (thumbnails and previews) are added to an archive, and are searchable and to some extent modifiable, while the high-resolution master files can be stored safely on removable media. When you need access to the high-resolution file stored on the removable media, FotoStation will display a dialog requesting the removable media complete with information about where it can be found. (This information is entered when the offline resource is created.)
For a more detailed explanation of how to work with local low-resolution copies of files stored on removable media, please refer to the topic Working with files stored offline.
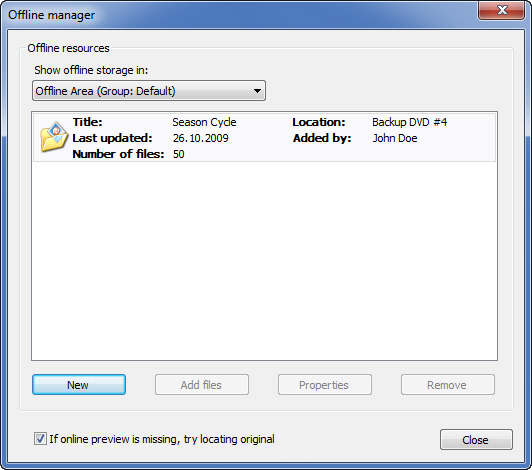
Open the Offline manager by clicking on the Archives menu and selecting Offline manager. From the Show offline storage in list, select the archive in which you would like to create an offline resource. Then click on the New button as shown in the screenshot above. You are then asked to select the folder containing the files you wish to make available offline. As described above, this will normally be a removable disk or a mapped network drive. Browse until you find the desired folder, and then click on the OK button.
If Online Preview is Missing: If you would like FotoStation to start looking for the original file if a preview of the file can’t be found, you must select the checkbox If online preview is missing, try location original. Note that this option will apply to all offline resources.
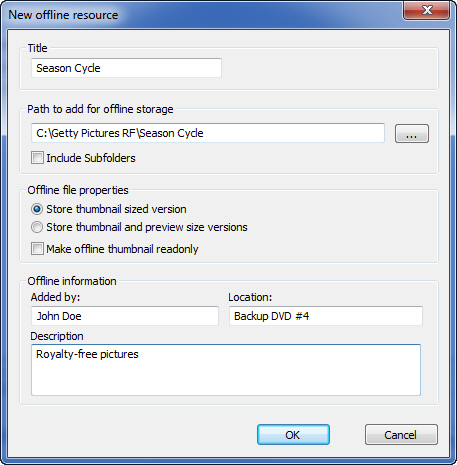
FotoStation opens the New offline resource window where you can enter information about the offline resource. In the Title field, enter a descriptive title for the resource. Since a folder for the resource has already been selected, you normally don’t need to change the path to the files. If the chosen folder has subfolders containing files that you want to include, select the Include subfolders checkbox.
Offline File Properties
Choose between creating only thumbnails of the files (the Store thumbnail sized version option) or creating both thumbnails and previews of the files on offline storage (the Store thumbnail and preview size versions option). Note that you can make the thumbnails read-only by checking the corresponding checkbox. This way, FotoStation will display a warning if you try to make changes to the thumbnail (or preview), and you will be given the option to remove the write protection.
Offline Information: When FotoStation requires access to the offline resource, it will display a dialog box with the information entered in this part of the New offline resource window. This information is included to make it easy to find and insert the correct removable media. Enter your name in the Added by field, the location where the disk is stored (for example shelf number, the label on the disk itself, etc.) in the Location field, and any other information that may be useful for easy retrieval of the removable media in the Description field.
When you are done, click on the OK button, and the offline resources are created.
By adding new files to an existing offline resource, these files will be added to the same subfolder as the existing offline resources. Only new files that are not already part of the offline resource will be added to the resource. Note that the offline resource properties (such as path to the offline storage and where the physical offline resource can be found) will be the same for all files in an offline resource. Hence, you should be careful when adding files to an existing offline resource if the files are located on different removable disks, since this may make it difficult to retrieve the correct media when FotoStation requests the files. In other words, if you need to distinguish between different offline resources you should not use the Add files option, but rather create a new offline resource using the New option.
Each separate offline resource has its own properties and will appear as a separate folder in the folder tree. If subfolder browsing has been enabled for the archive in FotoStation, you can expand the folder tree and browse each individual offline resource in the archive.
Adding New Files
To add new files, click on the offline resource you would like to add the new files to. (Make sure that you first select the correct archive from the dropdown list.) Then click on the Add files button. The Update offline resource window will open. Note that the title and path fields are disabled and can’t be edited. (If you would like to edit these fields, you will have to create a new offline resource.)
Edit the available properties as described above. Note that any changes to the settings in the Offline information part of the window will apply to the entire offline resource. When you are done, click on the OK button to start updating the offline resource.
If you wish, you can edit a few of the properties for an offline resource. This is useful if for example all CD’s are moved to a different location and you wish to change the description of where they can be found.
To edit the properties, click on the desired offline resource. (Make sure that you first select the desired archive from the dropdown list.) Then click on the Properties button. The Offline resource properties will open. Note that only the Offline information part of the window can be edited. Make the required changes to any of the three fields. When you are done, click on the OK button to close the window.
Removing Offline Resources
To remove an offline resource, open the Offline manager as described above. From the dropdown list, select the archive containing the offline resource you want to delete and click on the offline resource you want to remove in the overview. Click on the Remove button to permanently remove the link to the offline resource. Note that when you delete the link to the offline resource, all associated thumbnails and previews are also deleted.
When FotoStation is used in combination with an Index Manager server, all offline resources added to an archive controlled by the server will be available to all users that can access the archive. If you are running FotoStation in a network environment without Index Manager, but where common archives are shared on the network, adding an offline resource to this archive makes it available for all users to view and modify.
FotoStation can only create offline resources for files that display a thumbnail and a preview in FotoStation. If the thumbnail view in FotoStation doesn’t display a thumbnail of the file, then the metadata has not been extracted from the file and hence you can’t create offline resources for this file.
FotoStation was created to make the difference between working with files stored online and offline minimal. When you request an operation that requires the high-resolution file stored on the offline media, FotoStation will display a dialog box requiring you to insert the correct media containing the file. After you have inserted the offline media and located the file, the operation continues as normal.
Essentially, there are three ways FotoStation will let you modify a local low-resolution copy of a file stored offline. Normally, you would like to apply the changes to the high-resolution file afterwards. This is done using actions, and the changes are applied to the high-resolution file when the low-resolution copy of the file is processed by an action.
The three modification types are as follows:
Adding Metadata to Files
When adding metadata to the local low-resolution copy of a file stored offline (for example using the text editor or Quick Text), the text information is stored in the local copy. If you choose to copy the file to a new folder using an action, FotoStation will request the media containing the high-resolution file and apply the new text to the high-resolution file that is copied. Note that the text will not be applied when dragging and dropping a file directly to an external application; the file must be processed using an action.
Cropping Files
You may use the Crop function to apply a crop frame (i.e. soft-crop) to the low-resolution copy of an image stored offline. This allows you to real-crop the high-resolution image using an action, in which case FotoStation will request the media containing the high-resolution image, perform the cropping, and then store the image in the output folder specified in the action.
Rotating Files
FotoStation lets you rotate the local low-resolution copy of an image stored offline by using the Rotate on screen option. This stores information about the rotation in the EXIF and XMP metadata in the low-resolution file, and this rotation information will be applied to the high-resolution file when the low-resolution file is sent to an action. FotoStation will request the media containing the high-resolution file and then merge the information.
Also, when processing a soft-rotated image with an action that involves image processing, the rotation will be applied to the high-resolution file when the image is saved.
Editing High-Resolution Offline Files
If you select a local low-resolution copy of an image stored on offline media and then choose Edit from the toolbar, FotoStation will prompt you to insert/connect the resource containing the high-resolution image and then open it for editing.
If the image is stored on a CD or DVD, naturally you cannot save the edited high-resolution file back in its original location, so you will have to choose another folder to store it in.