The Crop function in FotoStation, which can be used by selecting one or more images and clicking on the Crop button on the toolbar (or using the keyboard shortcut Ctrl-K / Command-K) makes it possible to perform two different types of image cropping.
![]()
When used in a network environment in conjunction with a Color Factory server, you may want to let the server handle heavy processing. In such environments, FotoStation can simply add a crop frame to your images, letting Color Factory perform the actual crop later. Such application of a crop frame is called soft-cropping. When running FotoStation on a single computer however, it may be preferable to real-crop the image like you would in Photoshop, thus removing physical data from the image. However, you may find the soft-crop (masking) feature useful even in a single-user environment, for example if you would like to keep the original image intact while real-cropping a copy of the image using an action in FotoStation.
Note: Applying a crop frame to an image does not alter the physical image data, it simply adds extra information about the crop to a metadata field. In fact, this is the same metadata as Photoshop uses, so that an image that has been soft-cropped in FotoStation can be opened in the Camera Raw module in Photoshop to display the crop.
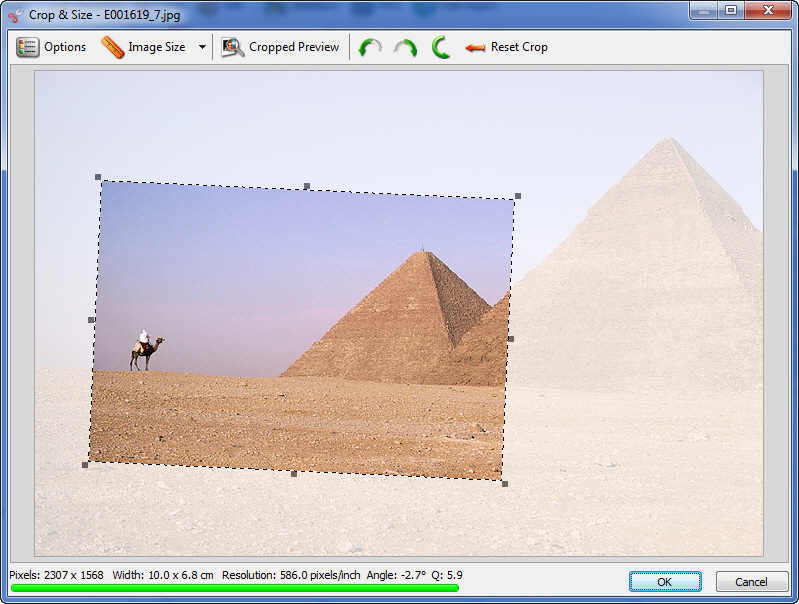
Mark an image and click on the Crop button on the toolbar. The Crop & Size window opens. By clicking the mouse and dragging a mask across the image a crop frame is created. You can change the mask size by clicking and dragging the little «handles» in each corner and on the sides of the mask. By moving the cursor inside the mask it changes to a hand. Now you can position the mask in the image. Positioning the cursor outside one of the corners of the frame makes it possible to rotate the crop frame freely, provided that free rotation of the crop frame has been enabled in the crop options.
Rotating the image
To rotate the image in steps of 90 degrees, click on one of the greet rotate buttons in the Crop & Size window. When you have applied a crop frame, it can be rotated freely by placing the mouse pointer outside the frame itself while clicking and dragging the frame to the desired position.
Previewing the crop
To get an idea of the final result after cropping, you can click on the Cropped Preview button. FotoStation will then preview the cropped image on a neutral background. Simply click your mouse to return to the crop window.
Resetting the crop
To remove the crop frame from an image entirely, click on the Reset Crop button in the toolbar of the crop window.
Aligning the crop frame
The crop window offers an aid to help you adjust the crop frame to compensate for a slightly tilted picture. Look for any straight lines or a horizon in the picture and press the Shift key while clicking and dragging the mouse along it. FotoStation will draw a line where you drag and then adjust the crop frame accordingly.
As mentioned, FotoStation can perform both a soft and a real crop. Whereas a soft crop only applies a crop frame that can later be removed and does not change the physical data in an image, a real crop will do just that. The kind of crop you choose will depend on how you intend to use FotoStation. It may for example be beneficial to soft-crop your images and set up an action that performs the real crop on a copy. That way, you can always go back and change the cropping on the original.
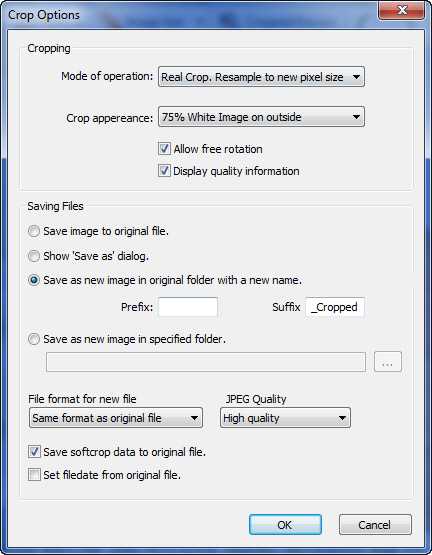
By clicking on the Options button in the crop dialog you can set options related to the type of cropping you want to perform.
Mode of operation
Soft Crop. No resampling: Performs a soft crop where no image data is lost. A crop frame is applied to the image, but the image data is not altered. You can remove the crop frame later if you like by clicking on the Reset Crop button in the toolbar of the Crop window. Soft-cropping is useful when you are using an action to real-crop the image (using the Apply soft crop sub action) or when FotoStation is configured to send files to a Color Factory server that takes care of the image processing. When choosing this option, all options related to file saving are disabled.
Real Crop. No resampling: The image is physically cropped, altering the image data, but no resampling is performed. Make sure you check the file saving options further down to make sure you don’t overwrite the original file unintentionally.
Real Crop. Resample to new pixel size: The image is physically cropped, and it will be resampled according to the size and resolution set in the Image size dialog. (See Setting Image Size below.)
Crop appearance
In this dropdown list you can choose the level of transparency of the area outside the crop frame. Choose 25%, 50%, 75% or 100% white level outside the frame, or choose Marquee line only.
Allow free rotation: By selecting this option you can place the mouse pointer outside the crop frame, then click and drag the frame to rotate it freely.
Display quality information: When you select this option, FotoStation will display a quality indication bar under the image in the crop window. The bar changes color to indicate whether the image contains sufficient data for the set print size.
File saving options
The file saving options are only available when performing a real crop, since it is only then the image data is physically changed. Simply applying a soft crop frame has no effect on the image data, and the frame can be removed at any time by opening the image in the crop window and clicking on the Reset Crop button.
Save image to original file: Overwrites the original file when a real crop has been performed.
Show “Save as” dialog: Displays a Save as dialog to let you choose a folder and new file name for the cropped image.
Save as new image in original folder with a new name: Saves the cropped image in its original folder with a new file name. The file name is specified by adding a prefix and/or suffix to the original file’s filename using the corresponding fields below.
Save as a new image in specified folder: Lets you choose a new folder where the cropped image will be saved using the original file name.
Choosing a file format for saving the cropped file
Use the File format dropdown list to choose between Same format as original file, JPEG or TIFF. If you choose JPEG, you can also set a JPEG quality level using the corresponding dropdown list. If you choose Same format as original file, when you crop a file which is neither TIFF nor JPEG format, FotoStation will display a dialog box that lets you choose between JPEG or TIFF or cancelling the operation altogether.
Save softcrop data to original file: Applies the crop frame to the original file. This may be a good idea if you would like to return to the image later and evaluate or change the crop frame. The crop frame can be removed entirely later by resetting the crop as outlined above.
Set filedate from original file: Saves the new image with the time and date of the original file.
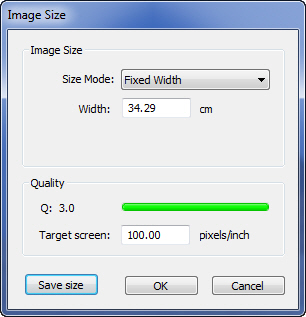
By clicking on the Image Size button you can see and change the print size of an image. You can lock the width, height, width and height and resolution and then adjust the values. Notice the Target Screen setting, which is the basis of all quality calculations in FotoStation. Set this to the screen you are using when printing images. If resampling has been enabled in the options dialog you can also specify the image dimensions in pixels, you can set an output image size in megabyte and you can change the output resolution of the image.
Saving a preset size
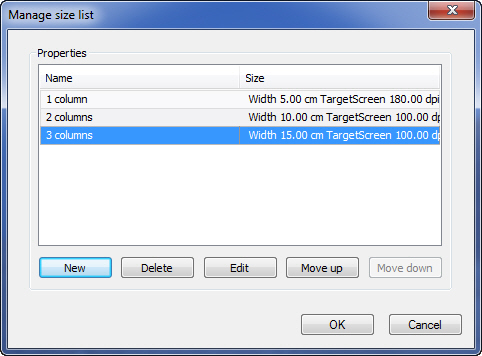
To save a size measure, for instance to predefine image sizes to fit a certain number of columns in a layout, set your size preferences and click on the Save size button. Name the custom size and click on the OK button, then click on OK in the image size dialog. This way you can crop an image and then pick a size by clicking on the little arrow next to the Image Size button. Pick a predefined size from the list or modify the preset sized by choosing Size options.
Size Quality Control
Note how the quality indicator below the image changes when you change the print size of an image. The quality indicator is calculated from the Target screen resolution set in the Image size dialog.
Tip for resizing images for web use:
When cropping images for use on the web, you will want to resample it to avoid creating very large files. The directions outlined below may be helpful in that regard.
Having opened an image in the crop window, click on the Options button and choose Real Crop. Resample to new pixel size. Then choose a suitable location for storing the new, cropped files by choosing Save as new image in specified folder and then selecting a folder. Choose JPEG as the file format and select a quality level from the dropdown list. Then click OK to close the options dialog.
Now, click on the Image Size button. Make sure that the Resample image checkbox is selected, and choose a size mode. In this example, we will choose a fixed width and height of 200 by 350 pixels. The value in the Resolution field is irrelevant in this respect, since it will only affect the print size of the image, and has no effect on the size of the output file, but for practical purposes you can set it to 96 pixels/inch, which is a standard value for many computer screens. Now you are ready to save this size for later use by clicking on the Save size button and labeling the size. Then click on the OK button to close the Image Size dialog.
To choose the preset size, click on the arrow next to the Image Size button and choose your size preset. You’ll notice that when adjusting the crop frame it will not resize freely since the aspect ratio is fixed. (Both width and height measures are locked in the Image Size dialog)