
By using Group Policy to deploy FotoStation to network clients, you avoid having to manually install it on each and every desktop. It also gives you the possibility to install the software selectively on a number of computers. When deployed through Group Policy, the clients will typically be pre-configured to connect to the FotoWeb server so that a minimum of user intervention will be required to use the application.
In addition to the FotoStation MSI package itself, the clients you distribute FotoStation to may need Apple QuickTime to correctly identify certain file formats. However, QuickTime is optional, and this procedure does not deal with QuickTime deployment.
This will need to be a shared folder on a server that the clients can access to run the installer. Make sure the users who need access to this distribution point have Read privileges on the share.
It can be downloaded from http://www.fotoware.com/en/Support/UpdateCenter/ClientApplications/Windows/FotoStation70/
Example: FotoStation-Setup.exe /a
This will unpack the files from the installer to a location you specify, typically the distribution point you created above.
If you don't have a centralized configuration, you can skip this step.
To do this, you must modify the locationdata.xml file located at <DistributionPoint>\CommonAppData\FotoWare\FotoStation\locationdata.xml.

Insert the path to the FotoStation Logon folder as shown in the screenshot above. Then set LocationType to Logon, replacing the Common default value.
Tip: The Orca MSI editor can be downloaded from this FotoWare Knowledge Base article.
Change the following values in the Property table of the FotoWare FotoStation 7.0.msi file:

Set the USE_LOCATION_FILE parameter to 1 to distribute the locationdata.xml file. This way the FotoStation clients will get their configuration from the location specified in the locationdata file.
Alternative 1: If you are using a single product key with several activations. (If you are using a license server, skip this step.)
In the Property table in the msi file, locate the FWLICENSEKEY property and paste your license key there:

Alternative 2: If you are using a license server.
In the Property table in the msi file, locate the FWLICENSESERVER property and type in your host name preceded by an @ character, like this: @licenseserver. If the license server is configured to use another port, use this format: 2000@licenseserver. (Replace 2000 with whatever port number you have configured in your license file.)

Note: The below procedure describes configuration of the FotoStation 7.0. Although the screenshots depict FotoWeb Desktop deployment, the steps involved are completely identical.
1. In Administrative Tools on the server, open the Group Policy Management
2. Right-click Group Policy Objects and click on New
3. Type in a name - e.g. FotoStation 7.0 Deployment (screenshot below)
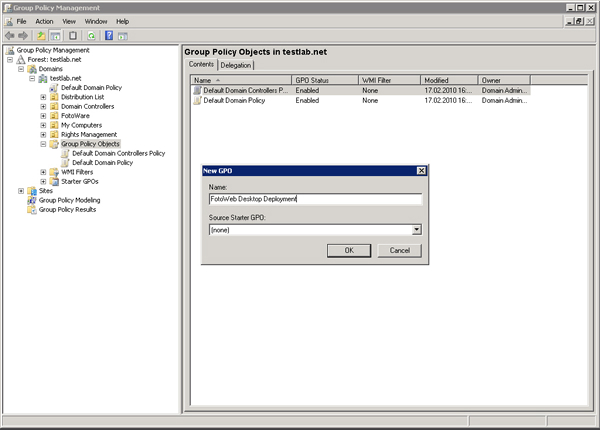
4. Now, decide whether the policy applies to computers or users. In this example we will use Computer mode:
5. Click on the Group Policy Object you just created. In the right bottom panel, click on Add and then click on Object Types and select Computers. Then choose the domain computers the package should by distributed to. (Screenshot below)
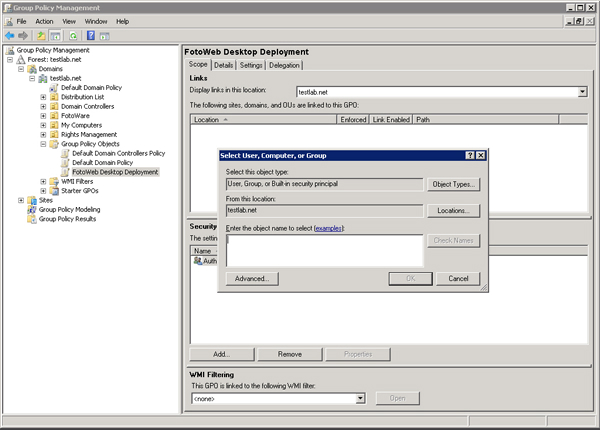
6. Next, right-click on the GPO you just created and select Edit. This will open the Group Policy Management Editor
7. Now, expand the Computer Configuration node, then expand Policies, then the Software Settings node. (Screenshot below)
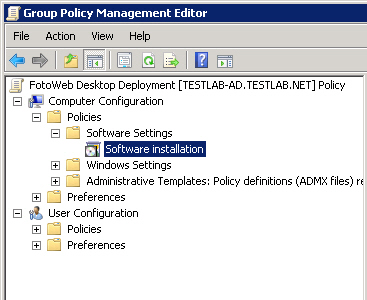
8. Right-click on Software installation and select New Package
9. Select the FotoWare FotoStation 7.0.msi file from the distribution point (the share where you stored the files expanded from the installer package).
Important: Make sure you access the file through its share path (typically \\servername\sharename)
10. Choose Assigned deployment method.
11. Highlight the Software installation node and right-click the deployment object you just created. Then select Properties
12. On the Security tab, add the groups / users that should be granted permission to install FotoStation. (They will need read access)
13. Go to the Deployment tab and make sure to check Uninstall this application when it falls out of the scope of management. This way, the software will be uninstalled from computers that are taken out of the management scope. (Screenshot below)
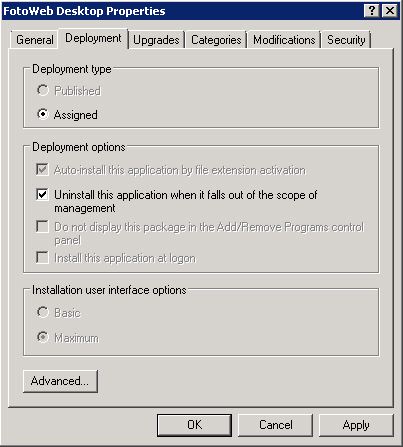
14. Finally, close the Group Policy Management Editor window. Now, it's time to link the Group Policy Object to a group of computers:
a. In the Group Policy Management window, right-click the computer or OU that you want to apply the GPO to and choose Link an Existing GPO, then choose the deployment package that you would like to distribute.
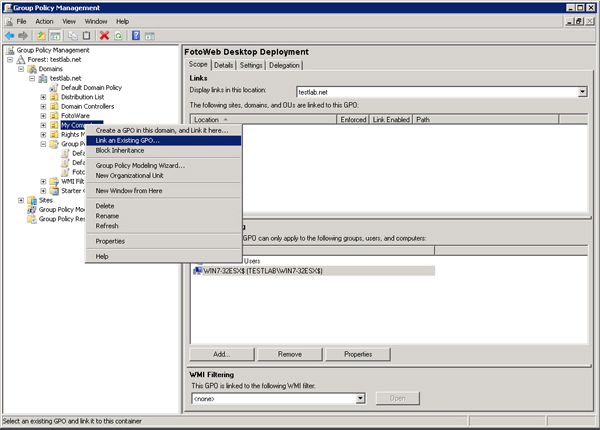
b. Now you should open the Active Directory Users and Computers program from Administrative tools and move any computers that you want to distribute the software package to, into this group. (Drag them from the Computers node into the group that you created in Group Policy Management.)
15. Force a Group Policy update:
Run gpupdate on clients to force update. This will refresh local and Active Directory-based Group Policy settings. Normally, it should not require additional options - just run gpupdate from the command prompt.
Command syntax: gpupdate [/target:{computer|user}][/force][/wait:value][/logoff][/boot]
More information can be had at http://technet.microsoft.com/en-us/library/bb490983.aspx
Note: gpupdate will run automatically roughly every 120 minutes on domain clients. Hence, the software will typically be installed on the next working day when users restart their computers.
Note: The below procedure describes configuration of the FotoStation 7.0. Although the screenshots depict FotoWeb Desktop deployment, the steps involved are completely identical.
1. In Administrative Tools on the server, open the Group Policy Management
2. Right-click Group Policy Objects and click on New
3. Type in a name - e.g. FotoStation 7.0 Deployment (screenshot below)
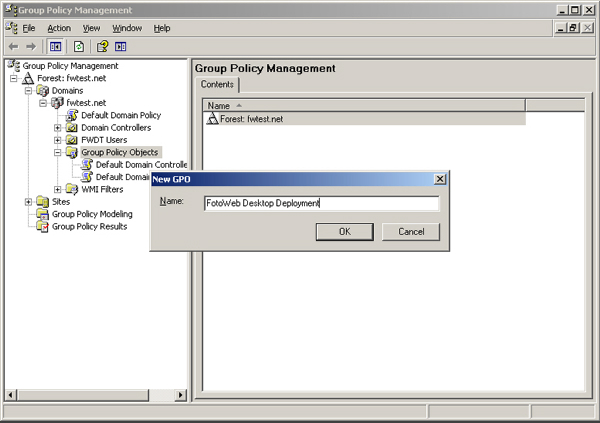
4. Now, decide whether the policy applies to computers or users. In this example we will use Computer mode:
5. Click on the Group Policy Object you just created. In the right bottom panel, click on Add and then click on Object Types and select Computers. Then choose the domain computers the package should by distributed to. (Screenshot below)

6. Next, right-click on the GPO you just created and select Edit. This will open the Group Policy Object Editor
7. Now, expand the Computer Configuration node, then expand the Software Settings node. (Screenshot below)
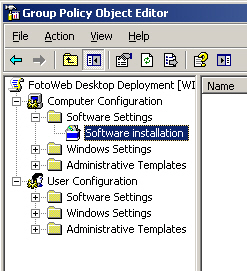
8. Right-click on Software installation and select New Package
9. Select the FotoWare FotoStation 7.0.msi file from the distribution point (the share where you stored the files expanded from the installer package).
Important: Make sure you access the file through its share path (typically \\servername\sharename)
10. Choose Assigned deployment method.
11. Highlight the Software installation node and right-click the deployment object you just created. Then select Properties
12. On the Security tab, add the groups / users that should be granted permission to install FotoWeb Desktop. (They will need read access)
13. Go to the Deployment tab and make sure to check Uninstall this application when it falls out of the scope of management. This way, the software will be uninstalled from computers that are taken out of the management scope. (Screenshot below)
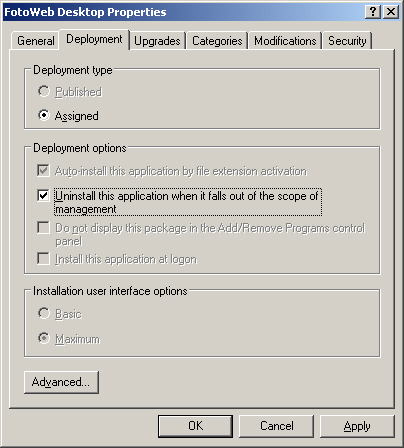
14. Finally, close the Group Policy Object Editor window. Now, it's time to link the Group Policy Object to a group of computers:
a. In the Group Policy Management window, right-click the computer or OU that you want to apply the GPO to and choose Link an Existing GPO, then choose the deployment package that you would like to distribute.
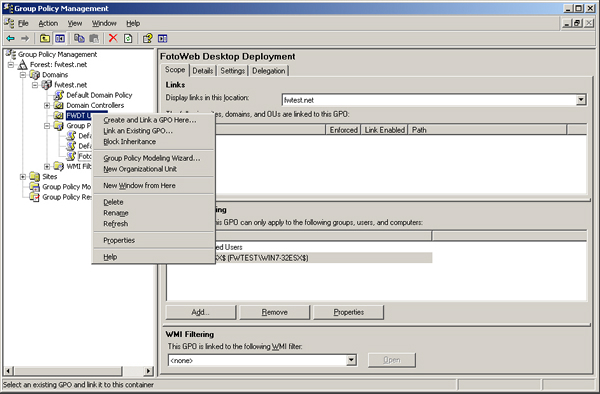
b. Now you should open the Active Directory Users and Computers program from Administrative tools and move any computers that you want to distribute the software package to, into this group. (Drag them from the Computers node into the group that you created in Group Policy Management.)
15. Force a Group Policy update:
Run gpupdate on clients to force update. This will refresh local and Active Directory-based Group Policy settings. Normally, it should not require additional options - just run gpupdate from the command prompt.
Command syntax: gpupdate [/target:{computer|user}][/force][/wait:value][/logoff][/boot]
More information can be had at http://technet.microsoft.com/en-us/library/bb490983.aspx
Note: gpupdate will run automatically roughly every 120 minutes on domain clients. Hence, the software will typically be installed on the next working day when users restart their computers.