FotoWeb Standard can run with only one site. The Enterprise edition, however, supports up to three sites by default. It is also possible to purchase additional licenses to run more sites on a server.
The procedure for adding a new site differs slightly based on whether you are running FotoWeb on Ingternat Information Services (IIS) or the embedded Apache web server.
In IIS, you must first add a new website in the IIS administration and then run the New Site Wizard from the FotoWeb Administration Console. With FotoWeb running on Apache, it is sufficient to run the New Site Wizard, and everything will be set up automatically.
If your FotoWeb runs on Apache, you can skip the initial steps below and jump to the section that describes how to add a new site in FotoWeb.
Users running FotoWeb on IIS: Please follow the below procedure for IIS 6 or 7 depending on your version.
Before adding a new site in FotoWeb you must manually create a new web site in Internet Information Services where FotoWeb can install the new site.
Creating a new site in IIS6
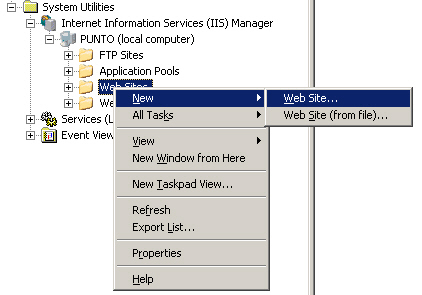
Open the Internet Information Services console from the Administrative Tools in the start menu. Right-click the Web Sites node and select New | Web Site. This will launch the wizard to create a new web site.
Type in the name of the new web site. This name for internal use only. It can be a good idea to name this web site the same as the FotoWeb site you are planning to create. This will make it easier to recognize which IIS web site is connected with what FotoWeb site.
Enter the information to identify the web site. When you have multiple sites on a single server they must either use unique IP addresses or host headers14. Write down the information you enter here, as you must enter the exact same information when you add the new site to FotoWeb later.
Specify a home folder for the new web site. If you are creating many sites that are just hosting FotoWeb you can use the same root folder for all the sites.
Finally, set the default permissions for the new web site. FotoWeb configuration wizard will create a fotoweb virtual directory in this web site with its own permissions.
Creating a new site in IIS7
Open the Internet Information Services console from the Administrative Tools in the start menu. Right-click the Sites node and select Add Web Site. This will launch the dialog to collect the parameters for the new web site.
Type in the name of the new web site. This name for internal use only. It can be a good idea to name this web site the same as the FotoWeb site you are planning to create. This will make it easier to recognize which IIS web site is connected with what FotoWeb site.
Specify a home folder for the new web site. If you are creating many sites that are just hosting FotoWeb you can use the same root folder for all the sites.
Finally, enter the information to identify the web site. When you have multiple sites on a single server they must either use unique IP addresses or host headers14. Write down the information you enter here, as you must enter the exact same information when you add the new site to FotoWeb later.
Adding the New Site in FotoWeb
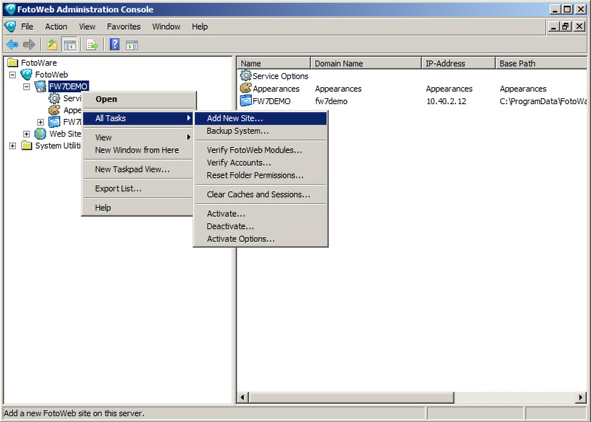
To add a new site right-click the server node in the FotoWeb Administration Console, then navigate to All Tasks | Add New site. The Add site option will be unavailable if your license does not allow additional sites. This menu will launch the wizard that collects information about the new site. It is the same as you saw when configuring your first site after a clean installation of FotoWeb.
Making the Site Available to Users
Before the new site can be accessed by your users, you need to create an entry in your DNS system for the new site name. Alternatively, the site can be accessed using the IP-address15.
If you will only access the new site from the server itself, it can be tested by making a mapping between the site name and the IP-address 127.0.0.1 in the \windows\system32\drivers\etc\hosts file.
You can remove sites from the FotoWeb Administration Console. Right-click the site icon and select Delete. This will show you a dialog box with the options available for the deletion process.
Note: You should stop all FotoWeb services before deleting a site and start them after the deletion process is completed.
To remove the site entirely, check all the options. The options are discussed in detail below.
This option will remove all the configuration files, templates and user folders for the site. The files will be permanently removed; they are not moved to the Recycle Bin.
This option will remove the /fotoweb virtual directory from IIS. You will be asked from which site you want to remove the folder, and you must make sure that you delete the folder from the correct site.
This option will instruct FotoWeb to drop the database. If the database server is on the same machine as FotoWeb, FotoWeb will make sure that the database files are deleted from disk. If the SQL server is on another machine you may have to delete the database files manually.
You must manually remove the site from IIS after deleting it from FotoWeb by right-clicking the web site in IIS Manager and selecting Delete. You must manually delete the root folder from disk if it is not in use any more.
Important! There is no way to undo the deletion of a site. Making a backup of the site before deleting it may be a good idea.