FotoWeb offers many powerful features that allow web designers to customize the look and feel of the application, and also to some degree change the functionality of a web site based on FotoWeb. The goal of this document is to give the reader the necessary knowledge to create custom sites based on FotoWeb.
Persons with knowledge of HTML programming (“manual coding”) can do customization of FotoWeb. Experience with scripting using dynamic server platforms (such as ASP, ASP.NET, JSP or PHP) will give you a head start.
All FotoWeb pages (FWX) are produced based on FotoWeb script templates. The templates are a mix of Html-code and FotoWeb 'tags', a kind of pseudo-html. By changing the templates you can completely customize the look and feel and functionality of FotoWeb.
Following the same idea as the scripting technologies, the FotoWeb tags serve as the interface to inner functionality of FotoWeb. With these tags, we can tell FotoWeb to perform a specific operation and from the same tags we can retrieve desired information processed by FotoWeb. Before going any further, lets look at some basic scripting concepts.
The following figures illustrate some basic processing and transmission concepts among Html, Asp and Fwx pages.
<HTML>
. . .
<BODY>
5 2 = 3.
</BODY>
</HTML>
Figure 1: A mathematical expression displayed by an Html page.
<HTML>
. . .
<BODY>
<%
Dim result
result = 5 - 2
Response.Write “5 2 = ” & result & “.”
%>
</BODY>
</HTML>
Figure 2: A mathematical expression evaluated and displayed by an Asp page.
<HTML>
. . .
<BODY>
5 2 = <%$ MathEval expression=“5 - 2” /%>.
</BODY>
</HTML>
Figure 3: A mathematical expression evaluated and displayed by an Fwx page.
All three pages in the above figures will finally display the string '5 2 = 3.' in the client's browser while the actual pages are designed and processed differently. The Html page must store the final results of the expression in the page itself. Upon request, this page is transmitted to the client AS IS. The Asp and Fwx pages are utilizing scripting to allow the final result to be evaluated and added to the page dynamically upon a request. Contents of the raw page enclosed within the script identifiers ('<%%>' and '<%$%>') are replaced with proper Html code before transmission to the client.
The Asp and Fwx pages are also Html pages with or without special identifiers such as '<%%>' (Asp) and '<%$%>' (Fwx). It is, however, the extension of these pages that inform IIS which module is responsible of processing and transmitting the page. IIS redirects requests made to Asp pages to the Asp processing module in IIS. Similarly, FotoWeb handles requests made to Fwx pages. Both modules will then scan their requested pages looking for the identifiers and process the requests made within them. The identifiers are then removed or replaced with proper Html code and, finally, the pages are transmitted to the client.
As in ASP programming, FotoWeb uses special prefix and postfix identifiers to create its tags to be able to recognize them among Html code in a page. These identifiers are “<%$” and “%>”, without quotes. In Asp programming, the prefix and postfix identifiers create a context that is processed by the Asp processing module. For example:
<%
Response.Write “5 1 = ” & 5 1 & “.<BR />”
Response.Write “5 2 = ” & 5 2 & “.<BR />”
Response.Write “5 3 = ” & 5 3 & “.<BR />”
Response.Write “5 4 = ” & 5 4 & “.<BR />”
Response.Write “5 5 = ” & 5 5 & “.<BR />”
%>
Figure 4: Multiple actions performed in a context created by Asp identifiers.
In FotoWeb, each action is enclosed by identifiers so that the prefix and postfix identifiers always appear on the same line. It is possible to create a multi line context in FotoWeb as well, but with slightly different rules that will be discussed later. In FotoWeb, the same actions would be repeated as follows:
5 1 = <%$ MathEval expression=“5 - 1” /%>.<BR />
5 2 = <%$ MathEval expression=“5 - 2” /%>.<BR />
5 3 = <%$ MathEval expression=“5 - 3” /%>.<BR />
5 4 = <%$ MathEval expression=“5 - 4” /%>.<BR />
5 5 = <%$ MathEval expression=“5 - 5” /%>.<BR />
Figure 5: Multiple actions performed in multiple contexts created by FotoWeb identifiers.
FotoWeb provides a large collection of actions that can be called to perform different operations. These actions can be divided into two categories:
1. Tags. Also called Commands.
2. Command Requests
A tag is what is enclosed and immediately called within identifiers “<%$%>”. See 'MathEval' tag in figure 4. The command requests are types of 'hidden' Fwx pages that do not exist physically. The difference between these types of actions lies in the way they are used and will be discussed later.
As in all scripting languages, FotoWeb also requires a harmonious uniformity in the templates and a steadfast adherence to some basic guidelines. To achieve this goal, FotoWeb provides a set of rules to obey when writing or updating templates. These rules are explained in 'FotoWeb script rules' later in this document. However, to understand the rules, you first need to know the basic elements of FotoWeb templates tags, attributes, variables, conditions and command requests.
A tag is an action or functionality identifier that triggers desired functions in FotoWeb. The operations performed by the tags can be divided into four different sections:
1. Something changes in memory/disk for later use.
2. A single result is processed.
3. A collection of results is processed.
4. No result is processed. An evaluation is performed.
The tags that change something in memory or on disk are simply removed from the final Html after processing. For example:
<%$ SetVariable name=”someVariable” value=”some value” /%>
Example 1: 'SetVariable' tag creates a variable in memory.
In this example, the tag 'SetVariable' create a variable named 'someVariable' with a value of 'some value' and stores it in the memory. The entire string is removed from the final processed Html.
The tags that process a single result are replaced with the result of command. For example:
<%$ InsertVariable name=”someVariable” encoding=”html” /%>
Example 2: 'InsertVariable' displays its results immediately.
In this example, the tag 'InsertVariable' inserts the value of a variable named 'someVariable' in its place. The final processed Html now contains the value of 'someVariable' instead of the above string.
The tags that process a collection of results are a hybrid of the two examples above. Lets look at the following command:
<%$ ImageList %>
<%$=imageList.currentArchive.id %>
<%$=imageList.currentArchive.name %>
<%$=imageList.currentArchive.description %>
<%$ /ImageList %>
Example 3: 'ImageList' tag processes a collection of results.
In this example, the tag 'ImageList' is called. This tag creates a collection of results that can be accessed through variables such as 'imageList.currentArchive.id' etc. In the final Html, the tag strings such as '<%$ ImageList %>' are simply removed, while the tag variables are replaced with their corresponding values.
Finally, there are tags that process no result, but rather perform an evaluation. For example:
<%$ CompareNumbers lhsValue="5001" rhsVariable="imageList.currentArchive.id" %>
<!Code to execute if archive id is 5001-->
<%$ /CompareNumbers %>
Example 4: 'CompareNumbers' tag creates an evaluation context.
In this example, the tag 'CompareNumbers' performs an evaluation where the current archive id is compared with the number 5001. If they match then the code in the tag's context is executed and/or included in the final Html.
As you may have noticed in the above examples, some tags are single line commands that end with
/%>
while others are multi line tags where the last line is same as the tags name in the form
<%$ /TagName %>
This difference is due to how information is retrieved from the tag and is identified as empty and non-empty tags.
Tags that change something in memory and/or return a single result are defined on a single line and have no context. In the final Html, these tags are either removed or replaced with the result and are, therefore, called empty tags. For example:
<%$ MathEval expression=“5 - 2” /%>
'/' marks end of tag.
Example 5: 'MathEval' is an empty tag.
In this example, the tag 'MathEval' processes the expression and the result is available immediately.
Tags that processes a collection of results or perform an evaluation are defined on multiple lines. Their definition consists of a starting tag with the tag name and an ending tag with the same tag name. Everything between these starting and ending tags becomes the context of the command. This context can consist of regular Html code, command's variables and conditions and other commands. For example:
Bla bla bla<br />
You have
<%$=imageList.imageCount.inArchive %>
images in your shopping cart.<br />
Bla bla bla<br />
Example 6: 'ShoppingCartList' is a non-empty tag.
In this example, the tag 'ShoppingCartList' is called that instructs FotoWeb to collect all the information about logged on user's shopping cart and stores the results in a collection in memory. These results can then be accessed through the tag's access points (variables and conditions) within the tag's context. In the final Html, the main tags will be removed and the access points will be replaced with the result values.
FotoWeb provides two evaluation tags:
1. If else endif
2. Ifnot else endif
These evaluation tags allow evaluation of existing conditions. For example:
<%$ if currentUser.isLockedOut %>
<!Code to execute if account is locked out.-->
<%$ endif %>
Example 7: 'If' tag creating context with 'endif'.
In this example, the condition 'currentUser.isLockedOut' is being evaluated. If the condition is true, the code in the tag's context (until 'endif') will be executed. This tag can be extended to evaluate both outcomes of the conditions. For example:
<%$ if currentUser.isLockedOut %>
<!Code to execute if account is locked out.-->
<%$ else %>
<!Code to execute if account is not locked out.-->
<%$ endif %>
Example 8: 'If' tag creating double context with 'else' and 'endif'.
The 'else' clause allows creation of a second context that can be executed if the condition is not true. Similarly, the entire evaluation can be reversed with the 'ifnot' tag. For example:
<%$ ifnot currentUser.isLockedOut %>
<!Code to execute if account is not locked out.-->
<%$ endif %>
Example 9: 'Ifnot' tag creating context with 'endif'.
In this example, the tag context is executed if current user is not locked out. To evaluate both sides of the condition, you can add the 'else' clause as follows:
<%$ ifnot currentUser.isLockedOut %>
<!Code to execute if account is not locked out.-->
<%$ else %>
<!Code to execute if account is locked out.-->
<%$ endif %>
Example 10: 'Ifnot' tag creating double context with 'else' and 'endif'.
Conditions are discussed later in this document.
Some tags allow regulation of information processing by passing parameters to FotoWeb. These parameters are called 'attributes' of the tags. These attributes instruct FotoWeb in detail on how to process and/or deliver the information. For example:
<%$ ImageList rows=“3” columns=“8” archiveId=“5005” %>
. . .
<%$ /ImageList %>
Example 11: Optional attributes of 'ImageList' tag.
In this example 'rows', 'columns', and 'archiveId' are attributes of 'ImageList' tag that instruct FotoWeb to produce an image list of archive 5005 with 3 rows and 8 columns. If the rows and columns attributes were not specified, then FotoWeb would use default values of 2 and 6 respectively. These are called optional attributes. Not all attributes are optional. For example:
<%$ MathEval expression=“(5 * 10 2) / 8” /%>
Example 12: Mandatory attributes of 'MathEval' tag.
In this example, the attribute 'expression' is not optional and must be specified for the 'MathEval' tag to produce any sensible information.
Variables are the information access points for the tags and externally set variables. The variables provide textual information that can be added to the final Html transmission to the client.
The variables can be divided into four categories:
1. Request variables.
These are variables that are passed with the http request. These variables can be accessed anywhere in the page, given they exist.
2. Global variables.
Variables that belong to 'Global', 'CurrentUser' and 'BrowserDetection' tags are called global variables. These variables can be accessed anywhere in the page without calling the tag or creating a tag context.
3.Tag variables.
Variables set by a tag. These variables must be used within the tag's context.
4.External variables.
Variables that are set manually by the programmer. These variables can be used anywhere in the page after they are set. They behave similar to global variables.
Since the variables return textual values, it is important to know, or at least have an idea of, what type of data you expect from the variables and where it will be used in the Html structure. FotoWeb provides several different options to display and use variable data. These options include:
1. Html encoding - Encodes the text in Html format for safe display in browsers.
2. URL encoding - Encodes the text in URL format to construct URLs and query strings.
3. JavaScript encoding - Encodes the text in JavaScript format to be passed to JavaScript functions.
4. Plain text encoding - Displays the text as is without any encoding.
5. Text length capping - Allows capping of the text if it exceeds a specified size.
6. Text abbreviation - Adds an abbreviation string at the end of the text if it is capped.
All these formats can be derived from the 'InsertVariable' tag by specifying different attributes. For example:
<%$ InsertVariable name=“browser.platformName” encoding=“html” maxLength=“10” abbreviator=“” /%>
Example 13: Displaying variable with formatting.
In this example client's platform name is being displayed with Html encoding. A maximum of 10 characters will be displayed. If the actual platform name consists of more than 10 characters, then it will be capped down to 10 and the abbreviator string '' will be appended to it.
If no encoding, capping or abbreviation is desired, as may be the case for numerical values, then you can simply retrieve the variable value by directly using the variable name as follows:
<%$=imageList.position %>
Example 14: Displaying variables without formatting.
It is important to know that a variable must exist before you can access its value. If an attempt is made to access a variable that does not exist, then the entire processing is stopped and an error is generated.
It is not always clear in the context when a certain variable may exist or not. To cope with such situations, FotoWeb provides following set of tags to check for existence of variables on different levels:
IfVariableExists
IfNotVariableExists
IfHttpRequestValueExists
IfNotHttpRequestValueExists
All these tags use a 'name' attribute to specify the name of the variable to be checked. In addition, these are nonempty tags that perform an evaluation and allow execution of their context accordingly. For example:
<%$ IfVariableExists name=“browser.platformName” %>
Client platform:
<%$ InsertVariable name=“browser.platformName” encoding=“html” maxLength=“10” abbreviator=“” /%>
<%$ /IfVariableExists %>
Example 15: Checking if a variable exists.
In this example, we check if a variable named 'browser.paltformName' exists. If it does, then the context of the 'IfVariableExists' is executed and the client's platform name is displayed, otherwise the entire context is skipped.
Similarly, a code section can be created for execution in absence of a variable. For example:
<%$ IfNotVariableExists name=“browser.platformName” %>
Client platform is not available.
<%$ /IfNotVariableExists %>
Example 16: Checking if a variable does not exist.
In this example the context of 'IfNotVariableExists' is executed only if 'browser.platformName' does not exist.
FotoWeb also allows creating your own variables for easy data access throughout the Fwx pages. The tags used to achieve this are:
SetVariable
SetSessionVariable
For example:
<%$ SetVariable name="productName" value="FotoWeb® 6.0" /%>
Example 17: Creating custom variables in the page scope.
In this example a variable named 'productName' is declared with a specified value. This variable can now be accessed anywhere in the Fwx page in any context. However, once another page is processed, this variable is no longer valid.
To declare variables that are valid and accessible through all pages, you can use the 'SetSessionVariable' tag. This tag sets a session variable that only needs to be declared once and is available during the entire user session. A session variable is recognized with a special prefix 'UDSV_', which stands for User Defined Session Variable. For example:
<%$ SetSessionVariable name="UDSV_productName" value="FotoWeb® 6.0" /%>
Example 18: Creating custom variables in the session scope.
In this example a session variable 'UDSV_productName' is declared that will be available throughout the user session in any context.
The externally set variables can be removed from the memory when they are no longer needed with the 'RemoveVariable' and 'RemoveSessionVariable' tags. For example:
<%$ RemoveVariable name="productName" /%>
Example 19: Removing custom variables.
In this example the externally set variable 'productName' is removed from the memory.
Conditions are the true/false evaluations points for the tags and externally set conditions. The conditions allow creating contexts of codes that can be chosen for execution in different situations.
The conditions can be divided into three categories:
1. Global conditions - Conditions that belong to 'Global', 'CurrentUser' and 'BrowserDetection' tags are called global conditions. These conditions can be accessed anywhere in the page without calling the tags or creating a tag context.
2. Tag conditions - Conditions set by a tag. These conditions must be used within the tag's context.
3. External conditions - Conditions that are set manually by the programmer. These conditions can be used anywhere in the page after they are set. They behave similar to global conditions.
Since the conditions are simple true/false evaluations, their usage is very straightforward. The evaluations are performed using 'if' or 'ifnot' tags. For example:
<%$ if currentUser.isLockedOut %>
<!Code to execute if account is locked out.-->
<%$ else %>
<!Code to execute if account is not locked out.-->
<%$ endif %>
Example 20: Evaluating conditions.
In this example the account status of the logged on user is being evaluated. If the account is locked out, then the first section of the if-clause is executed, otherwise the second section is executed.
The '<%$ else %>' clause allows evaluation of the negation at the same time. However, if only negation needs to be evaluated, then an 'ifnot' can be performed on the condition. For example:
<%$ ifnot currentUser.isLockedOut %>
<!Code to execute if account is not locked out.-->
<%$ endif %>
Example 21: Inverted condition evaluation.
In this example a context is created for execution only if the condition being tested is false.
The 'if' and 'ifnot' tags can be nested and they can contain any other tags in their contexts. For example:
<%$ if imageList.isImageFolder %>
<%$ ListArchives sort="No" %>
<%$ InsertVariable encoding="html" name="archive.name" /%>
<BR />
<%$ /ListArchives %>
<%$ else %>
<%$ if imageList.isOutBox %>
<%$ ListDestinations %>
<%$=destination.name %>
<BR />
<%$ /ListDestinations %>
<%$ else %>
<!Something else like shopping cart or albums.-->
<%$ endif %>
<%$ endif %>
Example 22: Nested condition evaluation.
It is important to know that a condition must exist before you can evaluate it. If an attempt is made to evaluate a condition that does not exist, then the entire processing is stopped and an error is generated.
It is not always clear in the context when a certain condition may exist or not. To cope with such situations, FotoWeb provides following tags to check for existence of conditions:
IfConditionExists
IfNotConditionExists
These tags use a 'name' attribute to specify the name of the condition to be checked. In addition, these are nonempty tags with the exception that they do not store any results in the memory. It is rather the context of the tag is responsible of delivering the results. For example:
<%$ IfConditionExists name=“browser.isOpera” %>
<%$ if browser.isOpera %>
You are using an Opera browser.<BR />
<%$ endif %>
<%$ /IfConditionExists %>
Example 23: Checking if a conditions exists.
In this example, we check if a condition named 'browser.isOpera' exists. If it does, then the context of the 'IfConditionExists' is executed and the condition is evaluated, otherwise the entire context is skipped.
Similarly, a code section can be created for execution in absence of a condition. For example:
<%$ IfNotConditionExists name=“browser.isOpera” %>
<!Code to execute if condition does not exist.-->
<%$ /IfNotConiditionExists %>
Example 24: Checking if a condition does not exist.
In this example the context of 'IfNotConditionExists' is executed only if 'browser.isOpera' does not exist.
FotoWeb also allows creating your own conditions for easy flag setting throughout the Fwx pages. The tags used to achieve this are:
SetCondition
SetSessionCondition
For example:
<%$ SetCondition name="openShoppingCartInNewWindow" value="true" /%>
Example 25. Creating custom conditions in the page scope.
In this example a condition named 'openShoppingCartInNewWindow' is created with a value set to true. This condition can now be accessed anywhere in the Fwx page in any context. However, once another page is processed, this condition is no longer valid.
To declare conditions that are valid and accessible in all pages, you can use the 'SetSessionCondition' tag. This tag sets a session condition that only needs to be declared once and is available during the entire user session. A session condition is recognized with a special prefix 'UDSC_', which stands for User Defined Session Condition. For example:
<%$ SetSessionCondition name="UDSC_fromLoginPage" value="true" /%>
Example 26: Creating custom conditions in the session scope.
In this example a session condition 'UDSC_fromLoginPage' is declared that will be available throughout the user session in any context.
The externally set conditions can be removed from the memory when they are no longer needed with the 'RemoveCondition' and 'RemoveSessionCondition' tags.
Commands requests seem like hidden Fwx pages that are nowhere to be found on disk. They are in fact just FotoWeb tags designed to behave differently.
The regular tags are always executed from their context in an Fwx page. The command requests on the other hand are only executed upon user interaction and can be called from any type of page (Fwx, Asp, Php, Html etc) or a third-party application. For example the 'ImageList' tag displays images from the archive, while it is up to the user to decide whether to add an image to an album or not. When the user clicks on the 'add to album' icon, the command request 'AddToAlbum.fwx' is executed and the selected image is added to the user's album.
Since the command requests are set up as 'hidden' Fwx pages, they must be accessed as if they were regular Fwx pages with the exception of their virtual path that must follow the string 'cmdrequest'.
http://<SERVER>/fotoweb/cmdrequest/AddToAlbum.fwx?f=<FOXTOKEN>&SuccessURL=/fotoweb/ViewA lbum.fwx&ErrorURL=/fotoweb/ViewAlbum.fwx
Example 27: Calling command requests.
When accessed, the user is actually redirected to these pages to execute the command. Once the command is executed, the user is redirected back to the previous page where the request was made from. The user usually does not notice the redirection and only experiences a simple page refresh.
In most of the commands, these redirections are controlled by parameters such as 'SuccessURL' and 'ErrorURL'. 'SuccessURL' defines the URL to be redirected to when the command is executed successfully while the user is redirected to the 'ErrorURL' if any error would occur during processing of the command.
Most of the command requests also require information that is processed by other commands, e.g. a file access token (foxtoken) of a file to work with. For example:
<%$ ImageList %>
<%$ Image %>
<a href="cmdrequest/AddToAlbum.fwx?fileId=<%$=image.foxToken %>&SuccessURL=/fotoweb/ViewAlbum.fwx&ErrorURL=/fotoweb/ViewAlbum.fwx"> <img src="rsrc/AddToAlbumBtn.gif" width="20" height="20" title="Click here to add this file to your album." border="0" /></a>
<%$ /Image %>
<%$ /ImageList %>
Example 28: Incorporating tags with command requests.
In this example the command request 'AddToAlbum.fwx' is used in the context of 'Image' command that is again used in the context of 'ImageList' command. The 'AddToAlbum.fwx' command request is being referenced as if it was a regular Fwx page with query string parameters 'fileId', 'SuccessURL' and 'ErrorURL'. These parameters are 'attributes' of the command requests that provide necessary information to the command request to work with.
The 'fileId' is the foxtoken of the image that is being added to the album. The 'SuccessURL' defines the URL to be redirected to when the command is executed successfully while the 'ErrorURL' defines the URL to be redirected to in case of any error. Notice the virtual path of the command request that starts with 'cmdrequest'. This string identifies that the following Fwx page is a command request.
As in other script languages, FotoWeb allows you to insert the content of one script file into another script file before the server executes it. It is done with a special 'include' tag that is enclosed by special identifiers '<%§' and '§%>'. For example:
<%$ include virtual="SystemSetup.inc" $%>
Example 29: Including files with virtual path definition.
In this example, a file 'SystemSetup.inc' is being included where the path of the file is virtual. To include files files absolute path use following 'absolute' keyword. For example:
<%$ include absolute="c:\FotoWare\FotoWeb\Includes\SystemSetup.inc" $%>
Example 30: Including files with absolute path definition.
This tag can be used to create functions, headers, footers, or elements that will be reused on multiple pages.
Now that you have been introduces to basic elements of FotoWeb scripting, its time to get to know the rules. The rules are few and simple and, more or less, already explained during the introduction of the elements.
Failure to follow these rules can cause incorrect information display, compromise security and processing stops. FotoWeb has implemented several mechanisms to prevent these occurrences, but the best mechanism lies in the hands of the template programmer adoption of FotoWeb script rules.
Whether it is an empty or non-empty tag, it must be closed with a forward slash '/'. For example:
<%$ MathEval expression=”1 + 2 + 3” /%>
'/' closes the tag.
|
<%$ ImageList %> |
Starting tag |
|
. . . . . |
|
|
<%$ /ImageList %> |
Closing tag with closing mark '/' |
Example 32: Closing non-empty tags.
The non-empty tags that create a context, must be closed with a separate closing tag. The closing tag is the same as starting tag, but with a closing mark '/' right before the tag name, with no space in between them.
Failure to close a tag will invalidate the hierarchal structure of the template and case a parsing error during template validation.
This rule is based on the same principal as the previous, but extends a little further. As explained in the previous rule, tags creating a context (non-empty tags) must be closed with a closing tag. Similarly, the evaluation tags ('if' and 'ifnot') must also close their contexts with 'endif'.
|
<%$ if condition %> |
Starting evaluation tag |
|
. . . . . |
|
|
<%$ else %> |
Optional else |
|
. . . . . |
|
|
<%$ endif %> |
Closing evaluation tag |
|
<%$ ifnot condition %> |
Starting evaluation tag |
|
. . . . . |
|
|
<%$ else %> |
Optional else |
|
. . . . . |
|
|
<%$ endif %> |
Closing evaluation tag |
Example 33: Closing 'if' and 'ifnot' tags.
Failure to close a tags' context will invalidate the hierarchal structure of the template and cause a parsing error during the template validation.
Some tags such as 'ImageList', 'ShoppingCartList' etc cannot be repeated in the same template. They are called illegal peers. Any attempt to repeat these tags in the same template will invalidate all the illegal peers after the first occurrence. See 'FotoWeb 7.0 Tag Reference' document for details on illegal peers of tags.
FotoWeb allows usage of tags in the context of other tags. It is, however, not possible to repeat certain tags in their own context. As a general rule of thumb: the empty tags cannot be nested, because they cannot create a context. For non-empty tags, check documentation of the tag for individual reference.
'Of course!' you say. So do we, but we wouldn't have to make it an emphasized rule if it was only for the typos. Misspelling of a name or two can occur and be discovered and corrected with a little debugging. The real challenge is to adhere to the new standardized elements and names. A old template can be prone to following errors:
It contains elements that are being used with their old names.
It contains elements that are no longer in use.
It contains elements that are accepted by FotoWeb, but their functionality is not implemented.
It can be almost an impossible task to manually update the templates if you are upgrading from older FotoWeb versions. It can also be difficult to debug and verify large templates you have written yourself. FotoWeb provides a tool to automatically perform the upgrade and verification for you following the latest rules set. The tool is called 'Template Validator' and is discussed in next section.
Tip: Even if you have customized FotoWeb templates earlier, always refer to the 'FotoWeb 7.0 Tag Reference' document to make sure that you use valid elements with correct syntax.
Use the template validator on all templates every time they have been updated, modified or customized to verify their consistence and integrity. This tool analyses the templates and reports detailed error descriptions of errors found with their location and suggestions on how to correct them. It is very important to have all the templates validated before they are put into production. Incorrect templates can not only cause erroneous information to be displayed to the user, but also stop FotoWeb processing and further create undesirable and unexpected errors and situations.
Tip! Use extensive template validation on development / test systems.
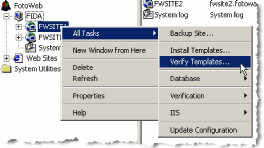
Screenshot 1: Verify templates menu.
This tool is located in each site's context menu. Selecting the 'Verify Templates' menu will launch the validation wizard.
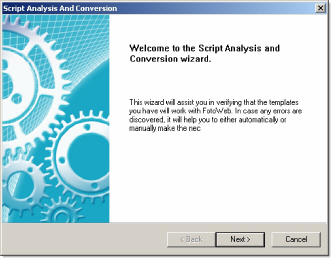
Screenshot 2: Verify templates wizard - Start page.
Click on Next button to start the wizard.
You can either select a single template or a folder with templates. The script or folder selected may be outside the Site's 'documents' folder. If that is so, then you need to specify the location of Site's 'documents' folder in the script base field.
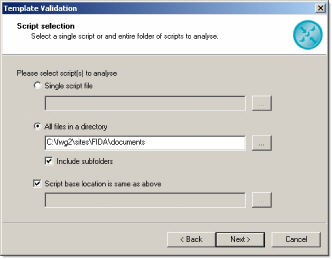
Screenshot 3: Verify templates wizard - Template selection.
The templates are validated through a set of rules. FotoWeb is shipped with a built-in rule set that is always valid for templates up to the current version of FotoWeb. An external rules file can be used, only if one is recommended and supplied from FotoWare.
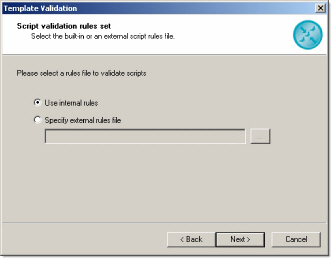
Screenshot 4: Verify templates wizard - Rule set selection.
Since template validator can modify the templates on command, it is always a good idea to create a backup of the templates before starting to work on them. This option will automatically create backup of selected templates at the specified location before doing the actual analysis.
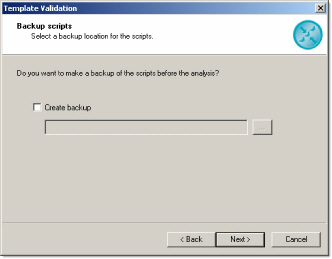
Screenshot 5: Verify templates wizard - Create backup.
Finally, click in 'Finish' to start the actual validation.
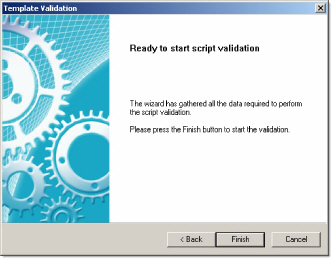
Screenshot 6: Verify templates wizard - Start validation.
A progress bar will appear displaying the status of validation.
Once the validation wizard has finished, it will launch the template validation window that displays the validation results, options to correct the errors and to re-validate the templates.
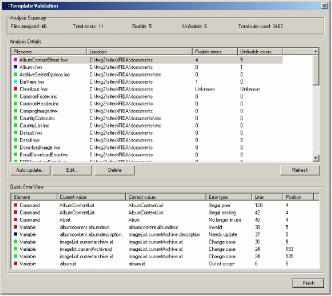
Screenshot 7: Template validation window.
The analysis summary on the top of the window displays general statistics of the analysis.
Files analyzed
Displays number of files analyzed.
Total errors
Displays total number of errors found in the files.
Fixable
Displays number of errors that can be fixed with the most simple 'Auto update' option
Unfixable
Displays number of errors that require manual editing. However, these errors can also be removed with the 'Auto update option by adding additional update flags that remove (not fix) the errors from the files.
Total rules used
Displays the number of FotoWeb script rules used to validate the files.
The 'Analysis Details' window displays all the files that are analyzed along with the error status of each file. The list also displays a color icon next to the file name to indicate the error status. The list can be sorted with respect to available columns for better information display. Once a single file is selected from the list, the 'Quick Error View' list box on the bottom lists the error occurrences in the file if any. The operation buttons 'Auto Update', 'Edit' and 'Delete' buttons are also enabled.
The types of errors reported by the 'Quick Error View' are:
Change case
The name of the tag/variable etc needs to update the case according to FotoWeb standard. This is a fixable error that can automatically be fixed with Auto Update.
Need update
The name of the tag/variable etc has become obsolete and needs to be updated. This is a fixable error that can automatically be fixed with Auto Update.
Incorrect folder reference
The “bin” folder reference has become obsolete and needs to be updated. This is a fixable error that can automatically be fixed with Auto Update.
Out of scope
The tag/variable etc is used out of scope. This is an unfixable error and must be fixed manually. The Auto Update can be used to remove this tag/variable from the template.
Invalid
The tag/variable etc is invalid. This is an unfixable error and must be fixed manually. The Auto Update can be used to remove this tag/variable from the template.
Not implemented
The tag/variable etc is valid. But not implemented in this version of FotoWeb. This is an unfixable error and must be fixed manually. The Auto Update can be used to remove this tag/variable from the template.
No longer in use
The tag/variable etc has become obsolete and will not be supported by FotoWeb any more. This is an unfixable error and must be fixed manually. The Auto Update can be used to remove this tag/variable from the template.
Illegal nesting
The tag is nested under illegal context. This is an unfixable error and must be fixed manually. The Auto Update can be used to remove this tag/variable from the template.
Illegal peer
The tag appears with another illegal peer in the same template. This is an unfixable error and must be fixed manually. The Auto Update can be used to remove this tag/variable from the template.
A template may not pass the parser at all if its FotoWeb tag structure is corrupt (e.g. unclosed contexts). In such case, FotoWeb will only attempt to report where in the template the tag structure is breaking. Once the tag structure is re-established, the template must be re-validated.
This 'Auto Update' button launches the a dialog box where more selections can be made for the auto update process. The basic function of this operation is to update the obsolete FotoWeb elements with their updated values and correct the case of element names that are not written according to the standard. It also corrects the folder references from 'bin' to 'fwbin' for the FotoWeb ISAPI modules.
In addition to this, 'Auto Update' provides four additional options that are directed toward 'unfixable' errors. These options will delete the sections of templates that contain unfixable errors along with their contexts. A single variable is simply removed from the file, leaving the surrounding structure intact. A condition is removed along with the entire if/else/endif structure it occurs in. A tag is removed along with the data, variables, conditions and/or other commands that appear under the context of the tag. It is, therefore, strongly recommended to use these additional options with extreme caution and certainly after carefully analyzing all the errors in the selected templates.
To perform auto update on multiple files, simply select multiple files in the list box before starting the operation.
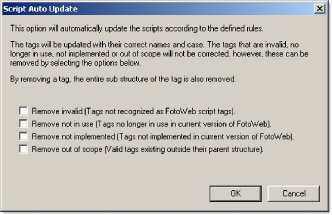
Screenshot 8: Auto update templates dialog.
The 'Edit' option launches a simple text editor with the selected template with a triple color-coding of the errors. The simple case errors are marked with green color. The errors that need an update are marked with blue and all other errors are marked with red color. The red color is a basic indication that the error should be fixed manually.
The drop down box on the top of the editor can be used to quickly navigate to the errors. By use of the drop down box, a brief description of the error is also displayed on the top of the editor.
If you have edited and saved a template in 'Edit' window, then it will automatically be re-validated when you close the editor. You can edit only one template at a time. Use the 'Edit' option to manually edit the templates or just to simply view the errors and the context they have occurred in.
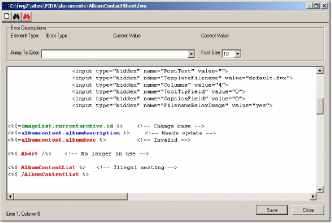
Screenshot 9: Manual edit template window.
You can delete the templates using the 'Delete' option. Multiple templates can be deleted simultaneously. This operation moves the selected files to Window's recycle bin where they can be restored.
Use 'Refresh' option to re-validate the templates. This option can be handy if you are using a third-party editor while validating the templates.
Some special cases can occur with respect to the include files where the logical structure of the including and included files is correct, but errors may be reported by the script validator. The following example illustrates such a case.
The assumed 'main.fwx' has two references of include files in the script, 'include1.inc' and 'include2.inc'. The 'include1.inc' sets some variables and conditions that are referred in 'include2.inc'. 'Include2.inc' does not have any direct reference for the variables used in the file that indicate their setting by 'include1.inc'. Thus, when 'include2.inc' is validated, 'out of scope' errors will occur every time the variables/conditions from 'include1.inc' are used.
To resolve this problem, a special include instruction is introduced that is as follows:
<!-- include-for-validation virtual="filename.extension" any other comments may follow here... -->
<!-- include-for-validation absolute="c:\filename.extension" any other comments may follow here... -->
Figure 6: Include statement for template validation.
In 'include2.inc', add one of the above strings on the first line with the reference to 'include1.inc'. This way, the validator will know that the file is using variables/conditions that are set by 'include1.inc' and no errors will be generated. Since the string is contained in HTML comments, this will not affect the normal processing of the page. However, it is important to maintain the exact structure of the string with respect to spaces etc in order to make it work.