By using Group Policy to deploy FotoWeb Desktop to network clients, you avoid having to manually install it on each and every desktop. It also gives you the possibility to install the software selectively on a number of computers. When deployed through Group Policy, the clients will typically be pre-configured to connect to the FotoWeb server so that a minimum of user intervention will be required to use the application.
In addition to the FotoWeb Desktop MSI package, itself, the clients you distribute FotoWeb Desktop to will need Visual Studio 2010 Tools for Office Runtime and .NET Framework 4 Client Profile.
The Visual Studio Tools can be extracted and prepared for Group Policy deployment in precisely the same as the FotoWeb Desktop package. However, the .NET Framework cannot be deployed with Group Policy and will have to be deployed using Windows Server Update Services.
Note: If you plan to deploy FotoWeb Desktop to client machines running a 64-bit version of Windows XP, the machine will also need .NET Framework 3.5 SP1. Make sure the system is prepped with this component before continuing with FotoWeb Desktop installation.
1. Create a distribution point. This will need to be a shared folder on a server that the clients can access to run the installer. Make sure the users who need access to this distribution point have Read privileges on the share.
2. Download the latest version of FotoWeb Desktop. It can be downloaded from http://www.fotoware.com/en/Support/UpdateCenter/ClientApplications/Windows/FotoWebDesktop70/
3. Run the setup program with the ‘/a’ startup parameter:
Example: FotoWebDesktop-7.0.452.3881-Setup.exe /a
This will unpack the files from the installer to a location you specify.
4. At the extraction point, open up the CommonAppData folder and modify the defaultSitePreferences file in a text editor or XML-compliant editor.
This file lets you set the default host name of the FotoWeb server in the <HostName> node.
You can also define a proxy type (system, user or none,) and optional proxy name, port and username and password for authentication if you choose the user option.
Save the file when you've made your choices.
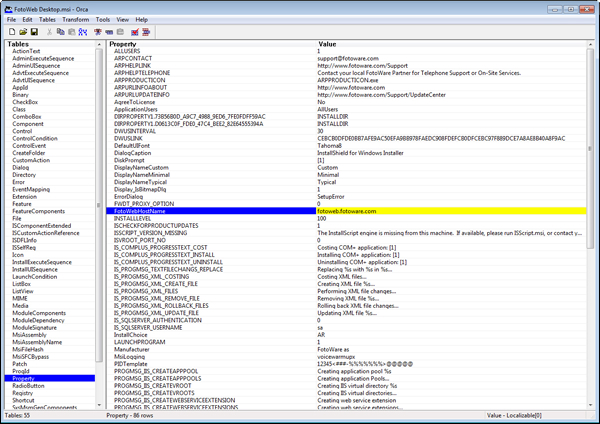
5. Using Orca (part of the Windows SDK Components for Windows Installer Developers package) or another MSI editor, change the following values in the Property table of the ‘FotoWeb Desktop.msi’ file:
FotoWebHostName: Your site name, e.g. ‘fotoweb.fotoware.com’.
FWDT_INSTALLDEFAULTPREFERENCES: Set to 1 to use the connection settings you prepared in the defaultSitePreferences file.
Note that http:// and any path information is omitted. See screenshot below:

5. Place the package on a network share that can be reached by all your clients.
6. Use Group Policy to install the package on client machines (see below)
Important note about the FotoWeb Desktop CS5 Extensions:
The Adobe CS5 Extensions are installed alongside the other components in the FotoWeb Desktop package. However, they are not enabled on the client computers, i.e. they're not added to the Adobe Extensions Manager automatically. To enable the CS5 Extensions on the client machines, you will have to manually right-click the FotoWeb Desktop tray icon and choose "Install CS5 Extensions". You may need administrative rights on the client computer to complete this task.
1. Download Visual Studio 2010 Tools for Office Runtime here. Note that there are two packages available; one for 32-bit client operating systems and one for 64-bit client operating systems. Make sure you choose the correct one.
2. Run the setup program with the ‘/a’ startup parameter:
Example: vstor40_x32.exe /a
This will unpack the files from the installer to a location you specify.
Unlike the FotoWeb Desktop package, there is no need to make changes to the Visual Stuido Tools MSI package before setting up the Group Policy.
Note: The below procedure describes configuration of the FotoWeb Desktop package, but the exact same procedure can be used when creating a deployment package for Visual Studio Tools for Office.
1. In Administrative Tools on the server, open the Group Policy Management
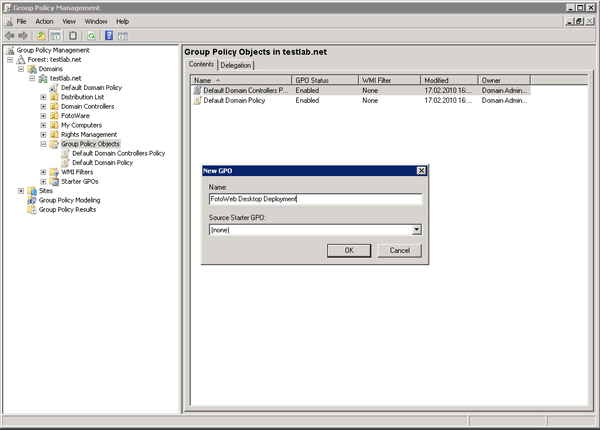
2. Right-click Group Policy Objects and click on New
3. Type in a name - e.g. FotoWeb Desktop Deployment (screenshot below)
4. Now, decide whether the policy applies to computers or users. In this example we will use Computer mode:
5. Click on the Group Policy Object you just created. In the right bottom panel, click on Add and then click on Object Types and select Computers. Then choose the domain computers the package should by distributed to. (Screenshot below)

6. Next, right-click on the GPO you just created and select Edit. This will open the Group Policy Management Editor
7. Now, expand the Computer Configuration node, then expand Policies, then the Software Settings node. (Screenshot below)

8. Right-click on Software installation and select New Package
9. Select the FotoWeb Desktop.msi file from the distribution point (the share where you stored the files expanded from the installer package).
Important: Make sure you access the file through its share path (typically \\servername\sharename)
10. Choose Assigned deployment method.
11. Highlight the Software installation node and right-click the deployment object you just created. Then select Properties
12. On the Security tab, add the groups / users that should be granted permission to install FotoWeb Desktop. (They will need read access)
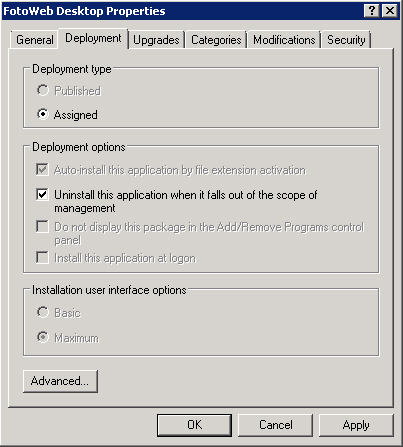
13. Go to the Deployment tab and make sure to check Uninstall this application when it falls out of the scope of management. This way, the software will be uninstalled from computers that are taken out of the management scope. (Screenshot below)
14. Finally, close the Group Policy Management Editor window. Now, it's time to link the Group Policy Object to a group of computers:
a. In the Group Policy Management window, right-click the computer or OU that you want to apply the GPO to and choose Link an Existing GPO, then choose the deployment package that you would like to distribute.

b. Now you should open the Active Directory Users and Computers program from Administrative tools and move any computers that you want to distribute the software package to, into this group. (Drag them from the Computers node into the group that you created in Group Policy Management.)
15. Force a Group Policy update:
Run gpupdate on clients to force update. This will refresh local and Active Directory-based Group Policy settings. Normally, it should not require additional options - just run gpupdate from the command prompt.
Command syntax: gpupdate [/target:{computer|user}][/force][/wait:value][/logoff][/boot]
More information can be had at http://technet.microsoft.com/en-us/library/bb490983.aspx
Note: gpupdate will run automatically roughly every 120 minutes on domain clients. Hence, the software will typically be installed on the next working day when users restart their computers.
Note: The below procedure describes configuration of the FotoWeb Desktop package, but the exact same procedure can be used when creating a deployment package for Visual Studio Tools for Office.
1. In Administrative Tools on the server, open the Group Policy Management
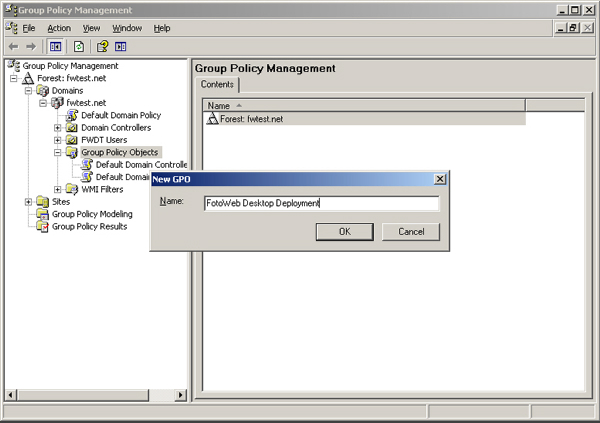
2. Right-click Group Policy Objects and click on New
3. Type in a name - e.g. FotoWeb Desktop Deployment (screenshot below)
4. Now, decide whether the policy applies to computers or users. In this example we will use Computer mode:
5. Click on the Group Policy Object you just created. In the right bottom panel, click on Add and then click on Object Types and select Computers. Then choose the domain computers the package should by distributed to. (Screenshot below)
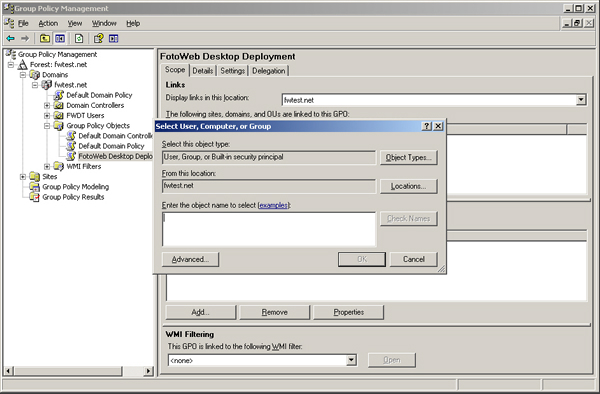
6. Next, right-click on the GPO you just created and select Edit. This will open the Group Policy Object Editor
7. Now, expand the Computer Configuration node, then expand the Software Settings node. (Screenshot below)
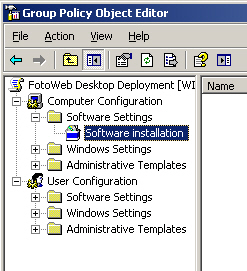
8. Right-click on Software installation and select New Package
9. Select the FotoWeb Desktop.msi file from the distribution point (the share where you stored the files expanded from the installer package).
Important: Make sure you access the file through its share path (typically \\servername\sharename)
10. Choose Assigned deployment method.
11. Highlight the Software installation node and right-click the deployment object you just created. Then select Properties
12. On the Security tab, add the groups / users that should be granted permission to install FotoWeb Desktop. (They will need read access)
13. Go to the Deployment tab and make sure to check Uninstall this application when it falls out of the scope of management. This way, the software will be uninstalled from computers that are taken out of the management scope. (Screenshot below)
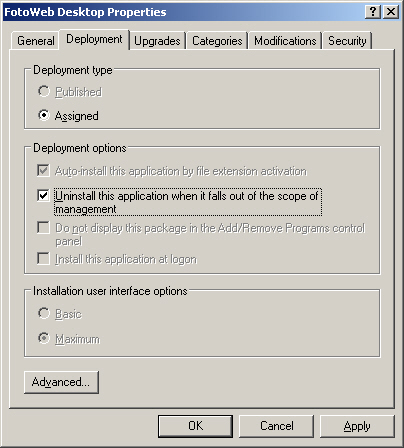
14. Finally, close the Group Policy Object Editor window. Now, it's time to link the Group Policy Object to a group of computers:
a. In the Group Policy Management window, right-click the computer or OU that you want to apply the GPO to and choose Link an Existing GPO, then choose the deployment package that you would like to distribute.

b. Now you should open the Active Directory Users and Computers program from Administrative tools and move any computers that you want to distribute the software package to, into this group. (Drag them from the Computers node into the group that you created in Group Policy Management.)
15. Force a Group Policy update:
Run gpupdate on clients to force update. This will refresh local and Active Directory-based Group Policy settings. Normally, it should not require additional options - just run gpupdate from the command prompt.
Command syntax: gpupdate [/target:{computer|user}][/force][/wait:value][/logoff][/boot]
More information can be had at http://technet.microsoft.com/en-us/library/bb490983.aspx
Note: gpupdate will run automatically roughly every 120 minutes on domain clients. Hence, the software will typically be installed on the next working day when users restart their computers.