The Metadata Configuration (MDC) is used to manage how metadata fields are configured for documents used in your organization. By using the XMP (“eXtensible Metadata Platform” – a specific XML format) standard when defining the metadata, you can create a completely custom field definition for use in your organization or build upon existing metadata fields if that is more convenient.
XMP sorts metadata fields into namespaces. The MDC configuration file contains several predefined namespaces such as the Dublin Core namespace and the Adobe Photoshop namespace. The configuration doesn’t contain all fields available for all the included namespaces; only fields that are commonly used are included. You might discover that one or more fields that are part of a namespace are not included in the configuration. These fields can then be imported, for example from an image file that contains this field. We advise you to be cautious when making changes to a schema using the MDC. If you want to add new fields to an existing namespace you must make sure that these new fields are part of that namespace’s specification.
When you are done editing the MDC file, the file must be distributed to all FotoWare products, both server and client applications. All FotoWare products in your system must be using the exact same MDC file to make sure that the products are working, writing and validating metadata in a consistent manner. See the heading Distributing the MDC File below for more information.
Open the FotoWare Metadata Configuration program. It can be found in the FotoWare program group in the start menu on the server. The window will open with the master schema file. In the left column you will see three main nodes:
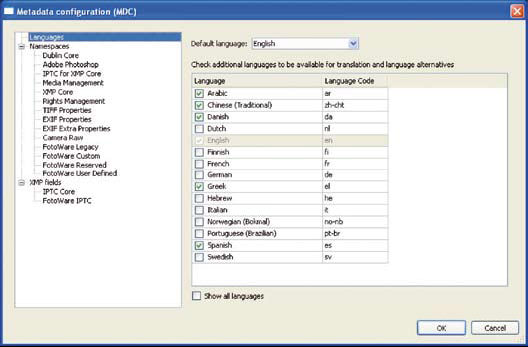
The Languages Node
The XMP specification and FotoWare’s implementation has support for multi-lingual metadata, and also built in support for multiple languages for the user interface of the metadata editors. You can localize the displayed labels and enter metadata for several different languages. If you require this functionality in your system, you should select all the languages you want to use in the Languages node. Only the most common languages are shown by default. If you would like to insert metadata for an additional language that is not on the list, select the Show all languages checkbox to view all available languages.
The Namespaces Node
Here you will find the different namespaces defined in the schema file. A namespace is a way of grouping related fields and avoid name collision between fields with identical names. You can add a namespace either by creating a totally new namespace (right-click on the Namespaces node and select Add namespace from the pop-up menu), or you can import a namespace that somebody else has created (right-click on the Namespaces node, and select Import namespace from file from the pop-up menu). Note, however, that creating a new namespace is normally done to create a new set of fields for a particular purpose. If you need to create one new field, you should create your own namespace if possible, since existing namespaces are locked per se. However, we allow you to add fields (that are missing) to existing namespaces. Make sure that the field you add conforms to the exact specification of the namespace in question. Also, if you discover that you organization needs to create a number of new fields for a use that is not covered in the included namespaces, you should create your own namespace to insert these new fields.
A namespace will often contain information about who created it and what it should be used for. The namespace is identified by a URI (often on the format http://ns.domain.com/namespace/version/). Note that the URI doesn’t have to be a valid web address, but the identifier must be unique. Use a domain name that you own when creating a new namespace. Alternatively, use purl.org to create vendor independent URIs.
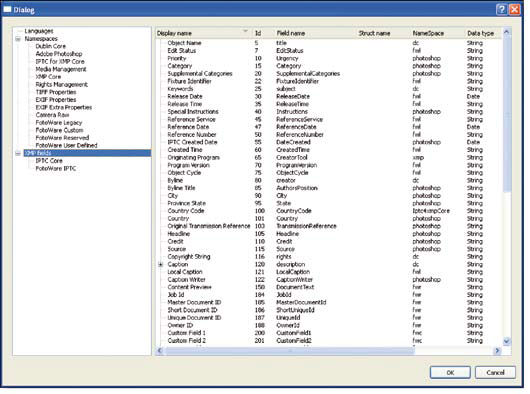
The XMP Fields Node
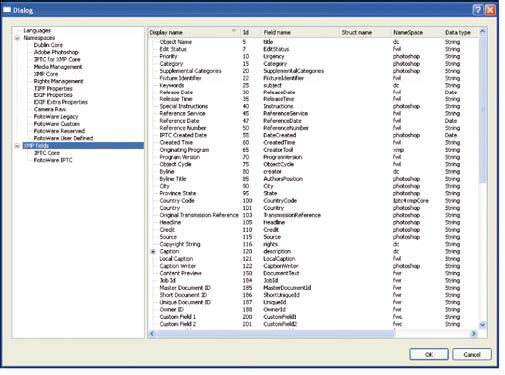
When you click on the XMP fields node, you will see a list of all the available XMP fields in the schema file. When expanding the XMP fields node you see the list of groups. Two groups (IPTC Core and FotoWare IPTC) are predefined. A group is a way of making it easier to locate fields that you need to view. The groups will appear in FotoWare applications to make it easier to find the fields you need. A group can consist of fields from multiple different namespaces, as in the case of IPTC Core. If you wish, you can create new fields and/or new groups (right-click on the XMP Fields node and select Add new field or Add new group, respectively, from the pop-up menu. Add a field to a group by selecting the field and then dragging and dropping the field into the new group.
As described earlier, it is possible both to add new fields and to edit previously created fields. Note that when editing a previously created field, you can only change some of its properties.
Add a field by right-clicking on either a namespace or the XMP fields node and selecting Add field. If you create the field from the namespace node, the namespace is automatically inserted.
Import a field from a file by right-clicking on a namespace and selecting Import field. Open a file containing XMP data. You will then see the namespaces and fields available in the file, and you are given the option to import selected fields.
Field Id Page
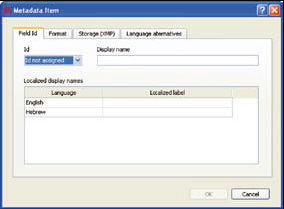
Id: This is an identification number. It is used internally in FotoWare applications for text editors, print templates, etc. When you create a new field you can choose an id number from the drop-down list. Only available (i.e. unused) id numbers will be shown in the drop-down list.
Display Name: This is the field label that will be displayed next to the field in text editors, print templates etc.
Localized Display Names: If you need to be able to localize text editors etc, make sure that the desired language is selected in the Languages node. The selected languages will appear in the left column of the Localized display names list. For each of these languages, click in the cell on the right column and enter the translation of the Display name text.
Format Page
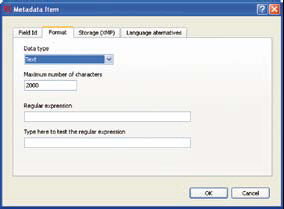
On this page the field’s format can be edited or set. The format type is used to validate field input from a text editor when you add metadata. The field format can be changed at any time, but you should be cautious when making changes to the data format, as this may be in conflict with metadata that is already stored in your files When the data type is selected, other options may also need to be set.
Data Type: Define what data type the field should be. Your choices are:
Text - This is the data type used earlier for almost all IPTC fields. Selecting this data type means that any type of text can be entered into the field. You must also choose the maximum number of characters that can be entered into this field. If desired, you can use the Regular expression field to define rules governing the type of text that can be entered into the field. This can for example be used to make sure that the text entered is a valid email address. Test the regular expression in the field below by entering something you think the regular expression should accept. The test field will be green if the text you entered is accepted and red if the text is not accepted.
Integer - Only integers (“whole numbers”) can be entered into the field if this is the data type selected. If desired, you can also enter a minimum and/or maximum number.
Real - Only numbers (integers or decimals) can be entered into the field if this is the data type selected. If desired, you can also enter a minimum and/or maximum number.
Date - Only dates can be entered into the field if this is the data type selected. The date format is defined by your system settings.
Boolean - Only the two values True or False can be entered into the field if this is the data type selected.
Storage (XMP) Page
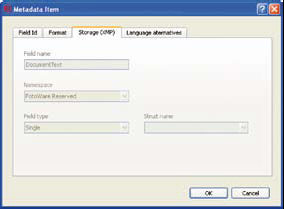
On this page you find information about where in the XMP file the field should be saved. If you are editing a previously created metadata field, you are not allowed to edit these properties and they are all disabled. If you created a new metadata field, these properties must be entered.
Field name: Enter a name for the field. This name is only used internally in the XML file, and is not visible anywhere else. The Display name found on the Field Id page is the name that will be displayed in text editors, etc. Use only letters (upper or lower case) and numbers for the Field name. The Field name may not begin with a number or contain spaces.
Namespace: Choose the namespace that this new field should be a part of. Available namespaces appear in the dropdown list. If no namespaces are available in the drop-down list you must first add a new namespace before you can add a new field.
Field type: Define what type the field should be. Your choices are:
Single: A single line of text. This is the format previously used for almost all IPTC fields. Note that the field’s length is set in the window on the Format page.
Single (struct member): Same as for Single, but this field type, together with some other fields, belongs to a group (a “structure”). An example could be a group of address information (the struct would be “address”) where the fields Street name, Street number, Zip code, City, and Country would be Single (struct member).
Sequence: This is a new field type that has not been available in FotoWare products previously. It is a repeatable field where the sequence in which the metadata is entered is saved.
Bag: This field is a repeatable field in the same way as the Sequence type, but where the order in which the metadata is entered is irrelevant. This is the same as for the existing Keywords and Supplemental category fields.
Struct name: If the field is a struct member, you must select what struct the field should be a member of. You can enter the struct name directly into the field or select from available structs shown in the drop-down list.
Language Alternatives Page
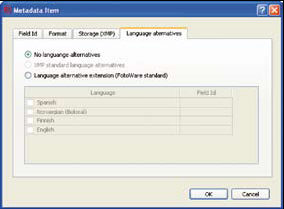
This window is used if you want to add metadata in several different languages. Note that only languages selected in the Languages node are available in this window.
No language alternative: This option is selected by default. If you are not going to translate the metadata into other languages, you don’t need any language alternatives. In this case, XMP does not store any information about which language the metadata is entered in.
XMP standard language alternative: This option is only available for editing when you are creating a new field. If metadata that is added to this new field has to be translated, you should select this option. Select the corresponding checkbox for the languages that apply, and choose the Field Id either by entering it directly or by selecting it from the drop-down list. Note that this option is not available if the Field type is Sequence or Bag. If you would like to have language alternatives for these two field types, you must select the next (Language alternative extension) option. Note that after the schema file is saved (and the FotoWare Metadata Configuration window is closed), you are not able to switch to any of the other two options. You can’t remove any previously selected languages, but you can add other languages by selecting the corresponding checkbox.
Language alternative extension (FotoWare standard): This option is FotoWare’s extension of the XMP standard. It is added because the XMP standard has some limitations when it comes to handling translation of metadata to other languages. Use this option if metadata entered in this field needs to be translated into other languages and the XMP standard language alternative option is disabled.
These are the steps needed to ensure that the display name for a field is localized when changing the language in FotoStation or FotoWeb.
1. Make sure that the language or languages you are going to translate metadata for, are enabled globally. This is done by choosing the Languages node and then selecting the language or languages that apply.
2. Locate the field you would like to change display name for. This can be done either in the Namespaces node or in the XMP fields node. Since clicking on the XMP fields node shows all available fields, it may be easiest to find the desired field here.
3. Open the field’s properties by double-clicking on the field. Make sure that the Field Id page is opened. In the Display name field, enter the new field name. If you would also like to change the displayed field name for one or more languages this must be done in the Localized display names list. Simply click inside the field on the right-hand side of the list and enter the new translation.
These are the steps needed to prepare a field for multilanguage use.
Locate the field for which you would like enable multilanguage support. This can be done either in the Namespaces node or in the XMP fields node. Since clicking on the XMP fields node shows all available fields, it may be easiest to find the desired field here. (Make sure that the language or languages you are going to translate metadata for, are enabled globally.)
Open the field’s properties by double-clicking on the field. Then click on the Language alternatives tab. Select the XMP standard language alternatives if this option is available. If the option is disabled, select the Language alternative extension (FotoWare standard) option.
Select the checkboxes next to the languages that you would like to enable multilanguage options for.
Choose a Field Id for each of these languages. These number ids are used as identifiers in the text editor.
Create a text editor (in FotoStation, this is done in the Dialog builder part of the FotoStation configuration) that includes the correct field id (if you are preparing translation to only one additional language) or field ids (if you are preparing translation to more than one language). You should now be able to add localized metadata to the selected field. If you are going to add localized metadata to several languages, these steps must be repeated for each field.
When you are done editing the MDC file, the file must be distributed to all FotoWare products, i.e. FotoStation, FotoWeb, Index Manager, and Color Factory. If the correct and updated file is not imported in all programs, part of information added to a file may not be available. You may for example discover that even if you added metadata in both English and German to the Caption field (by creating a new localized field), Index Manager won’t give you any hits on the German metadata. Distribute the MDC file by exporting it and then importing the file in all the FotoWare products available in you organization. If you need to share files with someone outside your organization that uses FotoWare products, the MDC should also be distributed to these persons by performing an export of your MDC. Exporting the MDC will ensure that the recipient cannot change the definition of fields that you have defined. If your organization needs to import the MDC file to several FotoStations, we recommend using a server-based configuration, which makes it possible for an administrator to configure the MDC and store it on the server for deployment to all FotoStation clients in the network.