The Service Options page lets you configure the server's name and set the account that Index Manager runs under when indexing files and processing searches. It also allows you to set an optimization schedule. Some of these settings may have been configured during the initial program installation, but it may be a good idea to verify that they're set correctly.
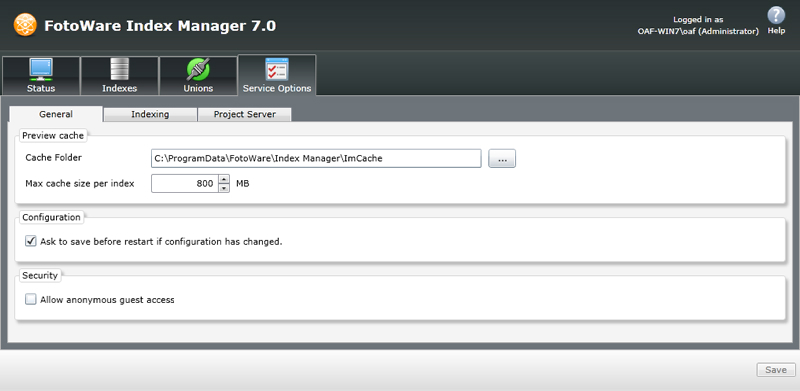
Cache Folder
Index Manager creates and stores a low-resolution copy of the thumbnails and previews that it serves to the clients. This helps speed up the system since the server does not need to generate a new thumbnail and preview the next time a client requests a file that is in the cache. Caching is a major factor in optimizing system performance, and a large cache stored on a fast, local drive (with a large disk cache as well) is the key to building a responsive, high-performance FotoWare system.
If you would like to change the default cache folder, click on the Browse button (...) and locate another folder.
Max cache size per index: This setting controls the maximum size of each index cache in megabytes. The cache can grow larger than the limit set here on a daily basis, but it will be reduced to the set size during the scheduled index optimization at which point the oldest cached items will be removed. Since caching is so crucial to maintaining solid system performance, you should consider storing the cache folder on a disk with much available space to allow the cache to expand.
When choosing a cache folder you should consider the following:
The cache folder should be placed on the fastest possible local disk, with plenty of available space to limit file fragmentation. Thumbnails generated by Index Manager occupy some 10-15Kb each, while each preview typically occupies 100-150Kb.
The Index Manager process account set in the Operations Center must have access to read and write to the folder you choose as your cache folder.
As explained above, the index cache may grow beyond the size limit that you set in the configuration but will be reduced during index optimization. Keep this in mind when choosing a cache drive.
When Index Manager creates thumbnails and previews for the image cache, it will honor the ICC profile that is present in the file. However, if the image does not have an embedded ICC profile, Index Manager will assume that the picture should be rendered with sRGB. This will have a negative impact on the thumbnail quality if the pictures are indeed in Adobe RGB even if they are not tagged with that profile.
Configuration
Ask to save before restart if configuration has changed: If changes have been made to the configuration and you try to restart the Index Manager Service, you will be notified and asked if you want to save the changes before restarting the service.
Security
Allow anonymous guest access: If you would like to give non-authenticated users access to the server archives, that can be enabled here. This will give anonymous users access to all file operations that are controlled by Index Manager (such as browsing, searching and editing of metadata) but not to file-specific operations, such as editing images etc that are beyond Index Manager's control.
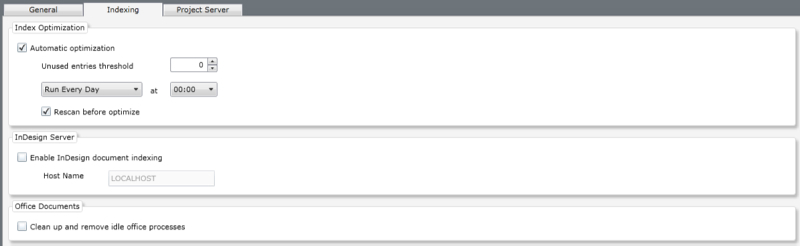
Index Optimization
Index optimization is a process which defragments the index to make it smaller and faster to search in. Fragmentation occurs in two ways:
1. When new files are added to the index, the new information is appended to the index files to avoid having to rewrite the index completely, and will cause fragmentation.
2. When files are updated or removed from the archive, the corresponding index entries are marked as unused causing fragmentation.
Although a FotoWare Operator or Administrator can perform index optimization through the FotoWare Operations Center, you can also enable automatic optimization of the indexes on the server. In this case you need to set a threshold, i.e. the number of unused index entries that much be reached before index optimization occurs. Keep in mind though, that because of point 1 above, an index can in fact be fragmented even though there may not be any unused entries in the index. This should be taken into account when setting an index optimization schedule.
Index Manager determines whether an optimize should be run based on the time you set for optimization and the unused threshold setting. At the given time it will check to see if the unused entries threshold has been exceeded and, if that is the case, run optimization. After optimization, the defragmented index is backed up as a safety measure to make it possible to restore an earlier index state in the event of a system failure.
Enable this option to set a schedule for automatically optmizing the index.
Unused entries threshold: Specify the number of index entries that must be marked as unused before the optimization should run. Keep in mind that an index may well be fragmented even if there are few unused entries in the index. (See point 1 above.) Hence, if you would like the index to optimize every day, you should set the threshold to zero and se the time as described below.
Time to run optimize: Set the time to run the optimization here. Choose which days you should optimize and the time at which optimization should occur.
Rescan folders before optimize: It's usually a good idea to enable this option as it forces Index Manager to scan through all the attached document folders and locate any files that may not have been added to the index. This way you can be sure that all files in the document stores are readily available for searches.
InDesign Server
This function makes Index Manager take advantage of a separate InDesign Server to perform content indexing and generate thumbnails and browseable previews for InDesign documents.
Read more about how to configure this functionality here.
Office Documents
When indexing of Microsoft Word or Powerpoint documents fails, Index Manager will keep on working but there may be an orphaned winword.exe / powerpnt.exe process running on the system. If several errors occur, there could be a number of these stray processes consuming resources on the server. If you have seen such behavior on your Index Manager server, you may wish to switch on the setting called Clean up and remove idle office processes. This way, Index Manager will monitor the idle office processes and terminate any processes that have failed to do so themselves after a reasonable amount of time.
If your archives do not contain office documents, you can leave this setting switched off.
Important: Switching on this functionality makes it impossible to use Word and Powerpoint for anything but office file indexing. You will not be able to use the programs to edit documents while Index Manager is running, since Index Manager will terminate office processes continuously.
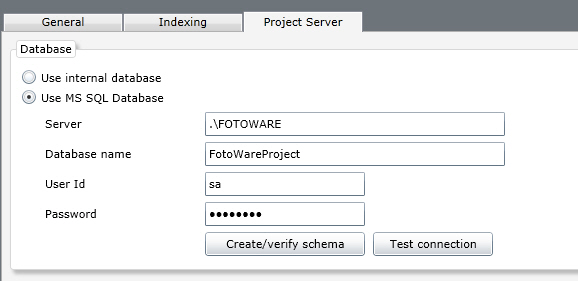
On the Project server page you find a configuration interface for the Project Server, which can be used to host shared FotoStation Projects on a database server in your network.
Index Manager can either use an internal database, or you can create a database on an existing Microsoft SQL server in your network if you prefer to do so.
The default setting is to use the internal database, but if you have upgraded from a previous version of Index Manager where an external database was used, that database will still be used after the upgrade.
If you choose to use a separate Microsoft SQL server, you will first have to create a blank, new database in a database utility such as Microsoft SQL Server Management studio and then fill in the required information in the Index Manager configuration to connect to that server:
Server: Specify the server in this field. Start with a period (.) to indicate a SQL database on the local host.
Database name: Specify the name of the databse that you created on your SQL server. Index Manager will configure the tables for you when you save your settings using the Save button at the bottom of the page.
User Id / Password: Type in the ID that should be used to access the database. This user will need read and write access to the database.
Having entered the necessary database information, you click on the Create/verify schema button. This will create the required tables in the database. Before the tables can be created, you will be prompted to fill in the username and password of a user with the permissions to do so. (For example the database sa user. Talk to your SQL server administrator if you do not have the correct credentials.) If you would like to validate the User Id and Password and whether the tables have been successfully created in the database, click on the Test connection button.
Note: Make sure you save the changes using the Save button at the bottom of the screen to update your changes.