When you create an index, you basically create an archive that FotoStation or FotoWeb can connect to. An index can contain files from a number of different sources or folders so that users may access the archive as if it were a single entity.
The term "Index" is much used throughout this manual and may have more than one reference. An explanation of the concept is therefore in place.
In its simplest form, the term "Index" refers to the folder in which Index Manager stores the files that contain searchable metadata that is extracted from files in the associated document areas. However, most of the time in this manual you will find that the term refers to the folder with the actual index and the attached document folders as a collective unit. In other words, it is used about what a FotoStation of FotoWeb user would typically refer to as an Archive. Although the context will often reveal which of the two we are referring to, we will make an effort to clarify the distinction when that is called for.
Everything related to creating and configuring indexes is done on the Indexes tab in the configuration window.
To create an index, go to the Indexes tab on the Index Manager configuration screen and click on New Index in the left side panel (The green Plus icon in the lower left corner.) The index properties are then configured on a number of associated pages, namely General, Document Folders, Access list, Filters, Fields and Advanced.
If you like you can also group collections of indexes by creating a group and dragging an index into the new group.
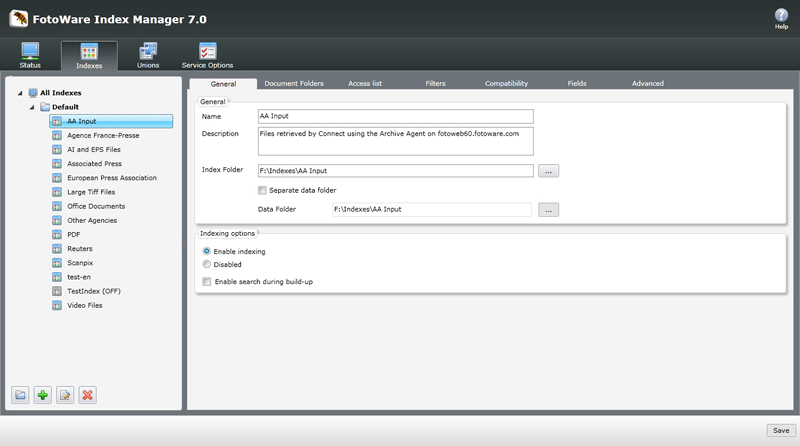
On the General tab you set the basic properties pertaining to the new index you are creating.
Name: Type a name for the index in this field. This name will be shown when connecting to the archive in FotoStation and FotoWeb.
Description: The Description field can be used to add additional information about the archive.
Index Folder: Here you choose the location of the folder where the index should be stored. It should be stored on a fast, local disk with a large cache, since Index Manager will access this folder extensively when processing searches.
Separate data folder: The index data folder is a subfolder inside the index folder where Index Manager stores all the information that is uses to process a search. Hence, the data folder should always be stored on the fastest possible local disk with a large cache. Normally the index folder and the index data folder are in the same location, but if you for instance upgrade your system with a larger, faster disk you can move the index data folder out to the new drive to improve performance without having to completely reconfigure your indexes. Note that this functionality is typically only useful when you require FotoStation 6.0 access to the archives, since the 6.0 clients require index folder access through a share. With version 7.0 clients working over IP, this is less of an issue, since you do not rely on placing the index folder on a share in the first place.
Enable search during build-up: If your clients need access to search the archives while it is being indexed, enable this option. Note, however, that this will slow down the indexing process somewhat.
Adding Document Folders to the Index

In the Document Folders area you add the folders that contain the files that you want to index. Several document folders can be added to an index and be set to include subfolders. You can also set up Windows share paths (UNC-based) and Macintosh volume mappings to enable network clients to access the high-resolution files, for instance to open them in third-party applications from FotoStation.
Fill in the path to the document folder at the top of the screen in the Document folder area using the regular file path (e.g. C:\Archive\Pictures) or use the Browse button (...) to locate it. Then fill in the Windows Share path and the Macintosh Volume name if access to the high-resolution files is required.
To add a new document folder, click on the Add new folder link at the bottom of the window.
The Unique name column lets you type in a description of the folder you are adding to make it easier to tell the different folders apart.
IMPORTANT: The maximum full path length for a file 225 bytes including folder path, file name and extension. In some languages a character is composed of several bytes and this will affect the number of characters a full path can have. If the path becomes too long, Index Manager will not index these files but rather log the event as "Path too long" with a reference to the files that could not be indexed to allow you to correct the issue.
Each time you add or edit a document folder, a number of options become available just below the area where you type in the path information. The options you can choose from are:
Include subfolders: If the document folder contains subfolders with files that you also want to add to the index, you must choose to include subfolders. Index Manager will then scan through and monitor all subfolders within the top level document folder.
Enable background scanning: When you enable background scanning Index Manager will check all file folders for changes at regular intervals. If it finds that the modification date of a folder has changed it will scan the files in that folder and update the changes in the index.
Background scanning increases the network traffic if the document folders are on another server than Index Manager, and is generally intended for non-NTFS file systems where there is no support for the NTFS hotfolder system which automatically notifies Index Manager of file changes. Also note that Index Manager 7.0 performs many of the file operations that in previous versions were left for the clients to handle, which means it will automatically update the indexes upon modification of the files.
Scan unchanged folders: This option is related to the background scanning option above. It will force Index Manager to scan the contents of the document folders at regular intervals even if the folder's modification date is not changed. This is typically required when indexing files on certain Unix disk systems where modification of a file in a folder does not change the folder's modification date. Enabling this function will increase the amount of scanning performed and may reduce system performance.

On the Access list tab you can determine which users are allowed access to the index. The default setting is to Allow everyone access. However, if you would like specify access you can do so by selecting the Specify access option and clicking on the Add button at the bottom of the screen. This will bring up a window that lets you search for users and/or groups and give them access. You can type in the complete or part of the user name or group name and click on Search to locate the entry you're looking for.
The type of authentication, whether local Active Directory-based, is determined by the choice you've made on the Server Settings tab in the Operations Center. Please refer to the Operations Center documentation to learn more.
Note that restricting access to an index in Index Manager does not eliminate the possibility that a FotoStation configuration can in fact contain a shortcut to the archive. If a user without access tries to connect to the indexed archive, he will simply get a message stating that access to the archive is denied.
Configuring Index File name Filters and Search Filters
Filters are used to specify which files in the document folders you wish to include or exclude. There are two types of filters available: File name filters and Search filters. They are configured on the Filters page when setting up an index.
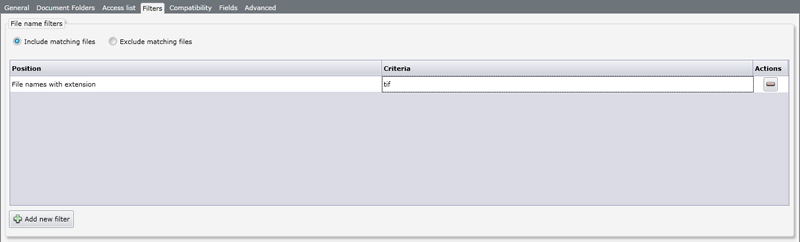
File name filters are used to include or exclude certain files based on their filename and/or extension. You can choose to either include or exclude files based on the specified criteria, but you cannot make a combination query of include and exclude conditions. Choose Include matching files or Exclude matching files using the radio buttons at the top, then use the dropdown lists to choose the criteria and the Criteria field to fill in the parts of the file name the filter has to match.
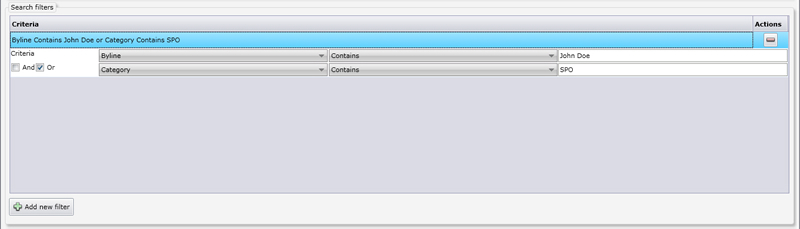
A search filter can replace an autosearch archive in FotoStation or FotoWeb. Search filtering is more effective than an autosearch when the number of files in the index is large (10.000 – 20.000 files or more) since it implies that the client will not perform a search every time it accesses the archive. However, when specifying a search filter the index will take longer to build since Index Manager has to extract metadata and match it with the specified criteria for every single file in the archive during index buildup.
To set your search criteria, start by selecting a metadata field in the dropdown list, choose whether the field Contains, Does not contain, Is empty or Is not empty and specify an additional string if applicable. You can add additional search criteria by clicking on the Add new filter link.
Choosing Fields to Exclude, Index as Empty and Datamine as string
The Fields page lets you choose specific fields to exclude from the index or to index certain fields as empty.
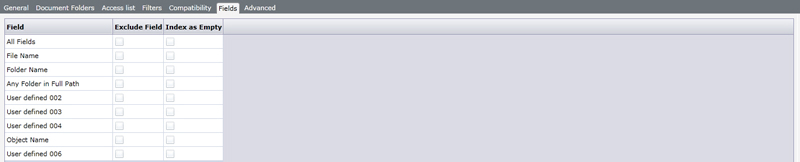
If files in your archives contain sensitive information that you want to make unsearchable, or if certain fields in your files contain excess information that causes client searches to generate too many irrelevant hits you may want set specify that these fields should not be indexed. Note that although this makes it impossible to search for the information in the file in Index Manager, it does not imply that the information is not available and editable in the file. For instance, it will be possible to retrieve the file and, given that the metadata editor allows, extract and edit the content. Hence, if your files contains sensitive information that should not be disclosed under any circumstances you should make sure only certain users have access to the archives in question.
There are two ways of selecting which fields should be excluded from the index. You can select each field that should be excluded one by one, or, if you would like to exclude almost all fields, you can right-click in the Exclude field list and choose Select All, and then deselect the fields you would like to include in the index. Note that if you choose to exclude all fields no metadata fields will be indexed. By doing so only file information (file path, file name, file size, and file type) will be indexed.
In many archives metadata is only entered in certain fields, leaving most fields empty. When configured to index certain empty fields, Index Manager creates an entry in the index called xnoword for these fields, allowing users to search for empty fields using this string. This can be a good way to reduce the size of the index and thus speed up searching in very large archives.
To allow indexing of fields as empty, simply add a checkmark by the field name. By right-clicking inside the column you can choose to select the Most Common Fields or All Standard Fields.
Most Common Fields comprise Object name, Category, Supplemental Category, Keywords, Special instructions, Created date, Byline, City, Country, Headline, Credit, Caption, Local Caption, Unique Document ID, and Document Notes.
All Standard fields includes all the most common fields in addition to Priority, Release Date, Release Time, Created Time, Byline Title, Province State, Source, and Copyright String.
By default, data mining of a field extracts all the words from the string so that each word can be filtered out separately in the data mining tables in FotoWeb and FotoStation. However, there may be some fields for which you would prefer "string" datamining. City names, such as New York, for example, would generate separate entries for 'New' and 'York', where 'York' could potentially coincide with the city of York (England) and New might coincide with New Mexico, thus producing inaccurate data mining results. For such fields consisting of more than one word where the whole entry should be construed as an entity you can enable 'Datamining as a string' to show the entire string in the data mining tables.
Configuring Additional Indexing Options
On the Advanced page you find additional settings for the index.
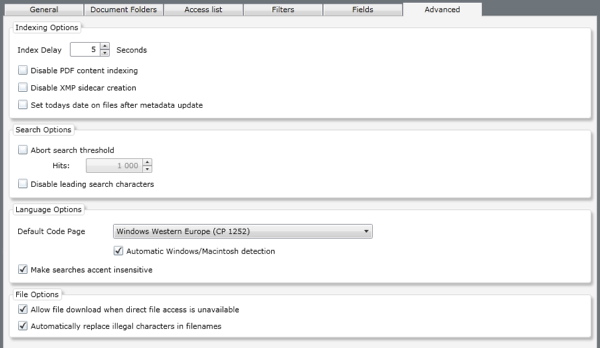
Index Delay: The Index Delay setting controls the number of seconds Index Manager waits from the time a file changes until it re-indexes that file. In an archive with much I/O it may be a good idea to increase the default setting of three seconds somewhat to avoid constantly rewriting of the index. Decreasing the delay will create more index fragmentation (and result in longer search time) while increasing it will extend the time before file changes are visible and searchable.
Disable document content indexing: By default, Index Manager will add both metadata and document content to the index. However, if you do not want to index document content, simply select this checkbox. XMP metadata (whether embedded or in a sidecar file) will still be indexed and searchable.
Disable XMP sidecar creation: Normally when indexing documents, Index Manager stores document in XMP either embedded in the file or in a sidecar file. This makes it possible to read out the document content in the FotoStation view templates and when hovering the mouse pointer over a thumbnail in FotoWeb. If you do not want Index Manager to write this information back, you should choose to disable XMP sidecar creation. The content will still be indexed and searchable, but FotoStation / FotoWeb will not be able to extract and display the document content.
Set today's date on files after metadata update: Normally, Index Manager updates the metadata in a file, it does not alter the file's modification date. However, if you do indeed want Index Manager to do this, you can enable this options. All updates files will then be stamped with the modification date corresponding to the time the metadata is updated.
Abort search threshold: This setting makes it possible to force Index Manager to abort a search that produces a very large number of hits, for example if a user performs a very general search. To use this option, enable the Abort search threshold and set the maximum number of hits Index Manager can produce before the search is cut off. Index Manager will return the files found to the client, but there is no guarantee that the files found are the latest or most relevant ones.
Disable leading search characters: Search strings that begin with a wildcard (#, * and ?) often result in very long search times. These characters have special meaning when preceding a search word. By disabling leading search characters with this option, any search that starts with any of the wildcards will be ignored and return zero hits. For a reference of the meaning of search wildcards, refer to the wildcards section in the search chapter.
Default code page: The code page setting determines the codepage Index Manager uses when interpreting metadata in IPTC format. Since IPTC can be stored in a number of different code page formats, it is important that you get the codepage setting correct. For systems set up for use in Western Europe and the USA, you can generally set the codepage to Windows Western Europe or Macintosh Western Europe and turn on automatic detection of Windows or Macintosh input.
Note that if your archive contains strictly XMP metadata, the code page setting does not come into play. XMP metadata is stored in Unicode which makes character set translation obsolete. If you want to make sure your entire archive is converted to XMP metadata you can contact FotoWare and ask for information about the Archive Converter application, which is designed to convert entire archives from IPTC to XMP metadata.
Important - How Index Manager indexes filenames:
When Index Manager indexes filenames, they are interpreted using the codepage you have selected in the Regional Settings Control Panel in Windows. Characters A-Z are always read correctly, but if you plan to index files with e.g. Cyrillic or Greek characters in the filename, you will need to make sure that you have selected that character set as Windows' default codepage.
Make searches accent insensitive: When Index Manager builds an index, it is by default accent-aware. This way, users can search for accented characters as well as unaccented ones, and Index Manager will distinguish between them. By ticking this checkbox, however, Index Manager will ignore accents when indexing and treat them as regular unaccented characters. Thus it will be possible for a French user, for example, to search both for précipité and precipite and return all hits with or without the accents.
A note to Scandinavian users: The special Scandinavian characters æ, ä, ø, ö and å are treated as accented versions of a and o. Hence, when searching in archives with Scandinavian metadata, it makes sense to retain accent sensivity (by not selecting the checkbox in question).
Important: Changing this setting requires a complete rebuild of the index since it controls how Index Manager interprets the files' metadata at the time when the index is built.
Allow file download when direct file access is unavailable: To allow clients to download files from the archive even if no Windows share has been created for the high-resolution files, tick this box. This will allow clients to download and process the files using FotoStation actions.
This setting has some limitations that you must be aware of:
Even with this option enabled, you may not open the file in Edit mode unless you first use an action to copy it to a locally accessible disk. Also, file rename operations will not work since they require a Windows networking connection (SMB) to the share with the high-res file.
To process files in the archive through a FotoStation action, the action chain has to start with one of these sub actions:
Copy File
Save File*
FTP Upload
HTTP Upload
Email Send
Launch Application
Write CD/DVD
* The Save File sub action is only valid if you do NOT choose to store the file back to its original location. You will have to store it on an available local or network volume before you can apply additional processing to the file.
Automatically replace illegal characters in filename: If your system contains files from non-Windows systems that contain characters that Windows does not recognize, you can have Index Manager automatically rename those files to comply with Windows naming conventions. In practise, Index Manager will map all illegal characters to an underscore (_) to maintain naming consistency.
Enabling or disabling an index
When you have created an index, you may notice that the index is marked as [OFF] in the list of indexes. You must go to the General tab under Indexes and click on the Play icon under Actions to enable it. Otherwise, even if you start the indexing service, this index will not be initialized. When an index is enabled, the Play icon changes to a Pause icon that lets you disable the index.
To delete an index, select it in the list and go to the General tab. Then click on the X button under Actions to remove it. You will be asked to confirm deletion of the index.