This is a file operation sub action, i.e. it can only apply the text macro/template for files stored on the computer. This means that if you have used an image processing sub action before using this sub action, you must use one of the two save sub actions before you use the Apply text macro/template sub action.
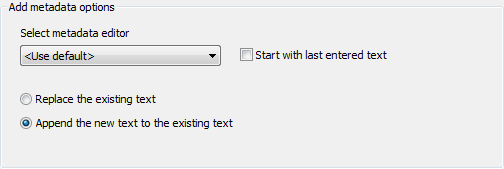
This sub action is used when you want to apply metadata to individual files that are processed in an action. For every file send to the action, FotoStation will open the metadata editor that you have preset in the action and let you tag the picture with metadata. This sub action also lets you control whether the text you apply should be appended to existing text or overwrite existing metadata in the fields you are editing.
You can also configure the action so that it remembers the last text you typed in the editor to make it easy to add that text to additional files that are processed in the action.
Tip: If you would like to add a template or a macro to a number of files without any user input, you may want to use the Apply Text Macro/Template sub action instead.
This is an image processing sub action which must be followed by a save sub action. Note that you can create chains of sub actions that require a save sub action before you use one of the two save sub actions (Save file sub action or File format sub action) at the very end of the chain.
This sub action is used to perform the actual cropping of an image that has previously been soft-cropped. If an image without a soft crop frame is dropped on an action that involves applying a soft crop, the image is simply copied to the folder specified in the Save file field or to the system’s temporary folder if you are using the File format sub action.
Apply Soft Crop Options
The soft crop sub action has only one option: you can choose to display a window where the soft crop frame can be adjusted and you may set related options before the actual processing takes place. To enable this functionality, select the Always open crop window checkbox.
Sequence considerations
As with all image processing sub actions, you must be careful when specifying the order in which the sub actions should be performed. This is especially important for the Apply soft crop sub action. This sub action should be performed before all other image processing sub actions.
If you select the Always open crop window checkbox, the error message below will be displayed if any image processing sub actions are performed before the Apply soft crop sub action. When this error message occurs, the action in question can’t be performed and is terminated.
This is a file operation sub action, i.e. it can only apply the text macro/template for files stored on the computer. This means that if you have used an image processing sub action before using this sub action, you must use one of the two save sub actions before you use the Apply text macro/template sub action.
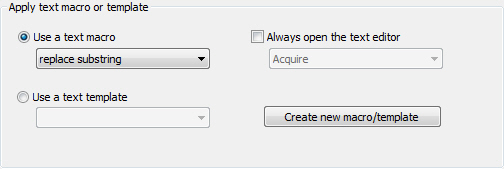
This sub action is used to change the metadata for one or more files. Choose if you would like to use a text macro to insert the text (select the Use a text macro radio button), or if you would like to use a text template (select the Use a text template radio button). Select the macro or template from the dropdown list found underneath the radio button.
Note the difference between a text macro and a text template. A text template is static in the sense that its content is added to empty fields, and that fields containing text are overwritten. Text macros however, can be customized to add text in almost any way you like. Using a macro you can for example overwrite the contents of certain fields, append text to other fields, and clear yet other fields in a single operation.
If you can’t find a macro or template that suits your needs, you can create one from the button shown in the screenshot above. (This button is available in Windows only. On the Mac you have to create templates and macros from within the text editor. See the Text editor topic for more details.) Start by selecting the radio button for either a text macro or a text template. Then, click on the Create new macro/template button, and create a text macro (or text template). After the new macro or template has been created, select it from the dropdown list.
Open the Text Editor (Windows Only): If you would like to open the text editor after the macro/template has been applied (either to simply view what was done to the metadata or to make more changes), select the Always open the text editor checkbox, and then select the appropriate text editor from the dropdown list.
Saving the File
This sub action is a file operating sub action. If you perform this sub action immediately after an image processing sub action, you must end the sequence with a save sub action.
This is a file operation sub action, i.e. it can only apply the text macro/template for files stored on the computer. This means that if you have used an image processing sub action before using this sub action, you must use one of the two save sub actions before you use the Apply text macro/template sub action.
This sub action makes it possible to attach a usage rights license from Creative Commons or Plus to your pictures. The use of this functionality is described in detail in the Rights Management topic.
This is an image processing sub action, i.e. it must be followed by a save sub action. Note that you can create chains of image processing sub actions before you use one of the two save sub actions (Save file sub action or File format sub action) at the very end of the chain.
This sub action is used to automatically adjust the black and white point in an image. This is a way of adjusting an image’s contrast by redefining the darkest and the lightest color in an image. If you are familiar with “Autolevels” in Adobe Photoshop®, it might be nice to know that FotoStation’s Auto levels sub action works in exactly the same way.
The default setting is that 0.5% of the darkest and lightest areas is ignored when adjusting the levels. You may change this by adjusting the Black clip and White clip values.
Preserve Color Balance: To avoid distorting the color balance of images when using the Auto Levels sub action, you can select this checkbox. By doing so, FotoStation will adjust the levels of all color channels equally. This function will preserve any existing color cast in the image.
This is a file operation sub action, i.e. it can only change the IPTC character set for images stored on the computer. This means that if you have used an image processing sub action before using this sub action, you must use one of the two save sub actions before you use the Change IPTC character set (codepage) sub action.
This sub action is used when you would like to change the IPTC character set used when storing IPTC metadata in files. Since FotoStation will automatically detect (and display correctly) what character set (codepage) was used when metadata was originally added to the file, this sub action is normally used if the metadata should be viewed by other applications.
Please note that this sub action will only apply to metadata saved as IPTC, not XMP, since XMP saves metadata as Unicode (UTF-8).
Character Set/Codepage Options
This sub action has only one option: The character set that files processed using this sub action should be converted to. Select the desired codepage from the dropdown list.
Please note the following: Normally, FotoStation will automatically detect the original codepage of the files being processed. The detected codepage will be converted via Unicode to the codepage you select in the dropdown list.
If FotoStation cannot correctly identify the file’s original codepage, the codepage settings in the Metadata section of FotoStation’s configuration dialog is used. (The codepage set in Default character set translation used for reading IPTC text is used to read the text from the file, and the codepage set in Default character set used for saving IPTC text is used as the codepage used when storing text.)
If the codepage conversion results in errors, i.e. garbled text or illegal characters, FotoStation will not convert that file’s codepage but rather leave the original codepage unchanged.
This is a file operating sub action, i.e. it can only check the quality of images stored on the computer. This means that if you have used an image processing sub action before running this sub action, you must use one of the two save sub actions before you use the Check quality value sub action.
This sub action is used to automatically check the quality of one or more images. It basically checks to see if there is sufficient data in the image to save or print it in the chosen resolution.
Quality Check Options
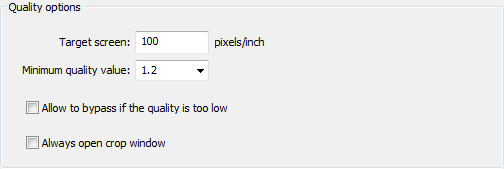
Set the Target screen resolution and the Minimum quality value. If the image’s quality value is too low, a warning message will appear as described later in this topic.
Allow to Bypass if the Quality is too Low: If you would like the users to be able to continue with the action even if the quality value is too low, you should select the checkbox Allow to bypass if the quality is too low.
Note that if there is a small chance that you might need to bypass this sub action, make sure that you select the Allow to bypass if the quality is too low checkbox. If not, you might discover that you have to abort the entire action because you are not able to increase the quality value.
Always Open Crop Window: If you want FotoStation to always open the Crop window, allowing you to adjust the image size and check the quality manually each time the action is accessed, select the Always open crop window checkbox.
When the Image Quality Value is too Low: If the quality requirements set in the Action properties window are not met in a file being processed by the action, a warning message will appear. Which warning appears and what options are available will vary depending on the properties set for this sub action.
If the Allow to bypass if the quality is too low option has not been selected, the warning will have two buttons:
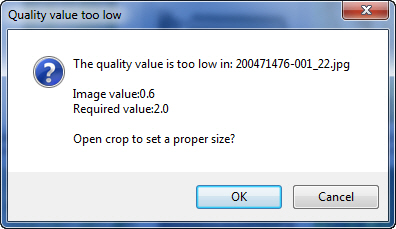
If you click on the OK button, the Crop dialog will open and you are given the opportunity to increase the image’s quality value. Clicking on the Cancel button will abort the entire action.
If the Allow to bypass if the quality is too low checkbox has been selected, the warning will look like this:
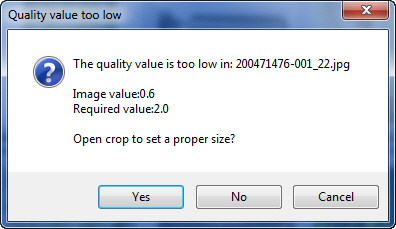
The Yes button will open the Crop dialog and the Cancel button will abort the entire action. If you, however, click on the No button, this sub action is simply bypassed and the remaining sub actions are performed.
This is a file operation sub action, i.e. it can only check to see if the required text has been entered into files stored on the computer. This means that if you have used an image processing sub action before running this sub action, you must use one of the two save sub actions before you use the Check required text fields sub action.
This sub action is used to check if text has been entered into one or more specified metadata field(s). It may for instance be used before an image is archived to make sure that information has been added to selected fields. This is necessary if you at a later state would like to search for metadata that has been entered into this field.
Note that FotoStation only checks to see if a field is empty or not. To make sure that information is entered according to your organization’s specifications, you should define Quicklists in the text editor so that you may enter correct predefined text in important fields such as the Copyright and Byline fields.
Check Required Fields Options
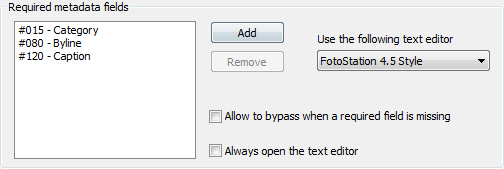
Click on the Add button to select the fields you would like FotoStation to check. In the window that appears, double-click on the field you want to make sure is not empty. You can select several fields by holding down the Ctrl key while clicking on the desired fields in the list. When you are done, click on the OK button to add these fields to the Required fields list.
If you would like to remove a field from the Required fields list, select the field and then click on the Remove button.
From the dropdown list, choose the text editor that should open if you need to insert metadata into the required text fields. It is important that you choose an editor that contains the fields required, otherwise you may not be able to add the required text to the files and the whole action may stall.
Allow to Bypass if a Required Field is Missing: If you would like the users to be able to continue with the action even if one or more required fields are empty, you should select this checkbox.
Note that if there is a small chance that you might need to bypass this sub action, make sure that you select the Allow users to bypass when a required filed is missing checkbox. If not, you might discover that you have to abort the entire action because you can’t or won’t add metadata to the required fields.
Always Open the Text Editor: If you want FotoStation to always open the text editor, allowing you to edit the field content manually each time the action is accessed, select the Always open the text editor checkbox.
When one or more Required Fields are Empty: If one or more of the required fields set in the Action properties window are empty in a file being processed by the action, a warning message will appear. Which warning appears and what options are available will vary depending on the properties set for this sub action.
If the Always open the text editor option has been selected, the warning will only have one button:
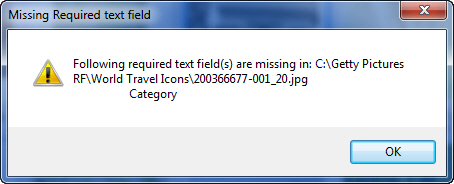
When you click on the OK button, the text editor will open and the required field(s) will be highlighted. You must enter metadata into the required fields and then click on the OK button in the text editor before the action proceeds.
If the Always open the text editor option has not been selected, the warning will have two or three buttons, depending on a second option: If the Allow users to bypass when a required filed is missing option is not selected, the warning will look like this:
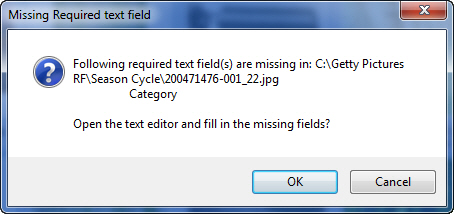
As for the earlier warning, clicking on the OK button opens the text editor. Clicking on the Cancel button, however, will abort the entire action.
If, on the other hand, the Allow users to bypass when a required filed is missing option is selected, the warning will look like this:

Clicking on the Yes button will open the text editor, and clicking on the Cancel button will abort the entire action. If you, however, click on the No button, this sub action is simply bypassed and any remaining sub actions are performed.
This is a file operation sub action, i.e. it can only process files stored on the computer. This means that if you have used an image processing sub action before using this sub action, you must use one of the two save sub actions before you use the Color factory job request sub action.
This sub action is used for processing files with the FotoWare Color Factory server. Normally, to be able to use Color Factory, it is sufficient to set up a Copy File sub action and copy the file(s) to a Color Factory input folder. Color Factory will then process the file(s) according to the channel’s settings. However, by using the Color Factory job request sub action, you get some added benefits:
First of all, you reduce network traffic if the file(s) you are processing reside on the same server as Color Factory, since only the job requests must be transferred between the client and the server. Secondly, you can change some of the settings of the Color Factory channel using FotoStation.
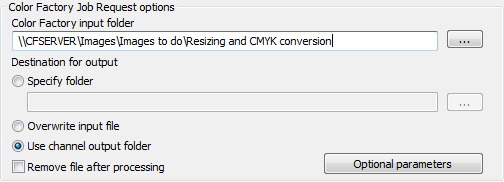
Input and Output Folders: Enter the path to Color Factory’s input folder in the Color Factory input folder field, or click on the browse button to locate the input folder of the Color Factory channel. Then select an output folder. Your choices are:
Specify folder: Select an output folder, either by entering the folder’s path into the field, or by clicking on the browse button. Generally, it is recommended to store both input and output folders on the Color Factory server to reduce network traffic.
Overwrite input file: When Color Factory is done processing the input file (i.e. the file sent to the Color Factory job request sub action), the processed file replaces (overwrites) the original file.
Use channel output folder: The output folder specified in the Color Factory channel is used as output folder.
Remove File after Processing: If you would like to delete the original file(s) when Color Factory is done processing the file(s), select this checkbox.
Optional Parameters
By clicking on the Optional parameters button, you can set or override some of the parameters of the Color Factory channel. Select the checkbox in front of the parameters you would like to change. Your options are:
Change color space to: Choose between Grayscale, RGB or CMYK color space.
Set SmartContrast™ to: Choose if the SmartContrast™ filter should be ON or OFF.
Set sharpening to: Choose if the sharpening settings defined in the Color Factory channel should be ON or OFF.
Backup input file to folder: Choose a folder where you would like to store a backup of the unprocessed input file. You can either enter the path to the folder directly in the field, or click on the browse button.
This is an image processing sub action, i.e. it must be followed by a save sub action. Note that you can create chains of image processing sub actions before you use one of the two save sub actions (Save file sub action or File format sub action) at the very end of the chain.
The Color Management sub action lets you convert images between different color spaces using standard ICC profiles.
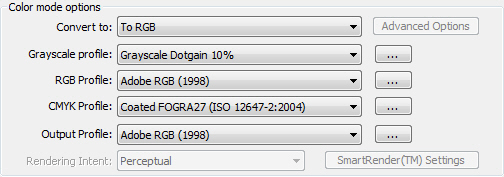
Convert To
Choose the color space that you would like to convert the image(s) to – Grayscale, RGB, or CMYK. If you choose to convert to grayscale, you get access to some additional options:
Advanced Options: Click on this button to gain access to additional options for the Grayscale conversion. A separate dialog window will open to let you choose a contrast enhancement level (choose between No Enhancement, Very small Enhancement, Small Enhancement, Normal Enhancement, Large Enhancement, and Very large Enhancement) and how the RGB colors should be mixed. (Note that the sum of the RGB mix percentages must be 100%.)
Input Profiles to Use, Depending on Input
When you have chosen the Convert to color space, you must select an input profile for the image(s). Note that if an image has already been tagged with an input profile, the embedded profile will take precedence over any input profiles set in this sub action.
Note that both the input and output profiles found in the dropdown lists are normally loaded from the system. This means that the available profiles may vary from one computer to another. If you would like to use a profile that isn’t listed, you can click on the browse button on the right-hand side of the dropdown list to locate it.
Grayscale Profile: From the dropdown list, select the input profile for grayscale images.
RGB Profile: From the dropdown list, select the input profile for RGB images.
CMYK Profile: From the dropdown list, select the input profile for CMYK images.
Output Profiles to Use
From the dropdown list, select the output profile that should be used. Note that the output profiles available will vary depending on what was selected in the Convert to dropdown list.
Rendering intent
If you chose to convert the image(s) to CMYK, the Rendering Intent option will become enabled. From the dropdown menu, select the rendering intent you would like to use. The choices are:
SmartRender™: This is FotoStation’s own rendering intent tool. If you select this option from the dropdown list, the SmartRender™ Settings button will become enabled, giving you access to quite advanced rendering settings. Essentially, SmartRender™ lets you choose an initial rendering intent and then choose between reducing saturation or switching to another rendering intent if more then a given percentage of pixels are out of gamut.
Please make sure you understand how this works before you start using it. If you have any problems, contact your local FotoWare Partner for support.
The other rendering options available are Perceptual, Relative Colormetric, Saturation, Absolute Colormetric, and According to Profile.
This is a file operation sub action, i.e. it can only copy files stored on the computer. This means that if you have used an image processing sub action (see the Action Overview topic for more information) before using this sub action, you must use one of the two save sub actions before you use the JPEG file size sub action.
The Copy file sub action is probably one of the most frequently used sub actions. It offers the possibility to copy files to a predefined folder, or to a folder selected manually. In addition this sub action offers customization of several parameters to ensure correct file flow.
Dialog Type
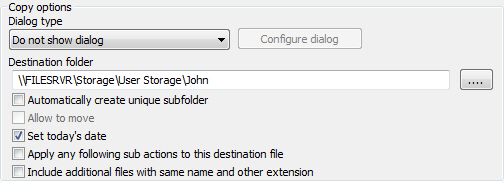
When creating a Copy file sub action, you can choose between five different levels of user interaction using the Dialog type dropdown list:
Do not show dialog: Use this option if you only want to copy files into the folder specified in the Destination folder field. The user will not be given any additional options.
Select Destination folder: Use this option if you would like the user to choose the folder that the file(s) should be copied to. The user will not be given any additional options.
Standard save file dialog: Use this option if you want the system’s standard dialog box for saving files to open when the user drops the file(s). This makes it possible to both choose a destination folder and a new file name.
Show file name dialog: Use this option if you would like the user to be able to choose a file name for each file or to add an incrementing number to the files if several files are being copied. The user will also be able to verify, but not change, the destination folder specified in the Destination folder field.
Show all features dialog: Use this option if you would like more customization than the previous four options above provide. This option gives you the possibility to configure the dialog that the user sees when using this sub action, so that you can include precisely the information you would like. See the topic Customizing the Copy file dialog for information on how to configure this dialog.
Depending on the dialog type you choose, one or more of the below settings may be disabled. If you would like to activate a disabled setting, you must select a different dialog type.
Destination Folder: Select the destination folder for the file(s) you would like to copy. You can enter the path directly into the field or click on the browse button to locate the folder.
Automatically Create a Unique Subfolder: Select this option if you would like FotoStation to create a unique subfolder within the chosen destination folder.
Allow to Move: Select this option if you would like to give the user the opportunity to move the file instead of copying it. The dialog that is displayed when running this sub action will include a checkbox labeled Move file that the user can select if he/she wants to move the file from its original location instead of copying it.
Set Today’s Date: Normally when copying a file, the new copied file will get the same date as the original file. If you would like the copied file to get the current date, select this checkbox.
Apply any Following Sub Actions to the Destination File: If you would like any sub actions following this Copy file sub action to be applied to the file in its new location, select this checkbox. Keep in mind that you need sufficient access privileges to the destination folder to be able to modify file(s) stored in this location.
Include Additional Files With Same Name and Other Extension: Select this option if you would like FotoStation to also copy any files that have the same filename as the file being copied using the action, but which has a different file extension.
This is useful if, for example, you are storing image metadata in a separate file. (Please note that since FotoStation automatically handles normal file operations such as copying, moving, deleting, etc. for metadata stored in an XMP sidecar file, you will not have to use this option for normal XMP metadata.) If the original image file’s filename is for example image01.jpg, then that file’s metadata might be stored in the sidecar file image01.txt. This means that if you would like to copy the image file to a different folder and also keep that file’s metadata, this option should be selected. FotoStation will then also copy the image01.txt file to the new location.
When working with the Copy file sub action, you can customize the Copy file dialog shown to the user when accessing this sub action. Configuring the dialog is quite complex, so make sure that you understand how this option works. When you are done configuring the dialog, run some test files through the action to make sure that the action is configured in the way you meant it to be.
To be able to configure the Copy file dialog, select Show all features dialog as Dialog type and click on the Configure dialog button. Select the desired option(s) in the window that opens. The options are as follows:
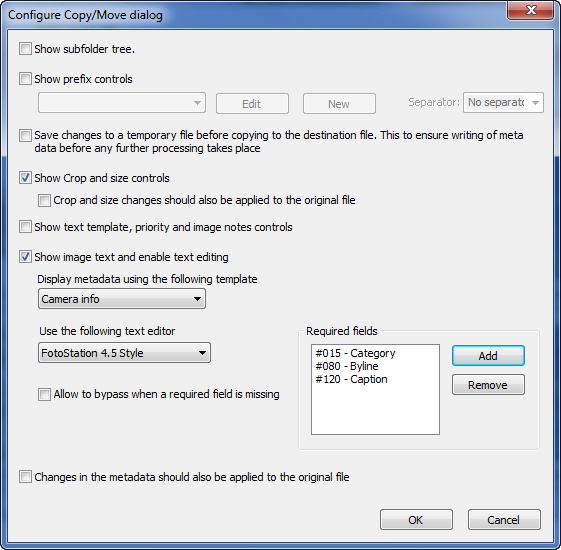
Show Subfolder Tree
When this option is enabled, the user can expand the destination folder (set in the Copy file sub action configuration window) and choose a subfolder within the destination folder to copy the file(s) to.
Show Prefix Controls
Select this option if you would like to enable prefix controls to be able to add a prefix to the filename of the copied file(s). Select a predefined prefix file from the dropdown list. If the prefix file selected is not exactly what you are looking for, you can choose to edit the prefix file (select the prefix file from the dropdown list, and click on the Edit button) or you can choose to create a new prefix file (click on the New button).
A prefix file can either have a column view or it can have an hierarchical view. When you click on the New button to create a new prefix file, a window will open where you must enter a name for the prefix file and choose between the two different views. Click on the OK button when you are done.
FotoStation will open a template with an example of the view type you selected, so that you can better understand the structure of these prefix files. The layout of the prefix text file will vary depending on whether you choose column or hierarchical view, but in either case you will be given a sample template that you can modify to suit your needs.
Hierarchical View: The hierarchical view contains superior and subordinate prefixes arranged in a tree that can be expanded. By choosing a prefix far down in the tree, this prefix and all superior prefixes will be added to the filename.
Column View: The column view gives you access to up to three columns containing prefixes that can be combined. For each column, the end user can choose to select an entry from the dropdown list or enter text directly into the field.
Separator: Choose a separator from the Separator dropdown list. You can choose between No separator, Underscore, and Dash, or you can simply enter a separator of your choice into the field.
Save Changes to a Temporary File
Select this option to make sure that other applications monitoring the output folder (such as FotoWare Color Factory) don’t pick up and start processing a file before the Copy File sub action has added metadata to the file.
Show Crop and Size Controls
By enabling this option, FotoStation displays the Crop dialog so that you may crop images before they are copied to the destination folder. If you would also like to apply crop changes to the original file being copied, you must select the checkbox labeled Crop and size changes should also be applied to the original file.
Show Text Template, Priority and Image Notes Controls
If you want the user to be able to apply a text template, change the priority settings of the file(s), or edit image notes for the copied file(s), select this checkbox. These options will then be included in the Copy file dialog when the user runs the action.
Show Image Text and Enable Text Editing
To view the metadata (text) in the files you are copying, select this checkbox. This way you can verify that the files contain the necessary amount of text and, if needed, make changes to the text. Select the template you want to use when displaying the metadata from the Display IPTC text using the following template dropdown list. Select a text editor from the Use the following text editor dropdown list. This text editor will be used if you would like to view or change the metadata. The user will have to click on the Text button to open the selected editor for viewing and/or changing the metadata.
Required Fields: This option is used to check if text has been entered into one or more specified metadata field(s). It may for instance be used before an image is archived to make sure that information has been added to selected fields. This is necessary if you at a later state would like to search for metadata that has been entered into this field. Use the Add and Remove buttons to choose which fields you wish to make required. Then, when the action is executed, FotoStation will highlight any empty required fields to make them easier to see and fill in.
Allow to Bypass When a Required Field is Missing: If you would like the users to be able to continue with the copying sub action even if one or more required fields are empty, you should select the checkbox Allow to bypass when a required filed is missing. If this checkbox is not selected, you may discover that you have to abort the entire action because you can’t or won’t add metadata to the required fields.
Changes in the IPTC Text Should Also be Applied to the Original File: Select this checkbox if you would like changes made to the copied files’ text to also be applied to the original file.
This is a file operation sub action, i.e. it can only e-mail files stored on the computer. This means that if you have used an image processing sub action before using this sub action, you must use one of the two save sub actions before you use the E-mail send sub action.
The E-mail send sub action makes it possible to e-mail files by setting up a connection to an SMTP server. The files will be included as attachments to the e-mail message, and you have the possibility to enter a custom message in the e-mail body text.
E-mail Options
Please contact you system administrator if you are uncertain about any of the following settings:
SMTP Server: Enter the name or IP address to the outgoing mail server.
Note that in FotoStation for Mac you must first configure e-mail delivery in the system default e-mail client application, for example Apple Mail. Please consult your e-mail client’s documentation for more information on how to do this. This implies that on the Mac delivery is not limited to SMTP. By configuring your client to connect to for example an Exchange server, FotoStation can use Exchange for e-mail delivery.
Sender Address: Enter the email address that should appear in the From field in the e-mail. If you do not want to receive replies to this address, we advise you to include information about this in the Subject field or message body.
Sender Name: Enter the name that should appear in the From field in the e-mail.
Recipient Address: Enter the e-mail address you want to send the e-mail to in this field. Note that FotoStation will not notify you if the e-mail address is invalid, so you should make sure the address is correctly entered.
Subject: Add a subject for the e-mail in this field.
Body: This is the e-mail’s message body. Enter any additional information here.
This is an image processing sub action, i.e. it must be followed by a save sub action. Note that you can create chains of image processing sub actions before you use one of the two save sub actions (Save file sub action or File format sub action) at the very end of the chain.
This sub action is used if the original image is a bit dark, and you would like to apply a digital flash to the image. It will make the darkest part of the image appear brighter, but it may also remove some of the contrast from the image.
When you apply this sub action to an image, FotoStation will start analyzing the image to discover how much equalizing should be applied to the image. As with all image processing sub actions, make sure that you understand how this sub action is used before you start using it in a production setting.
This sub action has two setting:
Exposure fields: When using the Equalize (Digital Flash) sub action, you can choose between applying the digital flash to the entire image (1 (Whole image)) and to divide the image into equally large areas and apply the digital flash to each of these areas separately (4 Areas or 9 Areas). Dividing the image into several areas can for example be useful if one area of the image is particularly bright, and another part is substantially darker.
Strength: Select how strong you would like the digital flash to be. If the original image is very dark, you may want to use the strongest option (Strong), while if the image is quite bright, the Weak option may be more suitable.
The File format sub action is used to apply changes made to an image by a preceding image processing sub action. The changes are stored in a temporary folder. This way, a file operating sub action that comes later in the sub action chain can for example copy, move, or upload the edited image to a new location. When the last sub action in a sub action chain is complete, the temporary file is removed.
File Format Settings
Using the dropdown list shown in the Format options part of the Action properties window, you can choose between JPEG, TIFF, and EPS format for the saved file. By clicking on the Format options button you can adjust settings specific for the chosen format. For JPEG files, this includes a Quality setting that determines the compression rate and choice of whether an ICC profile should be embedded in the file or not. With TIFF files, you can only enable or disable the ICC embedding option, and with EPS you have a choice of Encoding (JPEG, ASCII or binary), Quality (assuming you choose JPEG encoding), Preview format, and an ICC profile embedding alternative.
The reason why a File format sub action is needed after image processing sub actions is that these sub actions work with images in system memory. Hence, in a chain of sub actions, any changes made by an image processing sub action must be applied, i.e. saved to a file, before your can execute file operations such as copy, move and upload.
The Difference Between the Two Save Sub Actions
As described in the Action Overview topic, an image must be saved after performing one or more image processing sub actions. FotoStation provides two different sub actions to utilize this: The File format sub action and the Save file sub action. Make sure that you understand the difference in use between these two sub actions.
Use the File format sub action if you are working with images and you don’t need a local copy of the processed file.
This is a file operating sub action, i.e. it can only upload files stored on the computer. This means that if you have used an image processing sub action before using this sub action, you must use one of the two save sub actions before you use the FTP Upload sub action.
The FTP Upload sub action is used to upload files to an FTP server. Since there is a difference in the FTP implementation in Windows and Mac OS, the available features vary slightly depending on whether you are running FotoStation for Windows or Macintosh.
General FTP Upload Options
Enter the FTP server name or the IP address to the FTP server in the Host field and specify the port number. The default port number for FTP access is 21, but your FTP server may be configured differently.
Normally, the FTP server will require you to log on to be able to upload files. To be able to log on to the server, enter a user name into the User name field and a password into the Password field. If you need more information regarding how to log on to the server, please contact the server administrator.
Destination directory: In the Destination directory field you may enter the path to the folder on the FTP server where you want to put the files.
File Name Prefix: If you wish, you can add a prefix to the file name of all the files you are uploading using this sub action. It may be a good idea to add a separator (such as a dash or an underscore) to the end of the prefix to separate it from the filename. If you would like to perform more advanced renaming of the files (such as adding a running number to the uploaded files), use the Rename sub action prior to using the FTP upload sub action. (See the Rename sub action topic to learn more.)
Passive FTP Mode (Windows Only): If you wish to use a passive FTP connection, select the Use passive FTP mode checkbox.
Keeping the Connection Open (Windows Only)
You may also keep an FTP session open, i.e. not log off after a successful upload, by selecting Keep connection open between batches. This will help save time if you upload files in several batches, as FotoStation doesn’t have to log in and verify the username and password every time files are uploaded. The FTP session will be closed when you exit FotoStation or when the FTP server closes the connection (server timeout).
Using an FTP Proxy (Mac Only)
To set up an FTP proxy, select the Use FTP Proxy checkbox. Then enter the host name or IP address of the proxy and the port number. If your proxy server requires you to log on, you can enter a user name and password and optionally enable tunneling by selecting the Use Tunnel mode checkbox. Finally, if the server supports the socks5 protocol, you can select the Use socks5 protocol checkbox.
Using a Secure FTP Connection (Mac Only)
On the Mac you have the possibility of using a secure FTP connection (the Use Secure FTP (FTPS) mode option) if your FTP server supports this functionality. Keep in mind that there are two secure FTP standards, and that FotoStation only supports the one referred to as FTPS.
Testing the Connection
Having configured the FTP settings you can click the Test now button to see if you can successfully connect to the server. A window will display the response from the FTP server and indicate whether or not a connection was established.
This is a file operating sub action, i.e. it can only upload files stored on the computer. This means that if you have used an image processing sub action before using this sub action, you must use one of the two save sub actions before you use the HTTP Upload sub action.
The HTTP Upload sub action is used to upload files to a web server.
Upload Server URL: Choose between entering the path to a server (such as www.someserver.com) or the full URL to a script that takes care of how the files that are uploaded should be handled (e.g. www.someserver.com/scripts/upload.aspx). You don’t need to enter ‘http://’ in the URL field.
User Name and Password: Normally, the web server will require you to log on to upload files. To be able to log on to the server, enter a user name into the User name field and a password into the Password field. If you need more information regarding how to log on to the server, please contact the server’s administrator.
File Name Prefix: If desired, you can add a prefix to the file name of all the files you are uploading using this sub action. If you would like to perform more advanced renaming of the files (such as adding a running number to the uploaded files), use the Rename sub action prior to using the HTTP upload sub action. (See the Rename sub action topic to learn more.)
HTTP Upload to a FotoWeb Server
If you are going to upload to a FotoWeb server using the HTTP Upload sub action, this will be taken care of by FotoWeb. These are the settings that you have to enter:
Upload server URL: Enter URL to the domain’s root folder, e.g. www.somedomain.com. Do NOT enter anything after the top domain (in the example, after the .com in the URL).
User Name and Password: Enter a username and a password into the fields. The user must have certain privileges. He/she must have upload access in addition to a disk quota on the web server so that the files can be uploaded to the server.
If you don’t have a user account on the FotoWeb server, contact the FotoWeb server administrator. Note that FotoWeb stores the uploaded files in a folder specified by the server administrator.
This is a file operation sub action, i.e. it can only change the JPEG file size for images stored on the computer. This means that if you have used an image processing sub action before using this sub action, you must use one of the two save sub actions before you use the JPEG file size sub action.
This sub action lets you set the maximum file size of a JPEG file. Note that non-JPEG files are not affected by this sub action. This means that if you apply this sub action to a non-JPEG file (such as TIFF or GIF), the sub action will simply be ignored. It also means that after a Save file sub action that stores images in TIFF or EPS format, the image sizes are not reduced.
Use this sub action if you for some reason need to reduce the file size. This can for example happen if you are uploading several large JPEG files to the web (for example using the HTTP Upload sub action). If the size of an image is larger than the Maximum file size for JPEG Files, then the image will be recompressed using a higher compression ratio so that the uploaded file won’t be larger than the specified size.
Please note that this sub action overwrites the original JPEG file. If you don’t want to reduce the original file’s size, we suggest that you perform this sub action on a copy of the original file and keep the original file in a safe place!
Keep in mind that JPEG recompression will somewhat reduce the quality of the images, so that sometimes it may be more beneficial to adjust the compression settings in the preceding Save file or File format sub action to avoid losing image quality by having to compress the JPEG twice.
This is a file operation sub action, i.e. it can only process files stored on the computer. This means that if you have used an image processing sub action before using this sub action, you must use one of the two save sub actions before you use the Launch application sub action.
The Launch Application sub action is normally used to open external applications (such as Photoshop or Microsoft Word) from FotoStation. The available options are:
Application to Launch: Enter the path to the application you would like to open. You can choose between adding the path directly into the text field (for example C:\Program Files\Microsoft Office\OFFICE11\WINWORD.EXE) or to browse for the program file using the browse button on the right-hand side of the text field.
Restart Application Every Time: Select this checkbox if you would like the application to restart every time the action is executed. This means that if the application is already running on the computer, running the action will restart the application (i.e. close the application and start it again). If you were working in the application (for example editing a Word file in Microsoft Word), you might experience losing your work since some versions of Microsoft Word will shut down without warning. So be very careful with this option, and only use it if you know what you are doing!
Command Line: For some applications it is possible to add extra parameters (also called switches) when starting the application. These parameters can for example be to start the program in safe mode (/safe for Microsoft Word). Such parameters differ from one application to another. See the application’s documentation for information regarding available parameters.
Add File Names to Command Line: By selecting this checkbox, the application will launch and open the files that have been processed using the action. Note that if your chain of sub actions includes image processing sub actions, you should add one of the save actions before using the Launch Application sub action. If this checkbox is not selected, the application will open without any files.
This is a file operation sub action. This means that if you have used an image processing sub action before using this sub action, you must use one of the two save sub actions before you use the Move file sub action.
The Move file sub action is probably one of the most frequently used sub actions. It offers the possibility to move file(s) to a predefined folder, or to a folder selected manually. In addition this sub action offers customization of several parameters to ensure correct file flow.
Dialog Type
When creating a Move file sub action, you can choose between five different levels of user interaction:
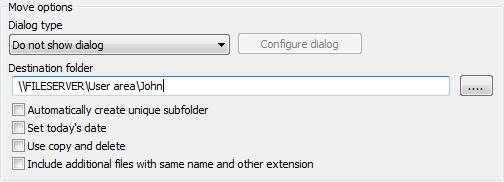
Do not show dialog: Use this option if you only want to copy files into the folder specified in the Destination folder field. The user will not be given any additional options.
Select destination folder: Use this option if you would like the user to choose the folder that the file(s) should be copied to. The user will not be given any additional options.
Standard save file dialog: Use this option if you want the system’s standard dialog box for saving files to open when the user drops the file(s). This makes it possible to both choose a destination folder and a new file name.
Show file name dialog: Use this option if you would like the user to be able to choose a file name for each file or to add an incrementing number to the files if several files are being copied. The user will also be able to verify, but not change, the destination folder specified in the Destination folder field.
Show all features dialog: Use this option if you would like more customization than the previous four options above provide. This option gives you the possibility to configure the dialog that the user sees when using this sub action, so that you can include precisely the information you would like. See the topic Customizing the Move file dialog for information on how to configure this dialog.
Basic Move Settings
This sub action provides several basic move settings. Depending on the dialog type you selected, one or more of these settings may be disabled. If you would like to activate a disabled setting, you must select a different dialog type.
Destination Folder: Select the destination folder for the file(s) you would like to move. You can enter the path directly into the field or click on the browse button to locate the folder.
Automatically Create a Unique Subfolder: Select this option if you would like FotoStation to create a unique subfolder within the chosen destination folder.
Set Today’s Date: Normally when moving a file, the file will retain its original file date after it has been moved. If you would like the file to get the current date, select this checkbox.
Use Copy and Delete: When this option is selected, FotoStation will copy the file to its new location and then delete the original file. The result is the same as when using a regular move operation, with one key difference: When moving a file, its original permissions are preserved, while if you copy it, it will inherit file system permissions from the destination folder. This is an important distinction that may affect how you choose to move files.
Include Additional Files With Same Name and Other Extension: Select this option if you would like FotoStation to also move any files that have the same filename as the file being moved using the action, but which has a different file extension.
This is useful if, for example, you are storing image metadata in a separate file. (Please note that since FotoStation automatically handles normal file operations such as copying, moving, deleting, etc. for metadata stored in an XMP sidecar file, you will not have to use this option for normal XMP metadata.) If the original image file’s filename is for example image01.jpg, then that file’s metadata might be stored in the sidecar file image01.txt. This means that if you would like to move the image file to a different folder and also keep that file’s metadata, this option should be selected. FotoStation will then also move the image01.txt file to the new location.
When working with the Move file sub action, you can customize the Move file dialog shown to the user when accessing this sub action. Configuring the dialog is quite complex, so make sure that you understand how this option works. When you are done configuring the dialog, run some test files through the action to make sure that the action is configured in the way you meant it to be.
To be able to configure the Move file dialog, select the Move file sub action from the Select action type list. Then select Show all features dialog as Dialog type and click on the Configure dialog button. Select the desired option(s) in the window that opens. The options are as follows:
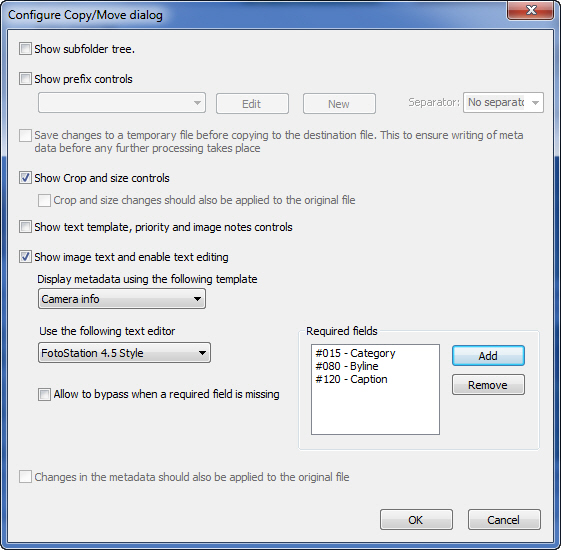
Show Subfolder Tree
When this option is enabled, the user can expand the destination folder (set in the Move file sub action configuration window) and choose a subfolder within the destination folder to move the file(s) to.
Show Prefix Controls
Select this option if you would like to enable prefix controls to be able to add a prefix to the filename of the moved file(s). Select a predefined prefix from the dropdown list. If the prefix file selected is not exactly what you are looking for, you can choose to edit the prefix file (select the prefix file from the dropdown list, and click on the Edit button) or you can choose to create a new prefix file (click on the New button).
A prefix file can either have a column view or it can have an hierarchical view. When you click on the New button to create a new prefix file, a window will open where you must enter a name for the prefix file and choose between the two different views. Click on the OK button when you are done.
FotoStation will open a template with an example of the view type you selected, so that you can better understand the structure of these prefix files. The layout of the prefix text file will vary depending on whether you choose column or hierarchical view, but in either case you will be given a sample template that you can modify to suit your needs.
Hierarchical View: The hierarchical view contains superior and subordinate prefixes arranged in a tree that can be expanded. By choosing a prefix far down in the tree, this prefix and all superior prefixes will be added to the filename.
Column View: The column view gives you access to up to three columns containing prefixes that can be combined. For each column, the end user can choose to select an entry from the dropdown list or enter text directly into the field.
Separator: Choose a separator from the Separator dropdown list. You can choose between No separator, Underscore, and Dash, or you can simply enter a separator of your choice into the field.
Save Changes to a Temporary File ...
Select this option to make sure that other applications monitoring the output folder (such as FotoWare Color Factory) don’t pick up and start processing a file before the Move file sub action has added metadata to the file.
Show Crop and Size Controls
By enabling this option, FotoStation displays the Crop dialog so that you may crop images before they are moved to the destination folder. If you would also like to apply crop changes to the original file being copied, you must select the checkbox labeled Crop and size changes should also be applied to the original file.
Show Text Template, Priority and Image Notes Controls
If you want the user to be able to apply a text template, change the priority settings of the file(s), or edit image notes for the file(s) being moved, select this checkbox. These options will then be included in the Move file dialog when the user runs the action.
Show Image Text and Enable Text Editing
To view the metadata (text) in the files you are copying, select this checkbox. This way you can verify that the files contain the necessary amount of text and, if needed, make changes to the text. Select the template you want to use when displaying the metadata from the Display IPTC text using the following template dropdown list. Select a text editor from the Use the following text editor dropdown list. This text editor will be used if you would like to view or change the metadata. The user will have to click on the Text button to open the selected editor for viewing and/or changing the metadata.
Required Fields: This option is used to check if text has been entered into one or more specified metadata field(s). It may for instance be used before an image is archived to make sure that information has been added to selected fields. This is necessary if you at a later state would like to search for metadata that has been entered into this field. Use the Add and Remove buttons to choose which fields you wish to make required. Then, when the action is executed, FotoStation will highlight any empty required fields to make them easier to see and fill in.
Allow to Bypass When a Required Field is Missing: If you would like the users to be able to continue with the Move file sub action even if one or more required fields are empty, you should select the checkbox Allow to bypass when a required filed is missing. If this checkbox is not selected, you may discover that you have to abort the entire action because you can’t or won’t add metadata to the required fields.
This is a file operating sub action, i.e. it can only print files stored on the computer. This means that if you have used an image processing sub action before using this sub action, you must use one of the two save sub actions before you use the Print sub action.
The Print sub action is used to print images. The printer setup and choice of print template is similar to that of the standard FotoStation Print feature, which is documented in the Printing topic.
Setting Up the Print Action
Start by clicking on the Setup print action button. In Windows, the standard printer setup dialog will open the first time you click on the button, giving you access to general printer preferences such as printer, number of copies, etc. Click on the Print button when you are done setting the preferences. Please note that this will not print the document. It will only set up the printer.
If you would like to change the printer or any other print preferences, click on the Print Setup button in FotoStation’s print dialog.
As explained in the Printing topic in this manual, the print dialog lets you choose from a number of single and multi-image templates, and you can also modify existing templates or create new ones.
When you are done setting up the Print sub action, click on the OK button to close the window.
Keep in mind that if you intend to set up a chain of sub actions that modifies images (image processing sub actions) before you add a Print sub action at a later point in the chain, you must use one of the two save sub actions so that the changes are incorporated in the file before it is printed. Otherwise, any changes made will not be visible on the print, since the last saved copy of the file is printed.
This is a file operating sub action, i.e. it can only rename files stored on the computer. This means that if you have used an image processing sub action before using this sub action, you must use one of the two save sub actions before you use the Rename file sub action.
The Rename file sub action makes it possible to rename files or change their file extension. The naming of files can be based on information in XMP or EXIF fields or specific file properties. It is also possible to add running numbers to files to ensure that all files are correctly renamed and are given a unique name. If files in your archive have the same filename as the file being renamed, but with a different file extension, the Rename file sub action can be configured to also rename these files. This functionality is useful for accompanying files such as text files containing metadata and other types of information.
To set up the automatic renaming of files, first decide whether the action should change the actual filename (choose the Change filename to option) or only the extension of the files (choose the Change file extension to option)
Changing the File Name
When choosing to rename files, you may enter a new file name in the text field. When renaming a number of files in a single operation, you will have to add some extra information to avoid getting duplicate file names. This can be done in two ways. Either you can add a running number to the files, or you can add information from a file’s XMP or EXIF fields or file properties, provided that this information is unique for each file.
There are two ways to add a running number to file names. You can start numbering the files from number 1 and onwards, or you can prompt the user for a starting number. Please note that both methods require you to insert the %%INSFNUMBER operator in the Change filename to field. The %%INSFNUMBER operator is one of many dynamic operators. See the Dynamic operators part of this topic below.
1. By Only Inserting a Dynamic Operator
By inserting the %%INSFNUMBER operator into the Change filename to field, FotoStation will start renaming the files and adding the number 1 to the first file and continue on up until all files have been renamed. Note that you are free to choose where in the file name the running number should appear. It can be inserted first, last, or even in the middle of the new filename.
For instance, you can enter the following in the Change filename to field:
%%INSFNUMBER_Summer2007
Thus, when processing files with the action, the renamed files will be called 1_Summer2007, 2_Summer2007, 3_Summer2007 and so on.
2. By Prompting for the Start Sequence Number
The advantages of prompting the user for a starting number is that you can choose to add leading zeros and you can choose which number should be the first running number in the renamed files.
When you select the Prompt for the start sequence number every time the action is started option, every time you run the action, FotoStation will display a dialog box that enables you to set the start number for the renaming sequence. Since the number directly substitutes the %%INSFNUMBER operator entered into the Change filename to field, it is a good idea to add a dash or an underscore after the static part and before the %%INSFNUMBER part of the filename, for example Newfile_%%INSFNUMBER.
This way, the underscore will separate the file name you choose from the running number, and if you for example choose 001 as the start number when prompted, the files will be renamed to Newfile_001, Newfile_002, Newfile_003, and so on. The files’ current extension will be preserved.
Dynamic Operators
To rename files according to metadata field content or file information, you can click on the Insert code button. This will allow you to choose from all available XMP and EXIF fields and file properties to build a unique file name. For example, by choosing #005 Object Name under XMP fields, FotoStation will use the information in the Object Name as filename.
You may of course combine the contents of several fields, for instance like this:
#005-#EXIF9003
This will combine the content of the Object Name field with the EXIF Date and Time field. Underscores or dashes can be inserted in the text field to separate one entry from another.
Note that all dynamic operators are available by clicking on the Insert code button. This means that you can also insert the running numbers dynamic operator %%INSFNUMBER by clicking on this button.
Tip: It is always a good idea to add a sufficient number of leading zeroes when renaming files using running numbers, since this will ensure that FotoStation sorts the files correctly when you choose to sort by file name, for example when viewing them in thumbnail view.
Including Accompanying Files in the Renaming Operation
Sometimes, files in an archive are accompanied by a second file that contains additional data about the file (metadata). Provided that such files, commonly referred to as “sidecar” files, have the same name as the file they accompany (extension aside), the Rename file sub action can rename the sidecar files automatically when renaming the master file. This is done by selecting the Include additional files with same name and other extension checkbox.
This way, when renaming for example image001.jpg, the sidecar files image001.txt, image001.inf and image001.doc will also be renamed. There is no limit to how many sidecar files a file can have; any file with the same name as the file being renamed will also be renamed.
Note that renaming of XMP sidecar files containing metadata is automatically handled by FotoStation whether this option is enabled or not.
Changing the File Extension
The Rename file sub action can also be used for changing the extension of files. Keep in mind that changing the file extension may make the file open in another application, since both Windows and to some extent Mac OS rely on a file’s extension to determine which application it should open in.
To change the extension of the files processed by the action, click on Change file extension to and enter a file extension in the text field below, omitting the dot. Typically the file extension is three characters long, but you may make a longer or shorter extension if you like.
This is an image processing sub action, i.e. it must be followed by a save sub action. Note that you can create chains of image processing sub actions before you use one of the two save sub actions (Save file sub action or File format sub action) at the very end of the chain.
Just like the regular resize function in FotoStation’s image edit mode and the Crop dialog, the Resize Image sub action is used for changing the document size or the physical (pixel) size of an image.
Setting Image Size
If you want to change the document size of the image, i.e. its size on print, without altering image data, simply enter a value in the Size field and choose a unit of measure in the dropdown list without selecting the checkbox labeled Resample image to new pixel width and height. (This will change the physical dimensions of the image – see below.) The available choices in the list are PPI (Pixels/inch), pixel/cm, inch, or cm.
Resampling Images to New Pixel Width and Height
Select this checkbox if you want to change the physical size of images, for instance to create lower-resolution copies for publishing on the web. Unlike when the resample option is not enabled (as described above), a resampling of the image implies altering the image data so that the actual number of pixels in the image is reduced. (Resampling can also be used to increase the size of images, but this is used far less frequently since it will produce a result with lower quality.)
When resampling images, you have these options to choose from in the dropdown list:
PPI (pixel/inch): Used for setting the number of pixels per inch after processing. In addition, you can limit the file size by entering the maximum number of megabytes in the (uncompressed) output file by entering a value in the Maximum file size field. If the resizing operation results in an image larger than the maximum size set, the image is not resized and the operation is aborted.
Pixel/cm: Used for setting the number of pixels per centimeter after processing. This option is the same as the one above, except for the unit of measure.
Pixel/max (width, height): Used for setting the maximum number of pixels horizontally or vertically (whichever is the largest). For this and the next seven options, select resolution and resize option (see Resolution Settings and Resizing part of this topic for more information).
Pixel/min (width, height): Used for setting the minimum number of pixels horizontally or vertically (whichever is the smallest).
Pixel width. Enable fixed proportions: Used for setting an absolute pixel width. When choosing a fixed pixel width, you can also choose how image proportions should be handled. Click on the Setup Proportions button to bring up a separate dialog for making this selection:
By choosing Unchanged. Pixel height floating, pixel height will change according to the width so that the original proportions of the image are retained.
By choosing Fixed. Expand canvas, the surrounding canvas will be expanded to accommodate the image, and you may set the Pixel height and Alignment. Click on the Set Canvas color button to choose canvas (background) color.
By choosing Fixed. Crop image, you may set the Pixel height and the Alignment, and FotoStation will crop the original image to fit the set proportions.
Pixel height: Used for setting a fixed pixel height.
Inch: Used for setting the desired width of the image in inches.
Cm: Used for setting the desired width of the image in cm.
MB per image: Used for setting the maximum file size (uncompressed) of the processed file.
MB per color channel: Used for setting the maximum number of megabytes in each color channel.
Resolution Settings and Resizing: These two settings are available for the eight last dropdown options:
Resolution: Set the image resolution by clicking inside the dropdown list and entering a value, or choose not to change the resolution by selecting Leave unchanged from the dropdown list. Choose between pixel/inch and pixel/cm as unit measure in the dropdown list to the right.
Do not resize images smaller than set size: By selecting this option, images that are smaller than the size specified won’t be processed by the sub action and remain unchanged.
The Save file sub action is used for saving images in a folder and can be customized in a number of ways. The file saving process can be completely preconfigured so that there is no need for user intervention after the action has been activated, or it can be configured to prompt the user so that a folder and file name can be chosen manually.
As with the File format sub action, you can use the Save file sub action to apply changes made to an image by one or more preceding image processing sub actions. The most important differences between these two sub actions are:
An image saved using the File format sub action will be removed (and hence not available locally) when the action is completed.
With the Save file sub action, you can specify a location and file name for the saved file (with the File format sub action the location and file name are chosen automatically). You can also choose if you would like to open the Save As dialog so that the end user can choose where the file should be saved.
For more information regarding image processing sub actions, see the Creating and Configuring Actions topic.
Save Options
Under Save options you find four different ways to save the file:
Save Image to Original File: Choose this option if you would like the result from image processing sub actions preceding the Save file sub action to overwrite the original file.
Show ‘Save As’ Dialog: Choose this option if you would like the standard Save image as window to open. The user will then to be able to manually decide the file name, file type (the choices are JPEG, TIFF, and EPS), and the file’s location.
Save as New Image in Original Folder With a New Name: Choose this option if you would like the result to be saved in the same folder as the original file, but with a different file name. To avoid overwriting the original file, a running number (_2, _3 and so on) will be appended to the file name.
If you would like a custom prefix and/or suffix to be added to the file name, select the Add prefix and suffix checkbox and enter the prefix/suffix into the corresponding Prefix/Suffix fields.
Save as New Image in Specified Folder: Choose this option if you would like the result to be saved in a different folder than the original file’s folder. The file name will be the same as the original file, since the folder name is different.
If you would like a custom prefix and/or suffix to be added to the file name, select the Add prefix and suffix checkbox and enter the prefix/suffix into the corresponding Prefix/Suffix fields.
File Format Settings
Using the dropdown list shown under File format for new file, you can choose between using the same format as the original file, JPEG, TIFF, and EPS format for the saved file. By clicking on the Format options button you can adjust settings specific for the chosen format. For JPEG files, this includes a Quality setting that determines the compression rate and choice of whether an ICC profile should be embedded in the file or not. With TIFF files, you can only enable or disable the ICC embedding option, and with EPS you have a choice of Encoding (JPEG, ASCII or binary), Quality (assuming you choose JPEG encoding), Preview format, and an ICC profile embedding alternative.
If you choose the Same format as original option, clicking on the Format options button lets you adjust the settings specific for each of the three previously mentioned output formats. Note that the Save file sub action only saves files in the JPEG, EPS, or TIFF format. If the input file is not one of these three types the end user will be asked to choose between these three as formats as Save file sub action output.
This is an image processing sub action, i.e. it must be followed by a save sub action. Note that you can create chains of image processing sub actions before you use one of the two save sub actions (Save file sub action or File format sub action) at the very end of the chain.
The Sharpening Filter sub action is used to increase the sharpness of images. It is similar to the unsharp mask filter found in Photoshop and other image editors. In addition to applying a basic unsharp mask filter, the sharpening filter has three modes of action: You can choose between the FotoWare SmartSharp™ technology, a Smooth mode that only sharpens edges and details, and a Contrast limiter that suppresses sharpening in darker areas of the image.
Note that sharpening an area that contains much noise (typically a dark area of an image) will make the area appear grainy.
As with image processing in general, make sure that you fully understand how the image processing works before using it in a production environment. We suggest testing the sub action on several test images to make sure that the sub action is performing the sharpening as expected.
Normal Sharpening
To perform normal sharpening of images (unsharp mask), simply adjust the Amount, Radius and Threshold values as you see fit. Do not select any of the three checkboxes, since this will enable built-in sharpening technologies. It’s usually a good idea to experiment a little with the values and try them out on some test images to be able to verify the result before putting the sharpening filter to use in production.
Using SmartSharp™ Technology
Select this checkbox if you would like to use FotoWare’s own sharpening technology. Essentially, SmartSharp™ analyzes the image to determine whether sharpening is necessary. By clicking on the Advanced settings button you can adjust the sensitivity to noise and sharpness required to apply sharpening. Since you generally don’t want noisy areas to be sharpened, a high noise sensitivity means that sharpening is disabled even for images with little noise, whereas a low noise sensitivity means that an image must have much noise before sharpening is disabled.
If FotoStation determines that sharpening is necessary, the radius and threshold settings come into play. To have the program automatically detect a suitable radius and/or threshold setting, select the checkboxes labeled Use automatic radius detection and/or Use automatic threshold detection respectively.
If you would rather set one or both of these values manually, leave the automatic detection unselected and adjust the values in the Radius and/or Threshold fields in the Unsharp Mask part of the Action properties window.
Using Smooth Mode
When using Smooth Mode, FotoStation analyses the image and sharpens only edges and details in the image. Even areas are less affected by the sharpening filter. There are three smoothness levels to choose from in the dropdown list, Low, Normal or High smoothness. The lowest setting will apply some sharpening to non-edge areas, while the higher levels will apply little or no sharpening to these areas, improving the sharpness only around edges and in smaller details.
Using the Contrast Limiter
Using the Contrast limiter will make FotoStation apply less sharpening to darker areas in the image, since these areas normally contain much noise. The Contrast limiter setting also has three levels; Low, Normal or High limiter. With the limiter set low, some sharpening will be applied in dark areas, while with the higher settings, little or no sharpening will be applied in these areas to avoid making image noise more apparent.
This is an image processing sub action, i.e. it must be followed by a save sub action. Note that you can create chains of image processing sub actions before you use one of the two save sub actions (Save file sub action or File format sub action) at the very end of the chain.
This sub action is used to automatically “clean up” a noisy image. When capturing images using a digital camera, you may encounter some amount of noise. The extent of noise will vary depending on camera settings and the amount of light available.
When removing noise, important image details may be blurred or removed altogether. Make sure that the noise level you end up using is the one that best suits your needs.
Using Automatic Noise Levels
You can choose between four preset noise levels: Digital camera image or Scanned image according to how the image was acquired, and Strong or Normal according to how much noise you would like to remove from the image. Select one of these levels from the Mode dropdown list if this is how you would like the noise to be removed.
Manual Adjustment of Noise Levels
If you are not satisfied with the results using automatic values, you can manually adjust the Luminance noise level and Color noise level. These options are disabled by default, but if you select Manual levels from the Mode dropdown list, they are enabled and you can adjust them manually by clicking and dragging the sliders.
FotoStation will start the "cleaning process" by analyzing the image and calculating the noise level. You can choose not to remove noise from images that already have a low noise level by selecting the Do not process images with low noise level checkbox.
This is an image processing sub action, i.e. it must be followed by a save sub action. Note that you can create chains of image processing sub actions before you use one of the two save sub actions (Save file sub action or File format sub action) at the very end of the chain.
The SmartContrast™ sub action is used to improve the contrast and color balance of images. This sub action has no effect on non-image files.
SmartContrast™ Options
This sub action doesn’t have any options associated with it. By adding this sub action to a chain of other sub actions, the contrast and color balance of the image is improved.
This is an image processing sub action, i.e. it must be followed by a save sub action. Note that you can create chains of image processing sub actions before you use one of the two save sub actions (Save file sub action or File format sub action) at the very end of the chain. When tagging JPEG files you don’t need to add a save sub action afterwards, as JPEG files are a special case.
This sub action is used for tagging an image file with an ICC profile. It does not alter the image data in any way, it simply rewrites the file to include the ICC profile so that other systems can reproduce the image data correctly. What ICC profile should be used depends on the color space of the input image:
Grayscale Profile: From the dropdown list, select the input profile for grayscale images.
RGB Profile: From the dropdown list, select the input profile for RGB images.
CMYK Profile: From the dropdown list, select the input profile for CMYK images.
Note that if desired, you can choose to ignore images of certain color space. Select the corresponding option from the dropdown list (Ignore Grayscale images for ignoring grayscale images, Ignore RGB images for ignoring RGB images, and Ignore CMYK images for ignoring CMYK images.) This means that if you like, images of a certain color space may be ignored while the others are tagged with a profile. If you would like to use a profile that isn’t listed, you can click on the browse button on the right-hand side of the dropdown list to locate it.
Note, however, that if an image already has a profile when it is processed by this sub action, FotoStation will by default not overwrite it with the profile chosen in the dropdown list. If you wish to overwrite any existing profile in the image you must select the Always ignore existing profile checkbox:
Always Ignore Existing Profile: By selecting this option, any ICC profile that is already in the file will be ignored, and the profile selected in the dropdown list will overwrite it. If the option is left unchecked, FotoStation will not make any changes to files that are already tagged with an ICC profile.
This is an image processing sub action, i.e. it must be followed by a save sub action. Note that you can create chains of image processing sub actions before you use one of the two save sub actions (Save file sub action or File format sub action) at the very end of the chain.
This sub action is used for inserting a block of text in the image, for example to include copyright or contact information. You can also insert a company logo or other graphics. The text block will be appended to the actual image data as a border below the image.
Note that while the text block sub action does add image data, it does not change an image, since the text block is appended below the existing image. Thus, it is possible to crop the image to remove the text block later. If you want to make sure that the image can be viewed and at the same time prevent unauthorized use, you may want to use the Watermark sub action instead.
Text Block Options
To set your preferences for the text block, click on the Set textblock options button. The new dialog that is shown gives you a number of options.
Including Graphics in the Text Block
If you want to include a company logo or other graphics, you can choose between placing it left of the text block (Put logo image on the left side of the text block) or below the text block (Put logo image below the text block). Click on the browse button to locate the graphics you want to use.
Please note that while it is possible to include a logo both to the left and below the text block, (i.e. select both Put logo image ... check boxes), you should validate the result before applying the text block to several images.
Text Extraction Template
Enter the text you would like to include in the image, such as copyright or contact information, into this field. You can also insert dynamic codes to extract text from the file’s XMP fields, EXIF camera information, or file information such as file name and path. To do this, click on the Insert Code button and choose which type of information you want to extract from the dropdown list, then double-click on the field you want to include.
The contents of the text field may for example look like this:
#120
Photo by: #080
This way, the Caption metadata field (field number 120) comes first in the text block, followed by the static text Photo by: and after this, the contents of the Byline metadata field (field number 080) is inserted.
Select font properties (such as font type, font style, and font size) by clicking on the Select Font button.
Setting Color Preferences
Text color can be set by clicking on Set Text color, and the canvas (background) color of the text block can be set by clicking on the Set Canvas color button. To make sure that the text is visible you should check to see that the canvas color and the text color “match” each other. This will normally be achieved by letting one of the colors be a dark color, and the other one a light color (for example black and white).
Always Put the Text Block on the Longest Side
By selecting this checkbox, the text block will be added to the image’s right side if the image height is greater than the width, and underneath the image if the width is greater than the height.
This is an image processing sub action, i.e. it must be followed by a save sub action. Note that you can create chains of image processing sub actions before you use one of the two save sub actions (Save file sub action or File format sub action) at the very end of the chain.
This sub action can be used if you wish to physically watermark your images, for instance as a copyright measure when publishing images on the web or making promotional discs with your image collections.
Choosing a watermark is pretty straightforward. Enter the path to the image file you wish to use as a watermark in the Watermark image field, or click the browse button to locate it. Then choose where in the image the watermark should be placed from the dropdown list.
The watermark sub action uses an emboss filter to create a watermark effect. Absolutely gray areas (R, G and B value 128) will be transparent in the watermarked image. To achieve the best possible result, we advise using grayscale graphics for watermarking images.
You can also use PNG files with transparency enabled to create nice watermarks on your pictures.
Scale Watermark to Fit Image: This option is available if you select the Center of image option for where the watermark should be placed in the selected image. Select this option if you would like the watermark image to be scaled to fit the image processed by the sub action.
This is a file operating sub action, i.e. it can only write files stored on the computer. This means that if you have used an image processing sub action before using this sub action, you must use one of the two save sub actions before using the Write CD/DVD sub action.
This sub action is used for writing files to a CD or a DVD. The disc is written in standard ISO format, which means it can be read both in Windows and Mac OS. FotoStation uses multi-session writing of CD’s in Windows, which means that files can be added to a CD several times until the maximum capacity of the disc is reached. In Mac OS, the disc is closed after writing and thus, multi-session burning of CD’s is not possible when using FotoStation for Mac.
Write CD/DVD Options
Create Offline Archive: When writing files to a disc, FotoStation can automatically add the written files to an offline archive, so that you may browse low-resolution copies of the images and search in their metadata even if the disc containing the files is stored elsewhere. To do this, simply select the Create offline archive option and select the archive where you would like to store it. Please refer to the Offline Files topic to learn more about the benefits of offline resources.
Create a Unique Subfolder Per Session on the CD (Windows Only): When writing a CD in Windows, FotoStation uses multi-session writing, which means that is leaves the disc “open” in case you wish to add more files to it later. Hence, if you would like to place different session files in separate folders on the disc (named according to the date they were written), you can select this option. Otherwise, files from all sessions will be stored on the root level of the disc.
Keep in mind that if you choose to store files on the CD root and later write a new session to a CD already containing files, any new file with the same name as a file already on the CD will overwrite the old one. We therefore recommend creating a separate subfolder for each writing session.
Please note that DVD’s do not support multiple writing sessions.
Specify Directory for Temporary Files: FotoStation always copies all files to a local temporary folder before writing. If you would like to specify which folder it should use, you may do this here. Be sure to choose a local volume to make sure that the data stream is not interrupted when writing.
Running the Write CD/DVD Sub Action
When running the action, FotoStation copies the files to a temporary folder and displays a summary window before the writing begins. At this point, make sure that the amount of data does not exceed the amount of space available on the disc. If your computer has more than one recorder, you may choose which one to use, and you may choose a write speed and a volume label for the disc.