There are many ways to add metadata to a file. In this topic we will focus on how to add metadata using the metadata editor.
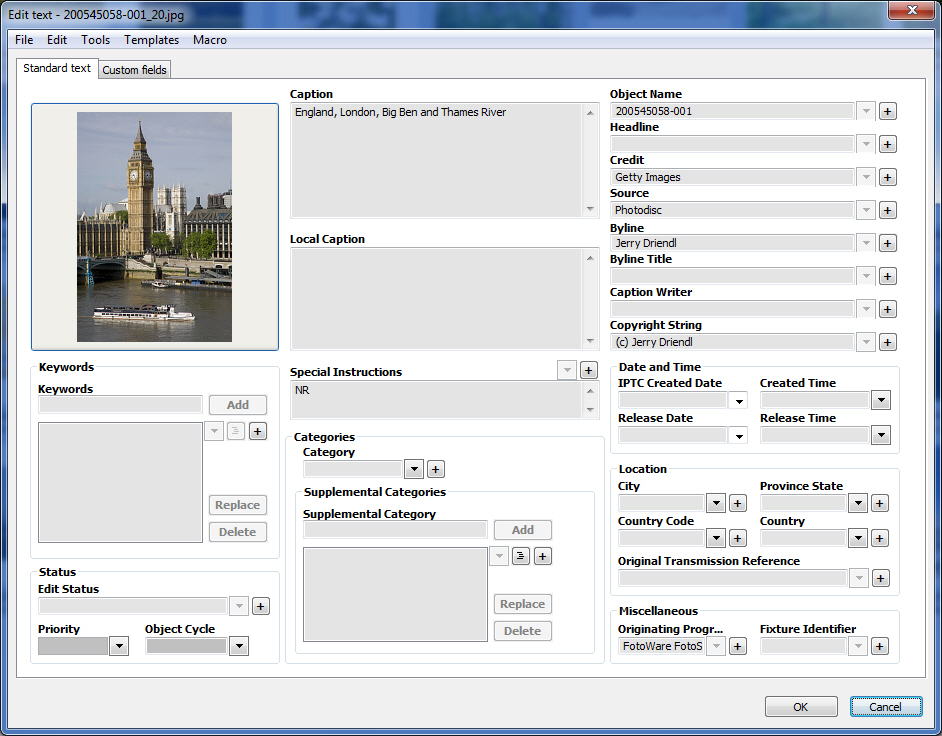
Select one file that you would like to add metadata to. Open the editor either by clicking on the Metadata button shown at the top of this topic, or by using the shortcut key Ctrl+T (Command–T on the Mac).
The metadata editor opens with the FotoStation 4.5 Style editor. Note that there are several editors available. If you want to select a different editor (each editor has a different layout and may contain different metadata fields), choose your favorite by clicking on the File menu and then choosing the Select editor menu option.) You can also customize the editors or create a new editor to fit your needs. See the Choosing Metadata Editor part of this topic for more information on using different editors.
Add text in the desired field. If you are happy with the text changes you made, click on the OK button. If you change your mind, click on the Cancel button to avoid saving the changes.
Note that it is possible to add text to more than one file using this method. Select the files you would like to add text to. Open the editor as described above. Add the required metadata to the first file. You can now choose between the following options:
• Click on the OK button. The text is saved and the editor will open once more, enabling you to add new metadata to the next file.
• Click on the Cancel button. The text change is not saved. The metadata editor will open with text for the next file.
• Click on the Cancel All button. The text is not changed for the currently open file and editing of the remaining files is aborted.
Sometimes you may want to add the same metadata to several files. For images, this could for example be adding information such as where the images were captured, caption and copyright information. This can easily be done by using the Add text to selected files option found on FotoStation’s Text menu:
1. Select the files that you would like to add information to. Select more than one file by clicking on the first file in a range, then Shift-clicking on the last file, or by holding down the Ctrl key (Command key on the Mac) and clicking on each file that you would like to add text to.
2. Click on the Text menu and select the Add text to selected files option (shortcut key Shift+Ctrl+T on Windows and Shift–Command–T on the Mac) from the menu. A new window will open.
3. In this window you must select how the text you enter should be handled if any of the fields that you insert new text into already contain some text. You can choose between deleting previously entered text (Replace the existing text) and adding new text after any previously entered text (Append new text to existing text). Click on the OK button.
4. The metadata editor will open. Notice that all text fields appear to be empty and that the preview area in the editor (provided that the metadata editor chosen has a preview area) doesn’t show any preview. This is because you are about to add text to several files, in which case it doesn’t make sense to be able to view previously added text or previews of the files.
5. Insert text into the desired fields. When you are done, click on the OK button to add the inserted text to the selected files. If you decide that you don’t want to change the text after all, click on the Cancel button.
Tip: This functionality can also be utilized through an Action, specifically by using the Add Metadata sub action.
If you often add the same metadata to files, you may want to use a template to automate this process:
6. Select the file that you want to insert the metadata into.
7. Open the metadata editor.
8. Click on the Templates menu and select the template you would like to use.
9. The metadata from the template is inserted into the text fields. Empty fields in the template will not alter the corresponding text fields in the file, while template fields containing metadata will replace any metadata in the file’s corresponding text fields.
10. When you are done, click on the OK button to add the inserted template’s metadata to the selected file. If you decide that you don’t want to change the text after all, click on the Cancel button.
To learn how to create templates, click here
If you want to add metadata to files and also want to be able to control how text should be inserted (if the text field should be cleared or not, if any new content should replace previous content, etc.), you will find that macros are more customizable than templates:
11. Select the file that you want to edit the metadata for.
12. Open the metadata editor.
13. Click on the Macros menu and select the macro you would like to use.
14. The metadata from the macro is inserted according to the macro’s setting.
15. When you are done, click on the OK button to add the inserted macro’s metadata to the selected file. If you decide that you don’t want to change the text after all, click on the Cancel button.
To learn how to configure macros, click here
In addition to using templates and macros, you can create and use lists to insert pre-defined metadata in one or more metadata fields. As a generic term, we call these lists “Quicklists”, and the buttons used to access these lists are called “Quicklist buttons”. By using Quicklists it is easy to add pre-defined text to one or more metadata fields. While some Quicklists are provided when installing FotoStation, it is also easy to create your own lists by clicking on the + button next to the metadata field.
Quicklists can be divided into the following different types:
1. Simple Quicklists: Single lists that open as dropdown lists when you click on the Quicklist button.
2. Thesaurus Quicklists: Lists that opens in a separate window when you click on the Quicklist button. A thesaurus Quicklist can be attached to a single metadata field, or it can link several metadata fields together so that when you select a word from the Quicklist, you insert text into several metadata fields.
3. Date lists: Lists where you can select a date from a calendar view (such as for the Created Date field).
Quicklists are accessed by clicking on one of the three Quicklist buttons shown below. From left to right, these buttons are the Dropdown button, the Thesaurus button and the Edit button.

Note that if all Quicklist buttons are disabled or missing for a field, it is because the settings in the current metadata editor disable these buttons for the field in question.
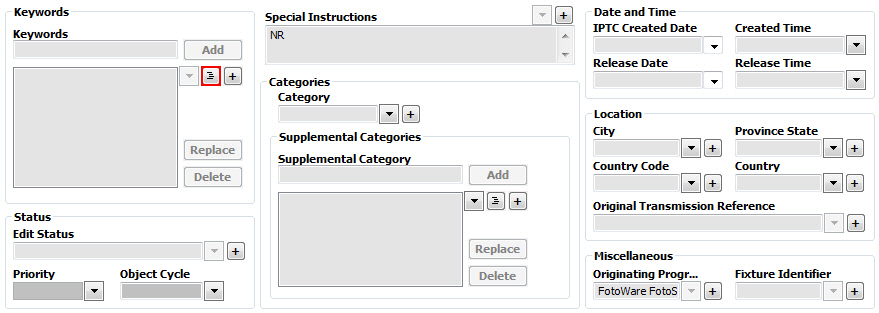
The dropdown button is used if the field has a simple Quicklist (as shown in the next screenshot) and for fields that have a date list, while the thesaurus button is used if the field has a thesaurus Quicklist. Note that repeatable fields (such as Keywords and Supplemental Category) can have both a simple Quicklist and a thesaurus Quicklist.
In the default FotoStation configuration, there are only three repeatable metadata fields: Byline, Keywords and Supplemental Category. While it is possible (by using XMP) to create your own repeatable fields, this topic will assume that there are only twhree repeatable metadata fields available. For all other fields, if both lists exist, only the thesaurus Quicklist will be available in the metadata editor.
Using Simple Quicklists
You can access a simple Quicklist by clicking on the dropdown button shown on the right-hand side of the desired metadata field. Then, a dropdown list will appear as shown below.
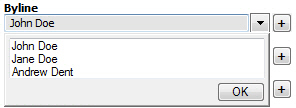
Click on the desired predefined text to insert this text into the field. When you are done, click on the OK button to close the metadata editor.
Notice that for simple Quicklists, it is possible to use codes to insert dynamic operators into metadata fields. By selecting the desired code from the dropdown menu, text such as current time and file name can dynamically be inserted into the field. Please refer to the Appendix List of dynamic metadata operators for a complete list of these codes.
Using Thesaurus Quicklists
A thesaurus Quicklist will appear in a separate window when you click on the Quicklist button located on the right-hand side of the desired metadata field. There are two types of thesaurus Quicklists. A thesaurus Quicklist can be attached to a single field, or it can be attached to several fields and link these fields together. Both types of Quicklists will normally contain words organized in a hierarchy. How text found in the thesaurus Quicklist window is shown and inserted into the metadata field is defined in the Quicklist file.
The repeatable fields Keywords and Supplemental Category have a Quicklist window with more functionality than other metadata fields. See the Using thesaurus Quicklists for repeatable metadata fields part of this topic for more information.
The thesaurus Quicklist window will open when you click on the thesaurus Quicklist button. Double-click on the word that you would like to insert into the chosen metadata field. If you don’t see the word you want to insert (this might happen if the list is very long and has several hierarchy levels), you can search for it in the Search for field. Enter the text you would like to search for and press the Enter key or on the Go button. (On the Mac, the search will be performed as you type.) If the text you searched for exists in the keyword tree, the tree will expand and the search word will be highlighted.
Note that text entered into the search field will only locate words that start with the search text entered. See a search example in the Using thesaurus Quicklists for repeatable metadata fields part of this topic.
You can browse manually through the keywords in the Quicklist by clicking on the + and - buttons to expand and collapse the tree view. Double-click on the text that you would like to enter in the field, then click on the OK button in the Quicklist window before you click on the OK button in the metadata editor window to save the changes.
By using thesaurus Quicklists, it is possible to extend the Quicklist functionality to easily add pre-defined text to more than one metadata field. While some linked lists are provided when installing FotoStation, it is also possible to create your own lists.
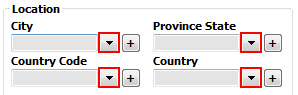
A Quicklist linking the four metadata fields City, Province State, Country Code and Country together is provided when installing FotoStation. This list is not exhaustive, and if you are going to use it we suggest adding the missing entries.
Open the linked list by clicking on the dropdown button located on the right-hand side of one of the linked fields as shown in the example above. A window with the linked list will appear. Search for a keyword by entering it into the Search for field:

As shown in the image above, the city Aalborg was selected from the list. When you are done, click on the OK button to close the metadata editor.
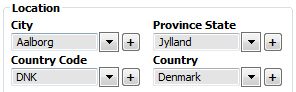
In the example above, you can see that text has now been inserted into the four metadata fields that were linked together.
Note: A Quicklist sample file is included in the FotoStation installer. It's called sample200_201_202_203-204-205-206(207).txt and contains all the information you will need to create your own custom quicklists. Its default location in Windows Vista and Windows 7 is under C:\Users\<Username>\AppData\Roaming\FotoWare\FotoStation\Configuration\Localized\<Language>\Metadata\QuickLists
To access the thesaurus Quicklist for one of the repeatable metadata fields (Keywords, Supplemental Category or Byline), click on the button shown above. Please note that this button is disabled if the field has no thesaurus Quicklist. (On the Mac, the button simply is not visible if the field doesn’t have a thesaurus Quicklist.) To create a Thesaurus rather than use the default, single-level quicklist, press Ctrl and click on the + icon. Your default plain text editor will open and you can choose to create the thesaurus file if it has not already been made.
The Quicklist window will open. Click on the Large dialog >> button to open the large version of the window as shown below. (On the Mac, click on the button on the right-hand side of the search field to switch between the small and large dialog.)

The window shown above will open, displaying the current content of the metadata field. Add words from the keyword tree on the left-hand side of the dialog by locating the desired word in the tree overview and then clicking on the >> button shown between the keyword tree and the content overview.
Search for a keyword by entering it into the Search for field. Note that text entered into the search field will only locate words that start with the search text entered. In the example above, entering the word “air” and then activating the search will first highlight the parent word “Air”. If you activate the search once more (click on the Go button or press the Enter key), the word “Airplane” will be highlighted. If you insert the word “plane” into the field, however, the word “Airplane” will not be highlighted since it doesn’t start with “plane”.
Copy all items from root to selection: If this checkbox is selected, adding a word from the tree view will also add any parent word. Adding the word “Parachute” from the example window above also adds the word “Air” and the word “Outdoor activity” as separate entries into the content overview.
Concatenate to one string: If this checkbox is selected, every parent word from the root word and down to the word you selected, will be added to the content. The words will be concatenated into one string. Selecting this checkbox and double-clicking on the word “Parachute” from the example window shown earlier will create the entry “Outdoor activity Air Parachute” in the overview, i.e. all words are added into one entry, only separated by a space.
Notice that this checkbox is disabled if Copy all items from root to selection is not selected.
Clear all: Click on this button to remove all entries from the content overview.
Simple dialog: This button will be visible if you are viewing the large version of this window. Click on this button if you would like to view a smaller and simpler version of the window.
Large dialog: This button will be visible if you are viewing the simple version of this window. Click on this button if you would like to view a larger version of the window.
The sort button: If you would like to sort the words in the right column, click on this button when you are done adding words. If you would like the words sorted in the opposite order, click on the button once more. Please notice that sorting is only a tool to help you when you are working with repeatable fields. The sort order you choose won’t in any way be visible outside the metadata editor.
The delete button: To delete an entry in the content, select the entry on the right-hand side of the window by clicking on it. Then click on the delete button shown above, or press the Delete key on the keyboard. If you want to delete more than one entry, simply select several entries before you click on the Delete key/the delete button shown above. (Mark several entries by holding down the Ctrl key (Command key on the Mac) while clicking on the entries.) All entries in the right column can be deleted by clicking on the Clear all button.
When you are done, click on the OK button to close the keyword tree window. Notice that you must also click on the OK button in the metadata editor to save the content.
Using Date Quicklists
When clicking on metadata fields that require a date (such as Created Date and Release Date), you will see that clicking on the corresponding Quicklist dropdown button opens a calendar you can select date from. If you like you can also enter a date directly into the field. Use only numbers and a period (“.”) to separate the numbers.
In this topic, we have been working with the FotoStation 4.5 Style editor. For images, this editor will normally have the features and functionality that you need. If, however, you are working with other file types such as PDF’s, you may want to use a different metadata editor.
Several different metadata editors are available when using FotoStation. In addition to the installed editors, you can also create your own editor.
To change to a different metadata editor, open the current editor, click on the editor’s File menu and then move the mouse pointer over the Select editor menu option. You will then see all available metadata editors.
Close the editor by clicking on the OK button.
If you have Microsoft Word installed on your computer, you can spell-check the metadata text. (On the Mac, spell checking is built in.) Select one or more files and open the metadata editor as described earlier. If you want to check the spelling of the currently selected metadata field only, press the F7 key. If you would like to check the spelling for all fields, press Ctrl+F7. (On the Mac, right-click on any text field and select Spelling from the menu to access spell checking.)