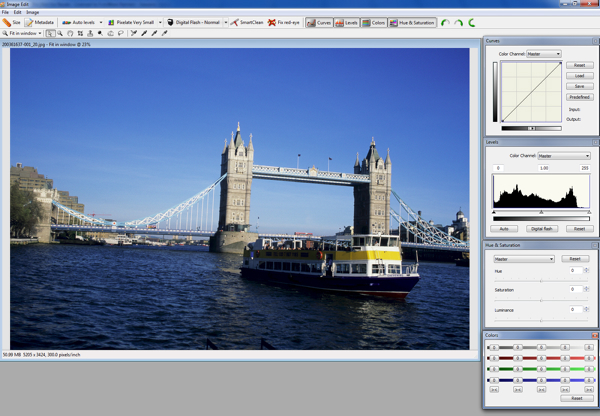
The FotoStation image editor is a general-purpose tool for editing and adjusting images. It has some quite effective tools for filtering out dust and reducing image noise, and can be used to crop, rotate and perform many types of color correction and processing that are useful to produce a good result. The toolbar and menus give access to all operations that can be carried out in the editor.
![]()
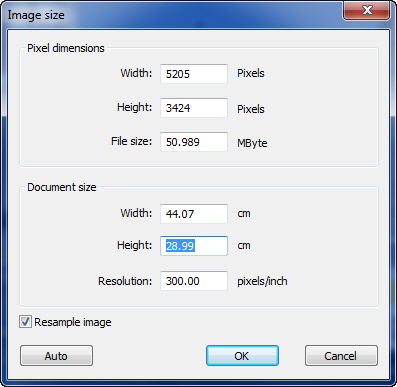
Changing print size
By clicking on the Size button on the toolbar you can change the document size and the physical size of the image. To only change the document size, often referred to as the file’s print size, make sure that the Resample image checkbox is not selected. Then enter new values in the Document size fields. Note that the Width and Height values are interrelated to preserve the proportions of the original image.
Changing the pixel size (resampling the image)
To change the pixel size of the image you must first enable image resampling by selecting the Resample image checkbox. This will allow you to change the values in the Pixel dimensions field, namely Width, Height and/or File size. Note that even when resampling images the width and height values are relative to each other to retain the original width/height ratio of the image. Hence, changing the value in either the Height or Width field will make FotoStation change the value in the other field correspondingly.
The Auto button
The Auto button has two modes of operation. When image resampling is disabled you can click it to specify a target screen resolution and a quality requirement, and FotoStation will adjust the print size accordingly based on the physical amount of data available in the image.
With resampling enabled you can click the Auto button and set a target screen resolution and required quality value, and FotoStation will retain the print size you have set and resample the image so that it contains the necessary amount of data to give the required quality with the specified print size.
Click on the Metadata button to open the metadata editor and add information to the image. The Metadata function in the image editor is identical to the one that can be accessed from the toolbar in the main program window. Please refer to the Metadata Editor chapter to learn all about it.

Click on the Curves button on the toolbar to open the Curves dialog. Essentially, both Curves and Levels can be used to adjust the image contrast and set black and white points; which method you choose is largely a matter of preference. The X axis in the Curves diagram represents range of image brightness from black to white, while the Y axis shows how bright the corresponding pixel in the X axis will be in the resulting image. To adjust the black point in the image, click and drag the dot in the lower left corner along to the right, leaving its Y axis value unchanged. Similarly, you can set the image white point by dragging the dot in the upper right corner to the left along the X axis without changing its output value along the Y axis. You can click anywhere along the diagonal line and drag it to change the mapping of pixel values, or you can enter an input value and its corresponding output mapping. By default the Curves dialog displays the Master color channel, letting you adjust the overall image levels, but you can choose the red, green or blue color channel from the drop-down list for individual adjustment. To remove a point on the curve, click it and then drag it outside the Curves dialog. If you are used to working with CMYK values where a value of zero corresponds to white, you can toggle the white/black setting by clicking on the gradient grayscale bar along the X axis.
By clicking on the white and black arrows in the middle of the gradient field along the X axis you can reverse the black/white point on the scale. Also, the Curves dialog has four buttons:
Reset: Resets the adjustments that you have made to curves.
Load: load a predefined curve file from a file.
Save: Save the current curve settings to a file.
Predefined: Click this button to choose from four predefined curve settings.
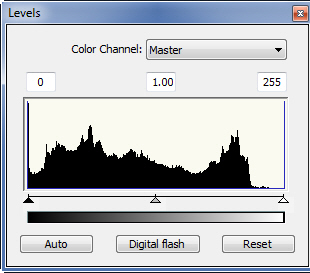
To adjust image levels, click on the Levels button on the toolbar. This will bring up the Levels dialog. By choosing a color channel (or Master for all channels combined) and dragging the sliders you can adjust the image levels in the shadows, midtones and highlights. You can also type in the values in the text fields above the histogram. To automatically adjust levels, click on the Auto button. You now have the choice of performing automatic level adjustment with or without color balance preservation. If you choose not to preserve the color balance, the levels for all three color channels will be adjusted individually, whereas choosing color balance preservation will make FotoStation adjust them combined. Note that choosing Auto levels from the Image menu adjusts levels without preserving the color balance.
Digital flash
The Levels dialog also lets you equalize the image using the Digital Flash function. Please read below to learn how to use the digital flash.
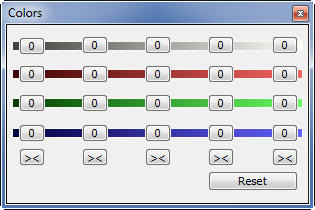
Click on the Color Adjustment button to bring up the color adjustment palette. You can use this palette to change the colors of the entire image or a selection that you have drawn using the Lasso tool. The top (gray) bar lets you adjust the overall color balance of the image. Click on one of the five gray buttons to adjust the balance of shadows, midtones and highlights in five levels. The three other rows are useful for removing color cast and adjusting the red, green and blue levels. To adjust, press and hold your mouse button on one of the five sliders on the appropriate row. The popup scale will indicate the color and contrast change when moving the slider.
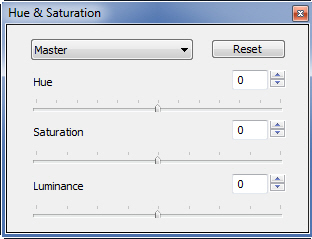
Click on the Hue & Saturation button on the toolbar. A separate dialog will let you adjust the hue, color saturation and luminance level of the image. These values can be adjusted for the Master channel, or you can pick a color channel using the dropdown list to adjust it individually.
The digital flash can be applied by clicking on the Digital Flash button on the toolbar, by clicking on the Digital Flash button in the Levels dialog (Click the Levels button on the toolbar to bring it up) or by applying it in an image action (see below).
The digital flash feature equalizes image levels to make shadows brighter and reducing the brightness of highlights. You should know that the three different ways to apply digital flash function slightly differently: When using the Digital Flash button on the toolbar in the image editor, you can apply three levels of flash – Strong, Normal or Weak. When using this button, FotoStation divides the image into four equally large fields and applies flash to each area separately. If you would like greater control of the flash, you should use the Digital Flash button in the Levels dialog or set up an image action (see below). That way you can also choose the intensity of the application of flash as well as the number of fields FotoStation should split the image into before applying the flash. For images with great contrasts between highlight and shadows it is usually a good idea to divide the image into many fields when applying the flash, even though this will require slightly more time for processing.
By making a selection and choosing the Pixelate tool you can blur details in the picture that you want to obscure. It may for instance be used to remove sensitive information from a picture. Using the little You can choose from three levels of pixelation, three levels of blurring and three different color masks that will make the selected part of the image unintelligible.
In addition to adjusting levels or curves to improve image contrast, FotoStation has a special filter called SmartContrast that combines several techniques to produce the best possible result. The filter has no settings, it can simply be applied by clicking on the little arrow on the Image Edit Actions button (the one next to the Metadata button) and choosing SmartContrast™.
FotoStation has a special filter for improving image sharpness. The SmartSharp™ filter can be applied by clicking on the arrow on the Image Edit Actions button and choosing SmartSharp™. Essentially, SmartSharp™ analyzes the image to determine whether sharpening is necessary. By creating a custom image action you can configure the filter so control when sharpening is applied and the amount of sharpening that is applied. (See Image Edit Actions below for more info.)
The SmartClean™ filter is used to remove color noise and luminance noise from images acquired from a scanner or a digital camera. Especially pictures captured in low light or fast action situations tend to contain noise, and the SmartClean filter can be used to automatically remove this kind of noise from your images. To clean the image, click on the SmartClean button on the toolbar in the image editor. For selective application of the SmartClean filter, use the lasso tool to make a selection before you start the SmartClean module. FotoStation will analyze the image or the selection you have made and try to determine the optimum levels of color noise and luminance noise reduction.
The SmartClean dialog lets you choose between four preset modes of application of the filter: Use the dropdown to choose between Digital camera image or Scanned image and set either Normal or Strong application of the noise reduction filter. To manually adjust the Luminance noise and Color noise levels use the sliders or enter a value in the corresponding fields. Increasing the Luminance noise level value will soften the image, and can be used even on images with little noise as a virtual soft filter. Generally, the filter determines the best balance between noise reduction and preservation of image detail, so there is relatively little need for manual adjustment of the values. To switch between the original image and the one with the filter applied, select or uncheck the Show original image checkbox. The same can be accomplished by using the keyboard shortcut Ctrl-Space, pressing and releasing the Space key to switch between the original and the modified version of the image.
Invert the current selection
If you have made one or more selections using the lasso tool, the selection can be inverted by choosing Invert selection. The SmartClean filter will the be applied to the area(s) outside the original selection(s)
Advanced parameters
By choosing Show advanced parameters you can make manual adjustment to Luminance reduction level, Luminance low frequency, Color low frequency and Sharpening.
To remove red eyes in an image, use the lasso tool to make the selection, then click on the Fix red-eye button to have FotoStation apply its automatic red-eye reduction filter.
Using Image edit actions you can create special actions that are exclusive to the image editor. Setting up an image action in the editor is somewhat similar to creating a regular action, but differs in that it only allows application of image-related sub actions.
To create an image action, click on the arrow on the Image Edit Actions button and select Options from the menu that appears. Now you can create a new image edit action by clicking on New, and you will see that each image edit action can perform a number of sub actions, in the same way that regular actions can. If you wish to know more about the concept of actions, please refer to the Actions chapter.
You will notice that some of the sub actions that can be added to an image edit action are documented in the Actions chapter, while others are specific to the image editor. (Digital flash, Levels, Curves, Hue & Saturation, Color Adjustment and Grayscale mode are sub actions specific to the image editor. Their settings are the same as for the similar functions in the main image editor window – please refer to the respective paragraphs to learn how the functions work.)
Images can be rotated in steps of 90 degrees using the green buttons to the right on the toolbar. The rightmost rotation button is used for rotating the image 180 degrees. Keep in mind that selections made using the crop tool can be rotated freely by placing the pointer outside the crop frame and clicking and dragging the mouse to rotate the crop frame.
Zoom level
![]()
Click on the Zoom level button to choose a zoom level. To adapt the image to the screen size, select Fit in window.
Arrow tool
![]()
This tool is used to select lassos that you have drawn to make selective adjustment to the image. For example, if you want to delete a particular selection, select the arrow tool, click on the selection that you want to delete and press the Delete key on the keyboard. You can also right-click the image to bring up a context menu with useful options.
Zoom
![]()
Use the zoom tool to zoom in and out. (Press the Alt key while clicking to zoom out.) You can click on a particular point in the image to zoom in on it, or you can click and drag a frame around the area that you want to enlarge. The current zoom level will be indicated on the Zoom level button to the far left on the toolbar.
Move / Pan
![]()
Having zoomed in you can use the hand-shaped move tool to move the image inside the image frame. By pressing or releasing the Ctrl button you can switch easily between the move and the zoom tool. (Press Ctrl-Alt to zoom out.)
Crop
![]()
To crop the image, select this tool and simply drag a frame across the area you wish to keep. If a soft crop frame has been applied to the image using the Crop function in the main program window, this crop frame will be displayed when activating the crop tool. To rotate the crop frame and adjust the crop, place the pointer outside the crop frame and click / drag the crop frame to rotate it. If you would like to align the crop frame to compensate for a slightly tilted picture, look for any straight horizontal or vertical lines in the picture – a horizon for example. Then press the Shift key while clicking and dragging the pointer along this line to adjust the crop frame accordingly. To move a crop frame after you have created it, place the pointer inside the cropped area (the pointer will change to a hand), then click and drag the crop frame with the mouse. Finally, to apply the crop, double-click inside the crop frame.
Clone
![]()
The clone tool can be used for removing smaller scratches and dust in the image. Press the Alt key while clicking on the area to clone, then release the Alt key and click on the target area to paint. The clone tool has two settings that appear in a separate small panel when the tool is selected. Clone size refers to the size of the area to clone. When you pick an area to clone, the size of the little ring that appears will indicate the size of the clone area. The Transparency setting lets you choose to what extent the target area should be transparent through the cloned layer. To fully erase the original content of the target area, set the Transparency level to zero.
Dodge
![]()
The Dodge tool lets you easily lighten up parts of an image by painting with your mouse. When you start painting, FotoStation will only modify the same pixels once. This means that if you happen to paint across the same area twice, the pixels will not become increasingly lighter (provided that you don’t release the mouse button and start painting the same area again). When using either the Dodge or the Burn tool a palette lets you set these values:
Tool size: The size of the area to which you are applying the dodge or burn effect.
Exposure: The intensity of the dodge or burn applied to the area.
Hardness: Increasing the hardness level will make the dodge or burn tool produce more pronounced edges in the areas where the tool is applied. Reducing hardness, on the other hand, increases the “feather” effect to give smoother edges.
Range: Using this dropdown list you can choose where the dodge or burn should be applied; in Highlights, Midtones or Shadows. For example, if you choose Shadows you can dodge dark areas to make then lighter without affecting neighboring areas that are already quite bright.
Burn
![]()
The Burn tool lets you easily darken parts of an image by painting with your mouse. When you start painting, FotoStation will only modify the same pixels once. This means that if you happen to paint across the same area twice, the pixels will not become increasingly darker (provided that you don’t release the mouse button and start painting the same area again). When using either the Dodge or the Burn tool a palette lets you set these values:
Tool size: The size of the area to which you are applying the dodge or burn effect.
Exposure: The intensity of the dodge or burn applied to the area.
Hardness: Increasing the hardness level will make the dodge or burn tool produce more pronounced edges in the areas where the tool is applied. Reducing hardness, on the other hand, increases the “feather” effect to give smoother edges.
Range: Using this dropdown list you can choose where the dodge or burn should be applied; in Highlights, Midtones or Shadows. For example, if you choose Highlights you can burn bright areas to make then darker without affecting neighboring areas that are already quite dark.
Lasso / Selection
![]()
![]()
If you want to color correct only parts of an image, use the Lasso tool to select that area. When you select the Lasso tool you can choose the type of lasso you would like from the dropdown list right next to it. Choose between a Freehand, Polygon, Ellipse and Rectangle-shaped lasso.
To make a selection, draw a line around the area that you want to adjust. You can subtract from the selected area by drawing a new selection inside it. If you want to change an existing selection, place the pointer on the line of the selection. A plus sign (+) will be shown next to the pointer to indicate that you can modify the selection. Draw a new line by clicking and dragging the mouse, and release the mouse button after connecting it with the existing selection. You can now edit the selection you have made by adjusting its color balance or with the Auto-Adjustment profiles. Press and hold Ctrl-Spacebar on the keyboard to compare the edited image with the original.
![]()
When a lasso mode has been chosen, you can click on the Feather button next to it to add feathering when modifying the selection. The feather makes it possible to soften the effect of e.g. color adjustment toward the outer edges of the selected area so that the color-adjusted area won’t be so easily distinguishable from the surrounding area. When the feather is selected, it has a separate dialog with these options:
Feather size: Sets the size of the surrounding area when modifying the selection for example by adjusting its color balance.
Show feather: By deselecting this option, the feather outline will not be shown. The feather effect is still enabled, however.
Feather on the inside: Select this option to apply the feather inside the selected area instead of outside.
Color info picker
![]()
The color info picker can be used to read out the color information of a certain pixel or an area in the image. When the tool is active, a little dialog called Picker shows the color of the pixel where the mouse pointer is currently hovering in the Current column. You can click the mouse button to “store” the color values in the Click column. To get an average color readout from an area, click and drag a frame around the desired area, and FotoStation will display the average values in the Click column.
Set Black
![]()
To set the black point in the image, click on the darkest spot in the image, or drag a frame over it. FotoStation will set the darkest spot within the selected area to black.
Set Gray
![]()
If your image contains an area that you know is supposed to be neutral gray, you can select this area using the Set Gray tool. FotoStation will then adjust the color cast in this area, and thereby also correct all the other colors in the image accordingly.
Set White
![]()
To set the white point in the image, click on the a spot which is completely white or drag a frame across it. FotoStation will then set the whitest spot within that area to white.
You can right-click on the image when using the editor to bring up a context menu of related options. The options available will depend on the functions you are using. For example, functions related to selections will only be available if a selection has been made.
Invert selection: Choose this option to invert the current selection.
Clear current selection: Remove the currently active selection. If more than one selection has been made, you can click on a selection outline to make that selection active.
Clear all selections: Remove all selections.
Deselect and flatten image: Apply the changes made to the selected areas and remove the selections.
Toggle show selection: Hide the selection outline from view or bring it back.
Zoom: Choose a zoom level from the submenu.
Save: Save the file using its current name and folder, overwriting the original.
Save as: Save the file with a new file name. You can also choose another folder and change its file format.
Save to archive: Save the file with its current name in an archive selectable from the submenu.
Save to archive as: Save the file to an archive selectable from the submenu and give it a new name. You can also change its file format. (TIFF, EPF or JPEG)
File menu
Next image: If you selected several images and opened the image editor, you can select Next image to proceed editing the next image in line. If you have made changes to the current image, you will be prompted to save or discard the changes made.
Save: Save the changes made to the image, overwriting the current file. Keyboard shortcut: Ctrl-S
Save as: Save the image with a new name. You can also choose another folder and file format. Keyboard shortcut: Alt-S
Save to archive: Save the file to an archive selectable from the submenu.
Save to archive as: Lets you choose an archive for storing the image and enter a new file name and choose the file type.
Revert: Discard any changes made to the image and reload the original in the image editor.
Exit: Exit the image editor and return to FotoStation’s main program window.
Edit menu
Undo: Undo the last operation
Show original: Show the original, unedited image to see compare it to the edited one. Generally, though, it is best to use the keyboard shortcut, Ctrl-Space, to toggle between the original and edited version.
Clear current selection: Removes the currently active selection
Clear all selections: Removes all selections.
Deselect & Flatten Image: Apply the changes made to the selected areas and remove the selections.
Toggle show selection: Hides or shows the selection masks.
Image menu
Rotate left: Rotate the image 90 degrees to the left.
Rotate right: Rotate the image 90 degrees to the right.
Rotate 180: Rotate the image 180 degrees.
Mirror left-right: Mirror the image across a vertical axis.
Flip up-down: Mirror the image across a horizontal axis.
Image text: Edit the file’s metadata. Please refer to the Metadata Editor chapter to learn more about this.
Image size: Adjust image size. Please refer to the Setting image size paragraph above to learn more.
Auto levels: Automatically adjust image levels. Please refer to the Adjusting image levels paragraph above to learn more about this function.
SmartContrast™: Apply the SmartContrast™ contrast enhancement filter.
SmartSharp™: Apply the SmartSharp™ sharpening filter with default settings.
Grayscale mode: Convert the image to grayscale.