
With the FotoWeb Desktop Extension for Photoshop you can check out files from your FotoWeb archives and edit them in Photoshop.
If you cannot see the Extension after starting Photoshop, open the Window menu and choose Extensions - FotoWare FotoWeb. If the extension is not visible there, it will have to be added using the Adobe Extensions Manager. Please refer to this topic for more information.
Having opened the FotoWeb extension, simply type in a search string and press Enter to find files that match your search criteria. FotoWeb will search in all the archives that your system administrator has configured for use with the CS5 extension. When the search is complete, each archive is represented with a node that can be expanded to view the results. There are also buttons below the search field that allow you to expand and collapse all archives.
To hide an archive from view, for example if you are not interested in results in that archive for future searches) you can right-click on the archive and choose Hide this archive. To return the archive to view, right-click in side the hits view and choose Unhide all archives.
You can change the size of the thumbnails in the list of search hits by adjusting the slider below the search field.
Having found the file you were looking for, simply double-click it to download and open the file. The file is then marked as checked out by you on the FotoWeb server and downloaded to your local machine. This implies that it is locked for editing by other users. When the file opens you can work with the file in Photoshop as you normally would.
When you have made changes to a file you will be given the opportunity to manage the file using the highlighted checked-out files icon as shown below:
![]()
Note: If you save the file with a different name using Save As... in Photoshop, the extension will notice that there is a 'new' file being edited. This file can optionally be uploaded to a FotoWeb archive using the other icon seen above (the green arrow pointing up).
Clicking the checked-out files icon brings up a window with all your currently checked out files where you can choose how each of them should be handled:
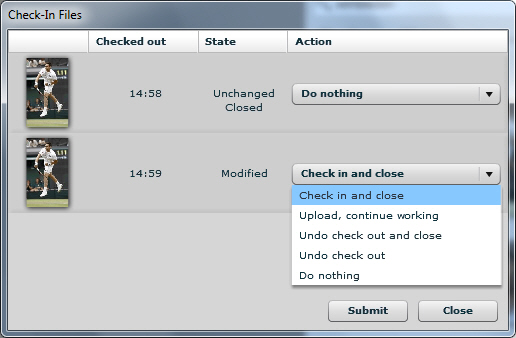
Check in and close: Saves the file, then uploads it to the FotoWeb server and checks it in. This option overwrites the original file in the archive.
Upload, continue working: Saves the file and uploads your changes to the FotoWeb server, but keeps the file checked out still so you can make additional changes to it.
Undo check out and close: Unlocks the file on the FotoWeb server, then closes and deletes the local copy of the file. No changes will be made to the original file in the FotoWeb archive.
Undo check out: Unlocks the file on the FotoWeb server, but leaves the local copy open. This way you can still edit the local version of the file and save it anywhere you like. You can optionally upload it using the FotoWeb Desktop uploader later. (A file that is uploaded later will be added to the archive like any other file, and not overwrite the original version that was checked out to begin with.)
Do nothing: Does not change the current state of the file. This option can be used if you have several file checked out but only want to check in some of them while leaving others as they are.
Tip: If you check out a file from FotoWeb and then make changes to it in Photoshop and close it, it will remain in the list of checked out files. To continue editing it, open the list of checked out files and double-click it to reopen it in Photoshop!
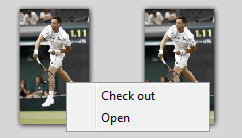
Alternatively, you can right-click a file and choose Open. This will not check out the file from FotoWeb; rather a copy of the archived file is downloaded to your local machine, allowing you to edit it as you please and store it anywhere you like. This copy will be completely 'disconnected' from the original in the archive. When you have saved the file you may optionally choose to trigger the FotoWeb Desktop uploader to put the file back in the archive without overwriting the original:
![]()
By clicking the green arrow seen above you trigger the FotoWeb Desktop uploader, which in turn lets you place the file in any archive that you have upload rights to.
More information about using the Upload tool can be found in this topic.
![]()
To control the amount of metadata you get when hovering over a thumbnail with the cursor, click on the tool icon you can see in the screenshot above. You can choose from these three options:
None: No metadata is displayed when hovering over the thumbnail.
Basic: File name and size information only.
Full: Several metadata fields may be displayed, depending on how the FotoWeb server has been configured.